
Introduction
Coinsnap Bitcoin POS Setup is the process of getting your business ready to accept Bitcoin payments at a physical Point of Sale. Coinsnap Wallet includes an integrated Bitcoin Point of Sale for merchants. A smartphone, tablet or compatible POS device can become a payment terminal without requiring a separate Point of Sale app.
For merchants who want additional business functionality, Coinsnap Wallet can be connected to a Coinsnap Merchant Account. The Merchant Account provides central management for Points of Sale, terminals, products, orders, reporting and employee payment devices.
In this guide, we will set up the merchant environment through the Coinsnap Dashboard. You will learn how to:
- create a Point of Sale
- create and configure payment terminals
- build a Product Catalog
- configure tips and Bitcoin discounts
- connect employee devices
- decide between a paired employee terminal and Kiosk Mode
When Coinsnap Wallet is connected to a Merchant Account, additional business functions become available, including central Point of Sale management, multiple terminals, employee devices, orders and reporting.
For the initial setup of products, categories, terminals and business settings, the Coinsnap Dashboard is usually the most convenient option because it provides more screen space and centralized administration.
This guide therefore uses the Coinsnap Dashboard for the main setup steps. Changes are synchronized with the connected Coinsnap Wallet and terminals.
Don’t have a Coinsnap Merchant Account yet? See how to register and open your Coinsnap account in just a minute.
By the end of this tutorial, you’ll have a fully configured Bitcoin POS that is ready to accept Bitcoin payments from your customers.
Whether you’re running a café, restaurant, retail store, market stall or service business, the setup process only takes a few minutes and requires no technical expertise.
This guide focuses specifically on configuring your Point of Sale, terminals and Product Catalog. For monitoring transactions, orders and reporting after your POS is running, see Coinsnap POS Dashboard: The Cockpit of Your Bitcoin Business.
At a Glance
What is Coinsnap Bitcoin POS Setup?
Coinsnap Bitcoin POS Setup is the process of configuring your business to accept Bitcoin payments with Coinsnap. It includes creating a Point of Sale, adding one or more payment terminals and building a Product Catalog.
Coinsnap Wallet contains the integrated Point of Sale interface. When connected to a Coinsnap Merchant Account, the merchant can centrally manage Points of Sale, terminals, employee devices, orders and reporting.
Quick Facts
| Feature | Description |
|---|---|
| Setup Time | Approximately 5–10 minutes for a basic setup |
| Technical Skills | No technical expertise required |
| Customer Payment | Bitcoin |
| Point of Sale | Integrated into Coinsnap Wallet |
| Devices | Smartphone, tablet, iPad or compatible POS device |
| Multiple Terminals | Yes |
| Employee Devices | Yes |
| Product Catalog | Yes |
| Bitcoin Discounts | Yes |
| Tips | Yes |
| Kiosk Mode | Yes, with connected Merchant Account |
| Reporting | Available through merchant tools |
Key Takeaway
A Coinsnap Bitcoin POS consists of several connected components: your Merchant Account, Point of Sale, one or more terminals, the physical devices operating those terminals and your Product Catalog.
A Point of Sale can have multiple terminals. A terminal belongs to a Point of Sale. A device can be connected to a terminal.
Understand Your Coinsnap Bitcoin POS
Before creating your first Point of Sale, it’s helpful to understand how the Coinsnap merchant system is structured.
Merchant Account
The Coinsnap Merchant Account is the central business environment used to manage Points of Sale, terminals, orders and reporting.
Point of Sale (POS)
A Point of Sale is a sales environment such as a shop, café, restaurant, event or other business location. A Point of Sale contains its products, checkout settings and terminals.
Terminal
A terminal is an individual checkout or payment location belonging to a Point of Sale. A POS can have multiple terminals, for example Main Register, Bar, Entrance or Waiter 1.
Device
A device is the physical smartphone, tablet, iPad or compatible POS device used by an employee to operate a terminal.
Product Catalog
The Product Catalog contains the products, categories and prices available to terminals connected to the Point of Sale.
A business can use one Point of Sale with multiple terminals or create several Points of Sale for different locations or business units. The Merchant Account provides central administration, while Coinsnap Wallet can be connected to the Merchant Account for mobile access and Point of Sale operation.
Your Coinsnap Bitcoin POS organizes the products, settings and payment activity associated with that sales environment. Payments accepted by staff remain associated with the appropriate terminal, helping you understand where individual orders and transactions were created.
The Merchant Account also provides access to merchant tools where you can monitor sales, review transactions, analyze payment activity, export accounting data and access information needed to run your business efficiently.
Most small businesses may only need one Point of Sale. A café, restaurant, retail store, market stall or service business can use one POS with multiple payment terminals simultaneously. You decide how many terminals you need — one for each checkout counter, employee, mobile staff member or other sales location.
You can also create several Point of Sale environments. This is useful if your business operates several stores, restaurants, cafés, events or business units and you want to keep their terminals and Product Catalogs organized separately.
Where do POS payments go?
The customer pays in Bitcoin, while the merchant receives the payment according to the settlement method configured for the Coinsnap Store.
Each Coinsnap Store uses one configured settlement destination at a time. This can be a Bitcoin wallet or, where available, a supported third-party fiat settlement provider.
The customer’s Bitcoin payment method and the merchant’s settlement method are separate concepts. Coinsnap does not automatically split an individual payment between a Bitcoin wallet and a bank account.
Create Your First POS in the Coinsnap Dashboard
1: Start the POS Setup in Your Coinsnap Dashboard
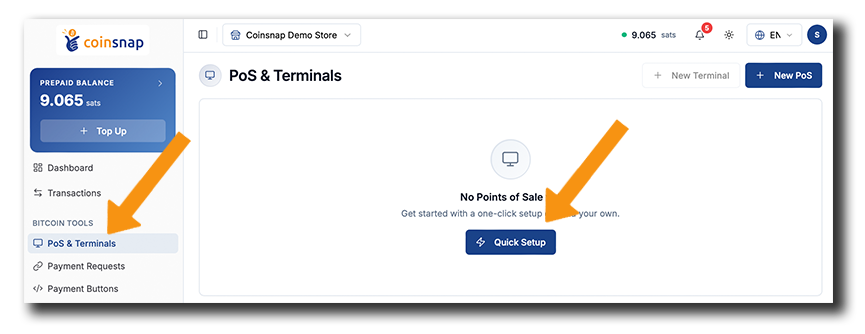
Sign in to your Coinsnap Merchant Account Dashboard and open PoS & Terminals. If no Point of Sale has been created yet, use Quick Setup or + New PoS to create the first one.
2: Open Your Point of Sale Settings
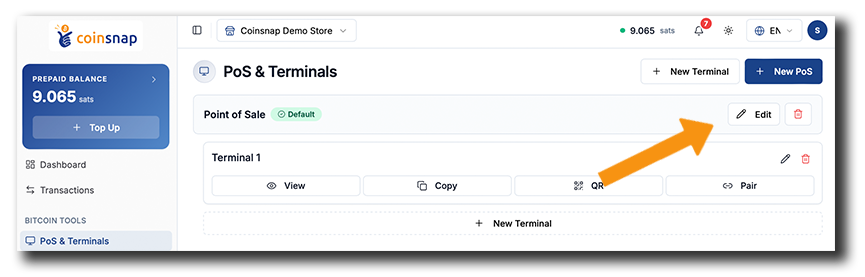
Once the setup is complete, your new Point of Sale appears in the PoS & Terminals overview together with its first terminal.
Click Edit in the Point of Sale field to open the POS configuration. There, you can customize your Point of Sale, including its name, currency, payment settings, product categories and Product Catalog.
3: Configure Your Point of Sale
The Edit Point of Sale page contains the settings you need to customize your POS for your business.
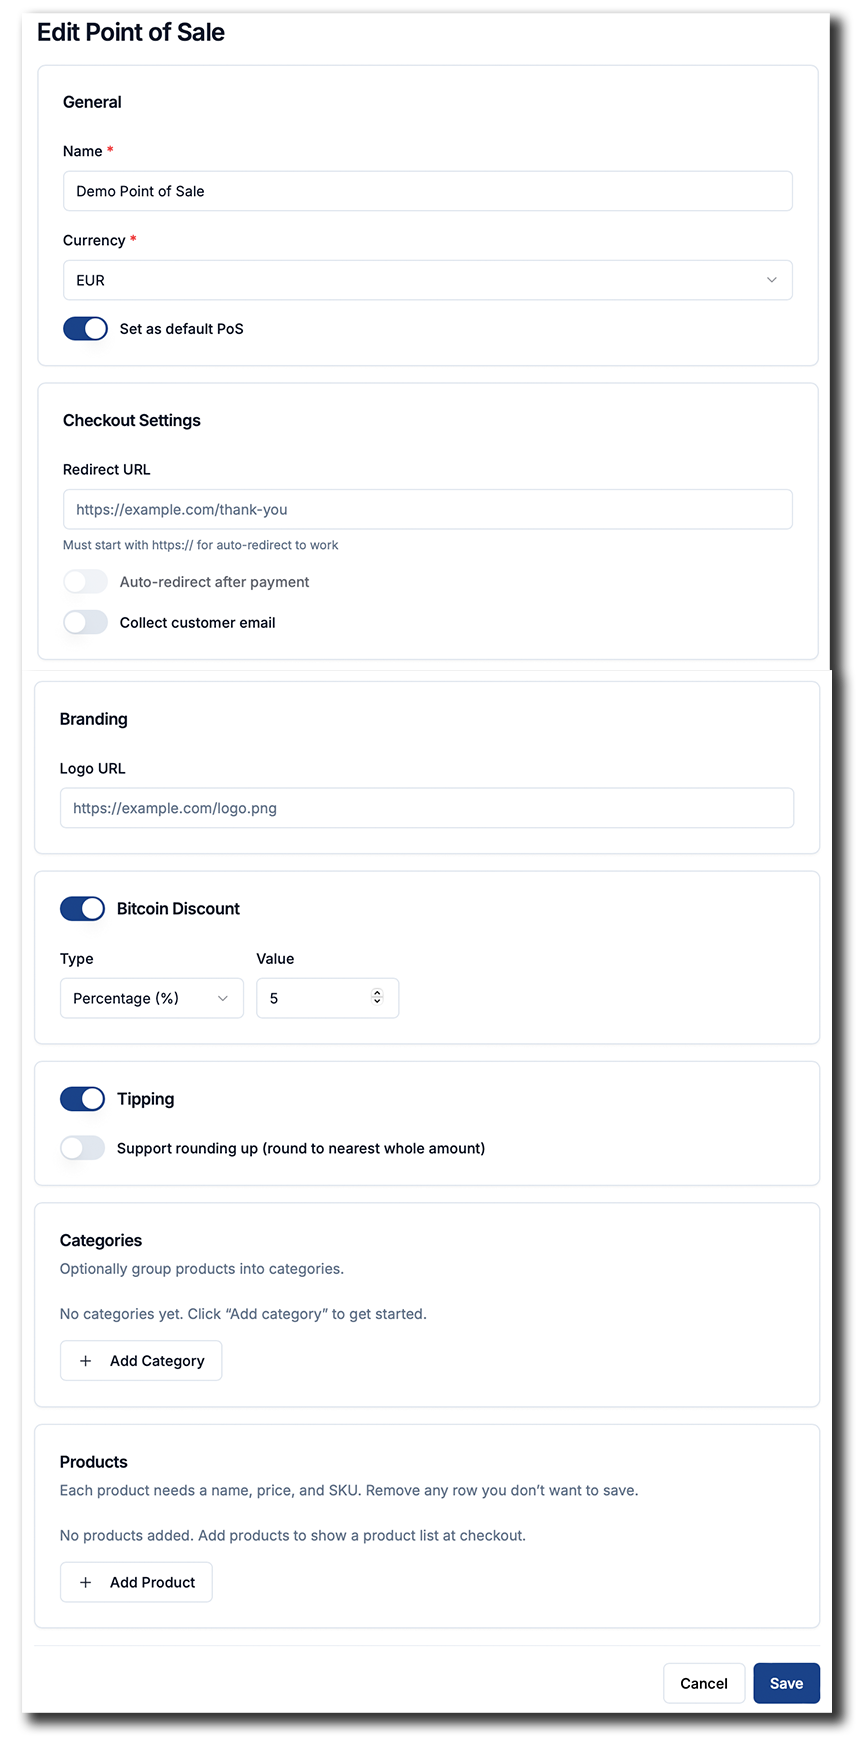
Start by entering a recognizable name, selecting your preferred currency, and deciding whether this should be your default POS.
You can then configure optional checkout settings, such as a redirect URL, automatic redirection after payment, and collecting the customer’s email address.
You can also add your logo, offer customers a Bitcoin discount, and enable tipping, including the option to round up the payment amount.
Further down the page, you can create product categories and add individual products to build your Product Catalog. You’ll find detailed instructions for this later in this guide.
Once you’ve configured your POS, click Save to apply your settings.
Your First Point of Sale Is Ready
Congratulations! Your first Point of Sale — Demo Point of Sale — has now been created and configured successfully.
Your new Point of Sale is now part of your Coinsnap Merchant Account. When Coinsnap Wallet is connected to the same Merchant Account, the Point of Sale and its terminals can also be accessed from the Wallet’s merchant functions.
To connect Coinsnap Wallet to the Merchant Account, open Settings → Connections → Merchant Account and complete the connection process.
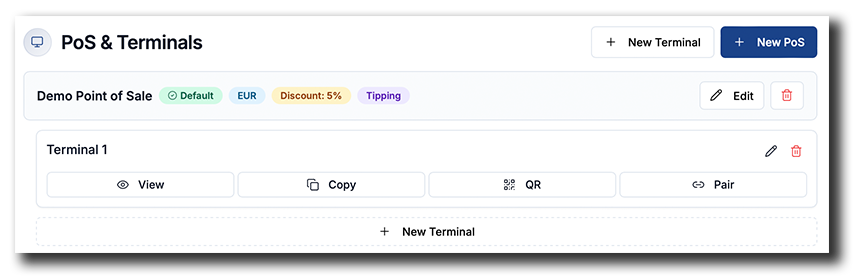
However, a POS alone cannot accept payments. To start selling products and accepting Bitcoin payments, you need at least one terminal connected to your POS.
In the next section, we’ll show you how to create and configure your first Coinsnap Terminal.
Create and Configure Your First Terminal
A terminal represents an individual checkout or payment location inside a Point of Sale. One POS can have several terminals, for example Main Register, Bar, Counter 1, Waiter 1 or Merchandise.
Each terminal inherits the relevant products and settings from its Point of Sale while payments and orders remain assigned to that terminal for merchant administration and reporting.
To add another terminal to your POS, click + New Terminal. You can use either the button at the top right of the PoS & Terminals page or the + New Terminal button directly below your existing terminal.
Enter a name for the new terminal and save it.
To change the name or settings of the default terminal, click the pencil icon on the right of the respective terminal.
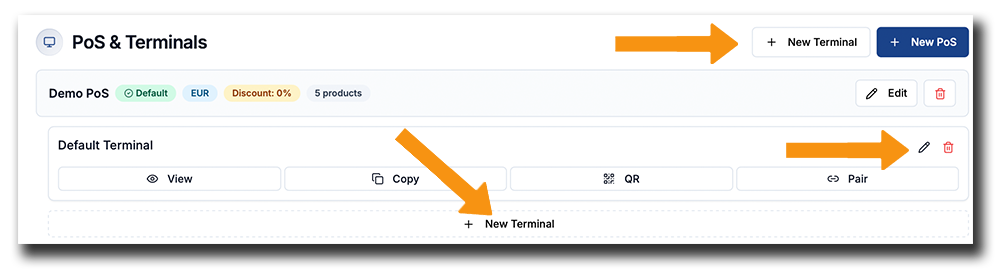
How to Configure Your Terminal
In the next screen, you can configure your terminal and assign it to the appropriate Point of Sale.
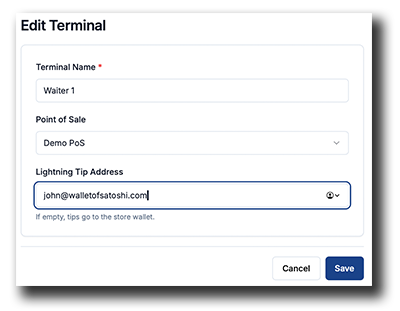
Enter a descriptive Terminal Name, such as Waiter 1, and select the Point of Sale the terminal should belong to.
A terminal can optionally have its own Lightning Tip Address. This is useful when tips collected at a specific terminal should be sent directly to an employee’s Bitcoin wallet.
For example, a terminal called “Waiter 1” can use that employee’s Lightning Address as the tip destination.
If no terminal-specific Lightning Tip Address is configured, tips are handled according to the Point of Sale’s configured tipping settings.
Click Save to finish configuring your terminal.
Your Terminal Is Ready
Your newly configured terminal now appears under its assigned Point of Sale.
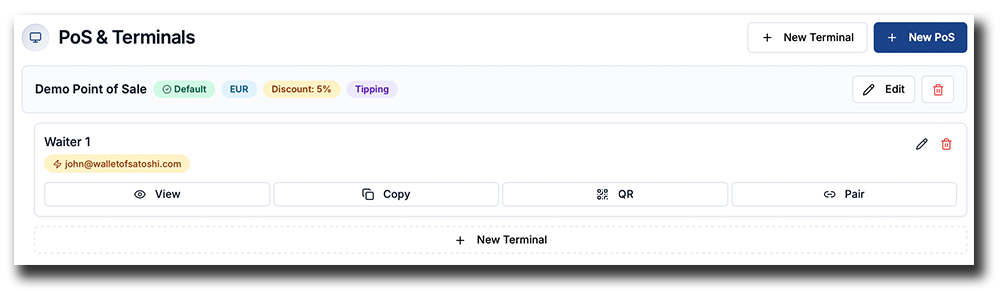
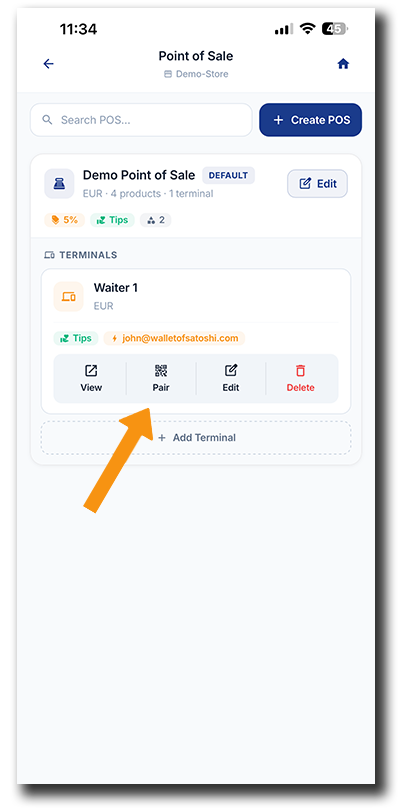
From here, you can view, copy, display the QR code or pair the terminal with a device. You can also edit the terminal at any time using the pencil icon or add additional terminals with + New Terminal.
At the end of this guide, we’ll show you how to connect individual terminals to employee devices and how to use Kiosk Mode for dedicated merchant-owned payment devices.
Find and Use a Terminal in Coinsnap Wallet
Open the Point of Sale in Coinsnap Wallet and select the terminal you want to use.
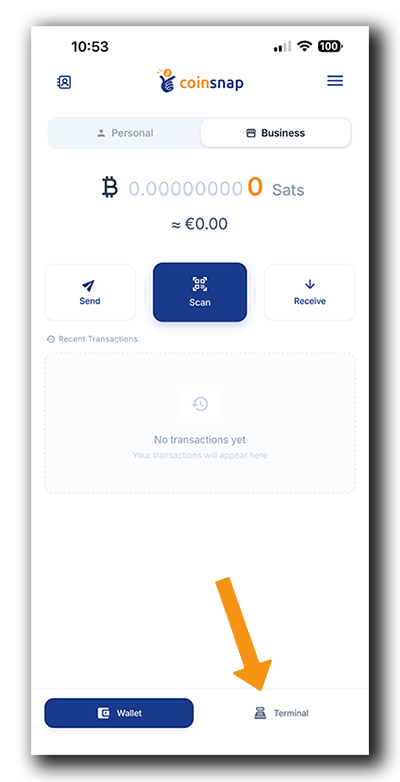
The terminal is where your staff accepts Bitcoin payments from customers.
Depending on how you’ve configured your Point of Sale, you can either enter the payment amount manually using the built-in keypad or select products directly from your Product Catalog.
Once the sale is ready, create the payment request for your customer.
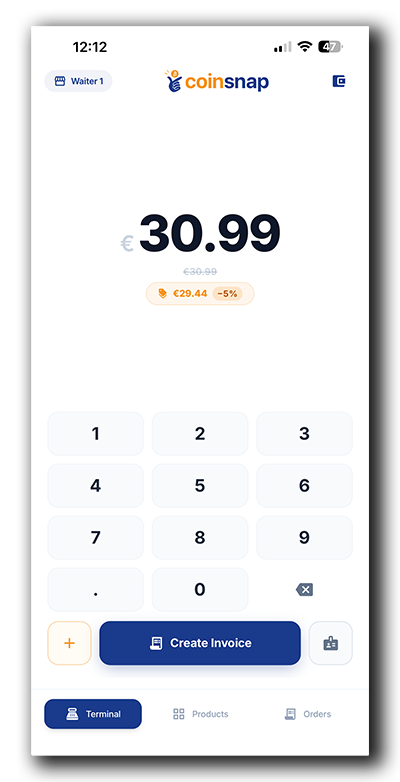
If your business operates multiple terminals, each employee can use their assigned terminal. Every terminal uses the products, pricing and settings inherited from its linked Point of Sale, ensuring a consistent checkout experience across your business.
In the next section, we’ll show you how to create a Product Catalog, organize products into categories and make checkout faster and easier.
Create Your Product Catalog
With your Point of Sale and payment terminal now configured, the next step is creating your Product Catalog.
By organizing your products into categories and adding them to your POS, you can complete customer purchases with just a few taps instead of entering payment amounts manually, making checkout faster, easier and less prone to errors.
Two Ways to Create Your Product Catalog
Coinsnap gives you two convenient ways to create and manage your Product Catalog.
The recommended method is to use the Coinsnap Dashboard in your web browser. Creating products on a desktop or laptop is faster and more comfortable, especially if you’re adding many products, categories or prices.
Alternatively, you can create and edit your Product Catalog directly in Coinsnap Wallet on your smartphone or tablet. This is particularly useful when you’re on the go or only need to add or update a few products.
Both methods are synchronized. Changes made through the Coinsnap Dashboard become available in the connected Coinsnap Wallet and terminals.
We’ll now show you how to create product categories and products in the Coinsnap Dashboard.
Create Your Product Catalog in the Coinsnap Dashboard
The Coinsnap Dashboard is the fastest and most convenient way to build your Product Catalog. Using a desktop or laptop computer, you can quickly create product categories, add products, set prices and keep your catalog organized.
Step 1 – Open PoS & Terminals
After signing in to your Coinsnap Dashboard, open PoS & Terminals from the navigation menu on the left-hand side.
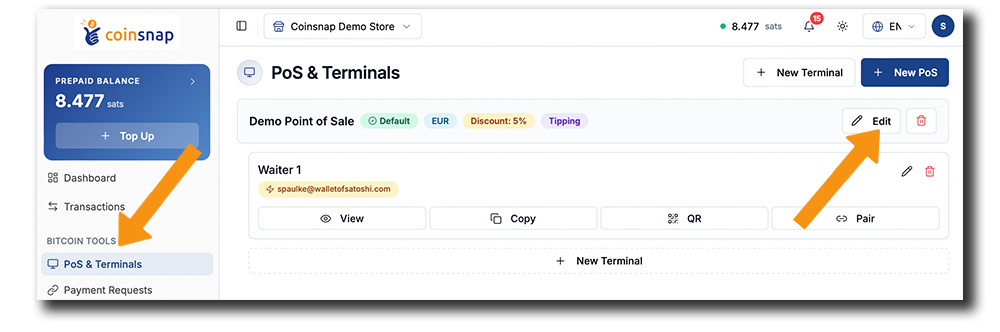
Open the Point of Sale you want to edit.
Step 2 – Create Product Categories
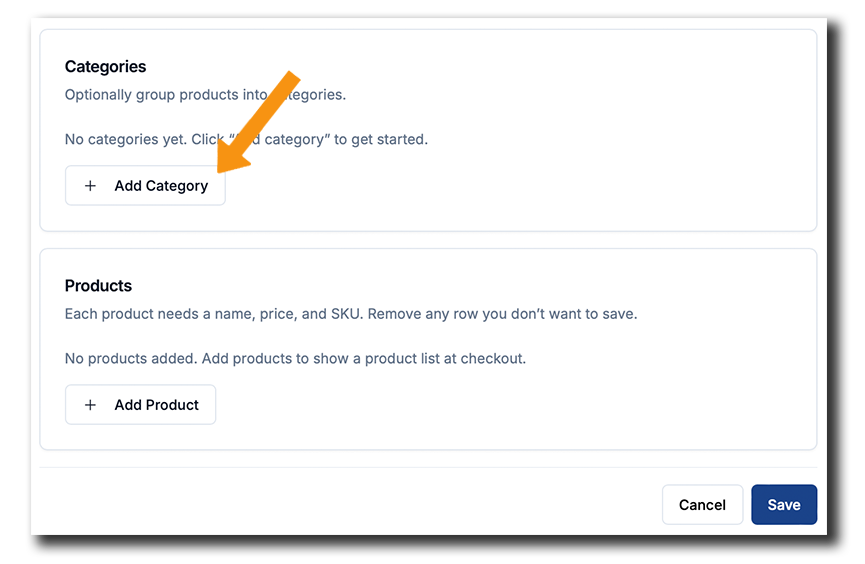
Scroll down to the Categories section of the Point of Sale configuration page.
To create your first product category, click + Add Category.
Now enter the names of the product categories you want to use in your Point of Sale.
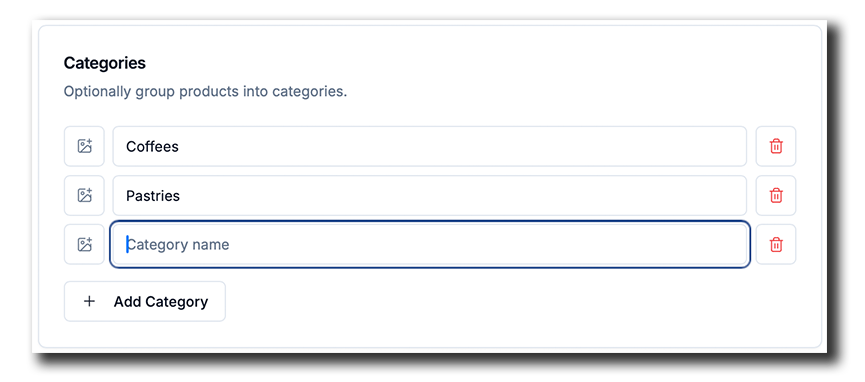
Categories help organize your products and make them easier to find during checkout.
For example, a café might create categories such as Coffee, Tea, Soft Drinks and Pastries, while a retail store could use categories such as Clothing, Accessories or Electronics.
Step 3 – Add Products
For each product, enter a product name, price and a unique SKU where required. Then assign the product to one of the categories you created.
Repeat this process for all the products you want to sell. Once you’ve finished, click Save.
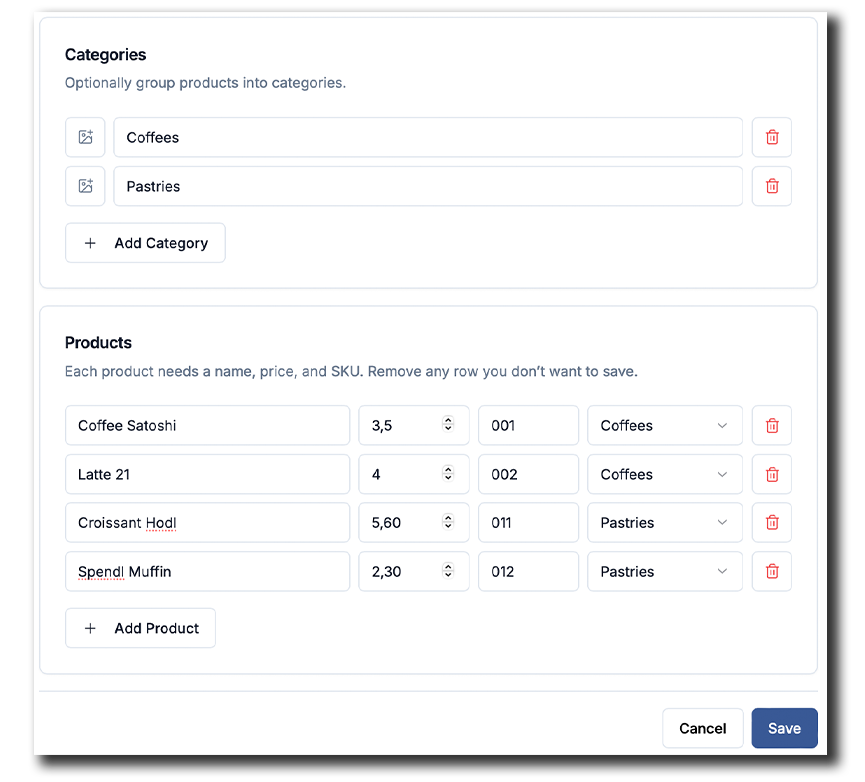
Your Product Catalog will be synchronized with the terminals connected to this Point of Sale, allowing your staff to select products during checkout.
Step 4 – Choose Product Icons
Product icons can be selected in Coinsnap Wallet. Open Settings → Connections → Merchant Account → Manage PoS, select the Point of Sale and edit the relevant product.
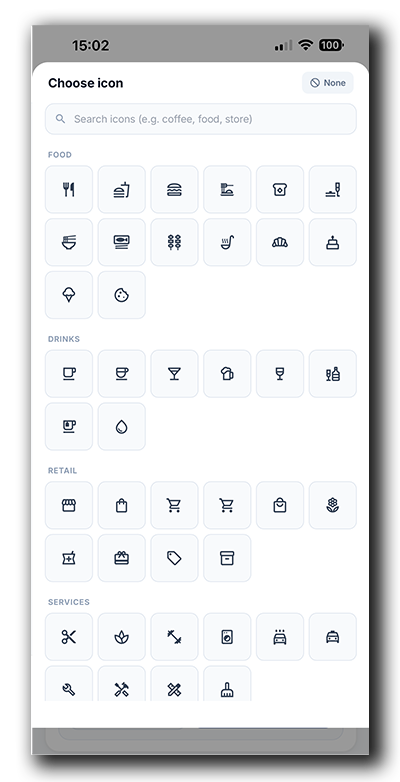
Tap the icon above the product name you want to change.
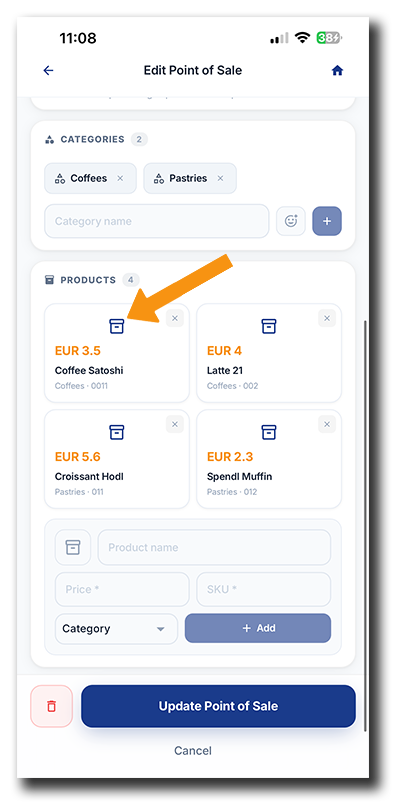
You will see an icon selector offering a range of icons organized into categories such as Food, Drinks, Retail and Services. Simply tap the icon that best represents your product. You can also use the search field to quickly find a suitable icon.
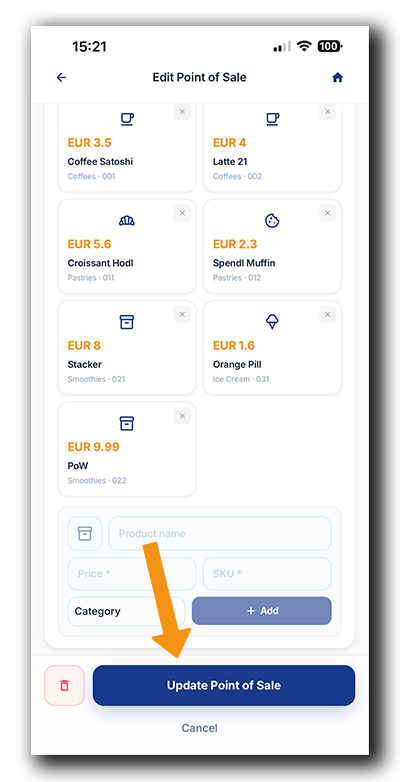
Once your categories and products are complete, tap Update Point of Sale to save your changes and make the updated Product Catalog available in your terminal.
Step 5 – Check the Product Catalog in the Terminal
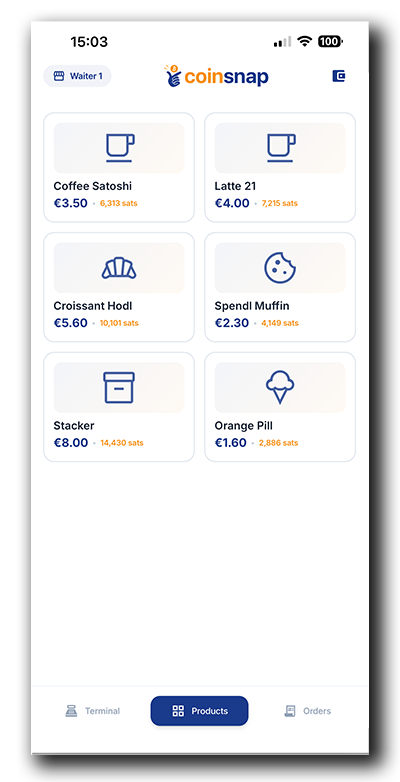
Open the Point of Sale terminal and select Products. Verify that categories, product names, prices and icons are displayed correctly.
The visual product cards make it much easier to identify and select items quickly during checkout, especially when you’re working with a larger Product Catalog.
Start Selling with Your New Product Catalog
Your Product Catalog is now ready. Open the Point of Sale in Coinsnap Wallet or on the paired terminal device.
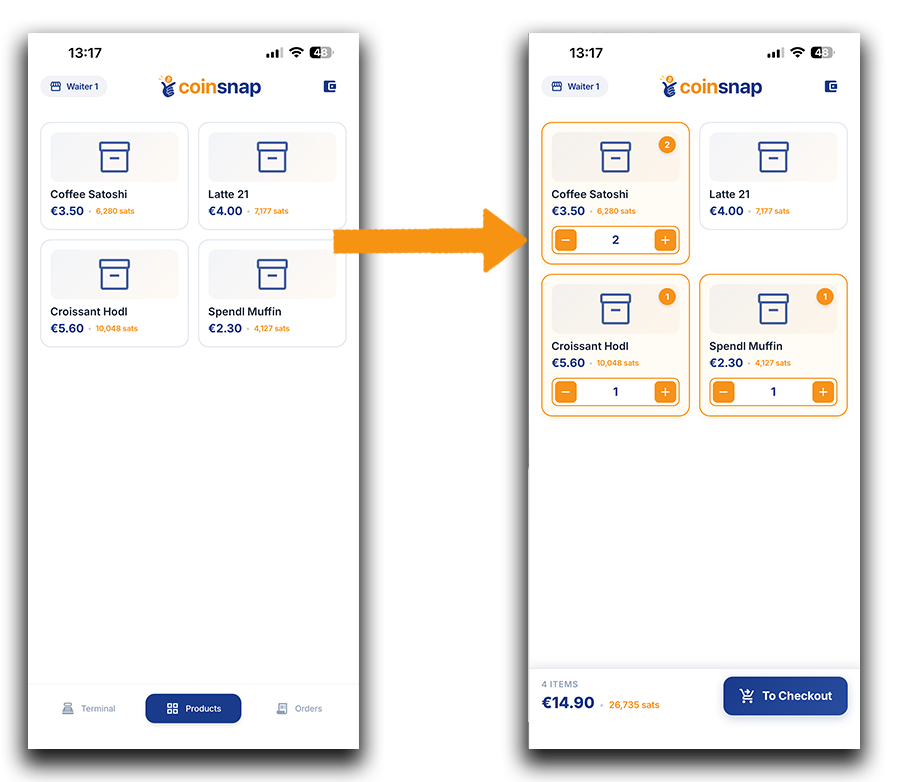
For a manual payment, enter the amount using the keypad. For a product-based sale, open Products, select the items the customer wants to purchase and continue to checkout.
Coinsnap then creates the Bitcoin payment request. Show the payment QR code to the customer and wait until Coinsnap confirms the payment successfully before providing the goods or services.
Congratulations! Your Coinsnap Bitcoin Point of Sale is now fully configured and ready for business.
Connect a Terminal to an Employee Device
A terminal can be connected to an employee’s smartphone or other device. This allows the employee to accept payments for the assigned Point of Sale while orders remain associated with the correct terminal in the Merchant Account.
You can complete the pairing process directly from Coinsnap Wallet.
Step 1: Select the Terminal You Want to Assign
In Coinsnap Wallet, go to Settings → Connections → Merchant Account → Manage PoS.
Select the relevant Point of Sale, find the employee terminal and choose Pair.
Step 2: Pair the Employee Device
Coinsnap displays a QR code and a temporary pairing code.
The employee can scan the QR code or enter the pairing code on the device that should operate the terminal.
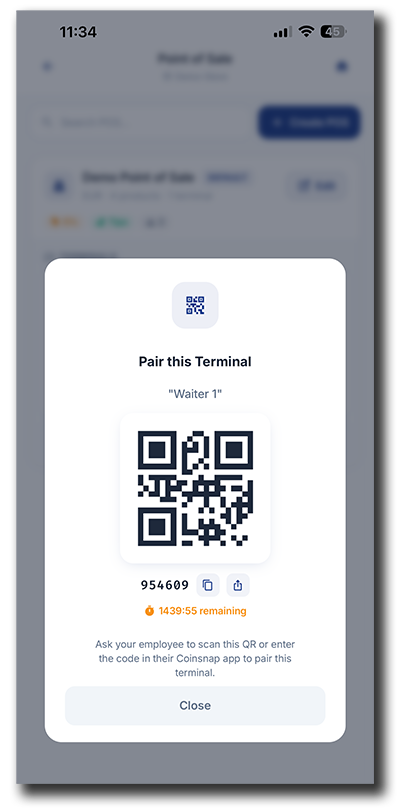
The pairing code is temporary, so the employee should complete the pairing while the code is still active.
Step 3: Open the Terminal on the Employee Device
A paired employee terminal is useful when an employee should accept customer payments on their own smartphone or another browser-enabled device without receiving access to the merchant’s Wallet, balances or administrative settings.
The employee can use the assigned terminal to enter amounts or select products and create customer payment requests.
The terminal is browser-based, so there is no additional app to install. We recommend that the employee bookmarks the terminal page or adds it to their browser favorites so they can quickly return to the terminal whenever they need it.
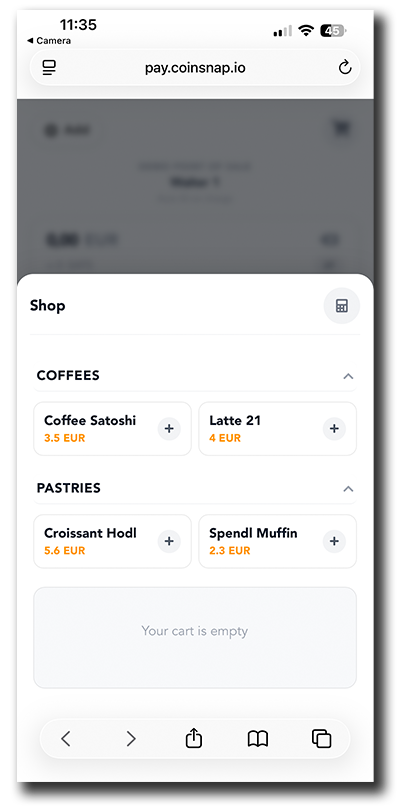
Once paired, each employee can use the assigned terminal on their device while payments and transactions remain associated with the corresponding Point of Sale in the Coinsnap Merchant Account.
If a terminal-specific Lightning Tip Address has been configured, tips collected through that terminal can be sent to the employee’s Bitcoin wallet.
Use Kiosk Mode for a Dedicated Employee Payment Device
Pairing a browser-based terminal is not the only way to provide employees with access to a Point of Sale. Coinsnap Wallet also includes Kiosk Mode for dedicated merchant-owned payment devices.
Kiosk Mode turns a smartphone, tablet, iPad or compatible Android POS device into a restricted Bitcoin payment terminal. Employees can use the assigned Point of Sale while access to the Wallet, balances, settings and Merchant Account administration remains protected.
Kiosk Mode is particularly useful for cashiers, waiters, shop employees and temporary event staff when the merchant provides the payment device.
A PIN protects access when leaving Kiosk Mode. Kiosk Mode requires a connected Coinsnap Merchant Account and an existing Point of Sale terminal.
Learn how to set up Coinsnap Kiosk Mode →
Paired Employee Terminal vs. Kiosk Mode
| Paired Employee Terminal | Kiosk Mode | |
|---|---|---|
| Typical device | Employee’s own phone or browser device | Merchant-owned dedicated device |
| Interface | Browser terminal | Coinsnap Wallet in restricted POS mode |
| Wallet access required | No | Protected / unavailable to employee |
| Merchant settings access | No | Protected |
| Terminal assignment | QR code or pairing code | Terminal selected during Kiosk setup |
| Best for | Employees using their own devices | Dedicated cashier or POS hardware |
Pairing and Kiosk Mode solve different operational needs. Pairing is useful for connecting an employee device to a terminal, while Kiosk Mode is designed to lock a merchant-owned device into a restricted Point of Sale environment.
Coinsnap POS Fees
Coinsnap charges merchants a 1% transaction fee for successfully processed payments through Coinsnap merchant infrastructure.
This fee is charged separately against the merchant’s prepaid Coinsnap credit. It is not deducted from the Bitcoin payment received by the merchant.
Wallet- or network-related costs are separate from the Coinsnap merchant fee. If a merchant uses a third-party fiat settlement provider, that provider may also charge separate conversion, spread or payout fees.
Continue with Coinsnap Wallet and Merchant Tools
This guide focuses on setting up your Point of Sale, terminals and Product Catalog. For other Coinsnap Wallet and merchant functions, use the following current guides:
Coinsnap Wallet – Get Started
Learn how to create and manage wallets, use Bitcoin and Digital Dollars, configure Stable Balance and connect a Merchant Account.
Coinsnap Wallet FAQ
Find short answers to common Wallet and Point of Sale questions.
Coinsnap Kiosk Mode
Learn how to configure a dedicated restricted payment terminal for employees.
Coinsnap POS Dashboard
Learn how to monitor orders, transactions, sales activity and reporting.
Frequently Asked Questions
Do I need a separate app for Coinsnap Point of Sale?
No. Point of Sale functionality is integrated into Coinsnap Wallet. A smartphone, tablet or compatible POS device can be used as a Bitcoin payment terminal.
Do I need a Coinsnap Merchant Account?
A Merchant Account is required for the centralized merchant functions described in this guide, such as managing Points of Sale, multiple terminals, employee devices, orders, reporting and Kiosk Mode.
Can one Point of Sale have multiple terminals?
Yes. A Point of Sale can have multiple terminals, for example one for each checkout, employee, bar, counter or sales area.
Can employees accept payments without access to my Wallet?
Yes. You can connect an employee device to a terminal or use Kiosk Mode. These options allow employees to accept customer payments without giving them normal access to the merchant’s Wallet balances and administration.
Can employees receive their own tips?
A terminal can be configured with a Lightning Tip Address. This can be used to send tips collected through that terminal to the employee’s Bitcoin wallet.
What is the difference between a Point of Sale and a terminal?
A Point of Sale represents the overall sales environment and contains products, payment settings and terminals. A terminal is an individual checkout or payment location belonging to that Point of Sale.
Can I use several Points of Sale?
Yes. A Merchant Account can manage multiple Point of Sale environments, for example for different stores, locations, events or business units.
Does Coinsnap split a POS payment between Bitcoin and a bank account?
No. Each Coinsnap Store uses one configured settlement destination at a time. Coinsnap does not automatically split an individual payment between a Bitcoin wallet and a fiat settlement provider.