
How to Send and Receive Bitcoin with the Coinsnap Wallet

Introduction

Once you have installed and set up your Coinsnap Bitcoin Wallet, you are ready to send and receive Bitcoin directly from the app – either over the Lightning Network for fast everyday payments or via the Bitcoin blockchain.

In this guide, we’ll show you how to send and receive Bitcoin with the Coinsnap Wallet, step by step. You’ll learn how to scan a Bitcoin or Lightning QR code, review and confirm a payment, receive Bitcoin from someone else, and find completed payments in your transaction history.

We’ll use real payment examples throughout the guide, so you can see exactly what happens on your screen when you send or receive Bitcoin.

If you haven’t installed your wallet yet, start with our guide How to Download, Install and Set Up the Coinsnap Bitcoin Wallet in Minutes. Once your wallet is ready, you can follow the steps below. Once you have completed these steps, you’ll know exactly how to send and receive Bitcoin with your Coinsnap Wallet in everyday situations.

How do I send and receive Bitcoin with the Coinsnap Wallet?
To send Bitcoin with the Coinsnap Wallet, scan the recipient’s Bitcoin or Lightning QR code, review the payment details, and confirm the transaction.
To receive Bitcoin, tap Receive in your wallet and share your QR code, Bitcoin address, or Lightning Address with the sender.You do not need to run your own Bitcoin or Lightning node or synchronize the blockchain. The Coinsnap Wallet handles the payment process directly in the app.

SEND BITCOIN WITH YOUR COINSNAP WALLET

Now that your Coinsnap Bitcoin Wallet is set up, you can send and receive Bitcoin directly from the app. Let’s start by sending a Bitcoin payment.

The easiest way to pay a Bitcoin or Lightning payment request is by scanning its QR code. In the following example, we’ll use the Coinsnap Wallet to make a small Bitcoin donation.

Step 1: Open Your Personal Wallet

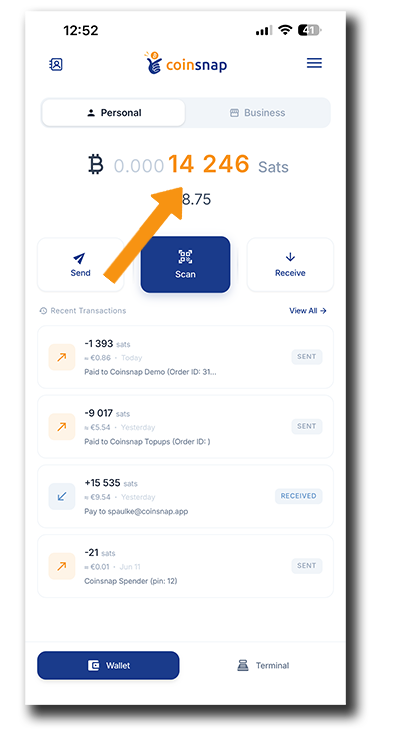
Open the Coinsnap Wallet and make sure Personal is selected at the top of the screen.

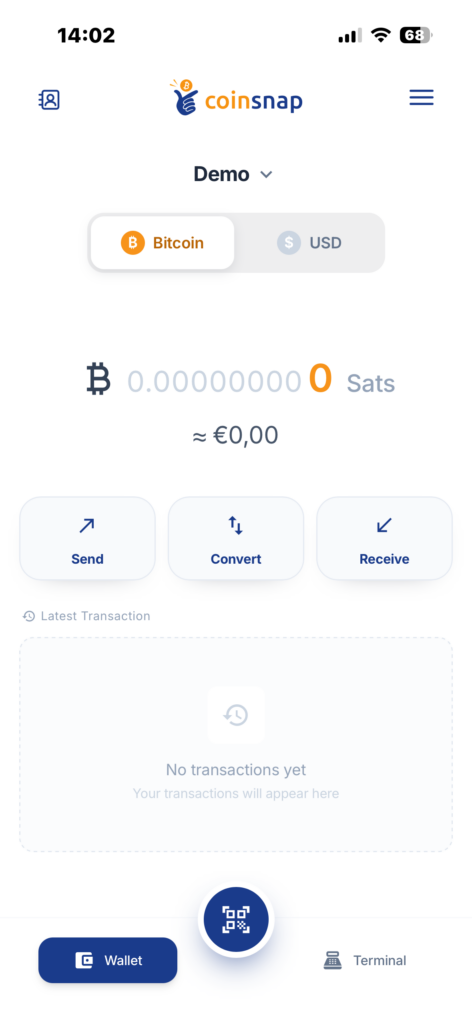
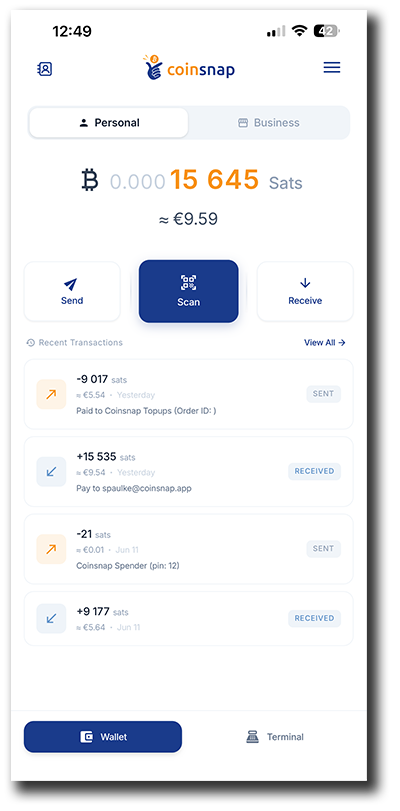
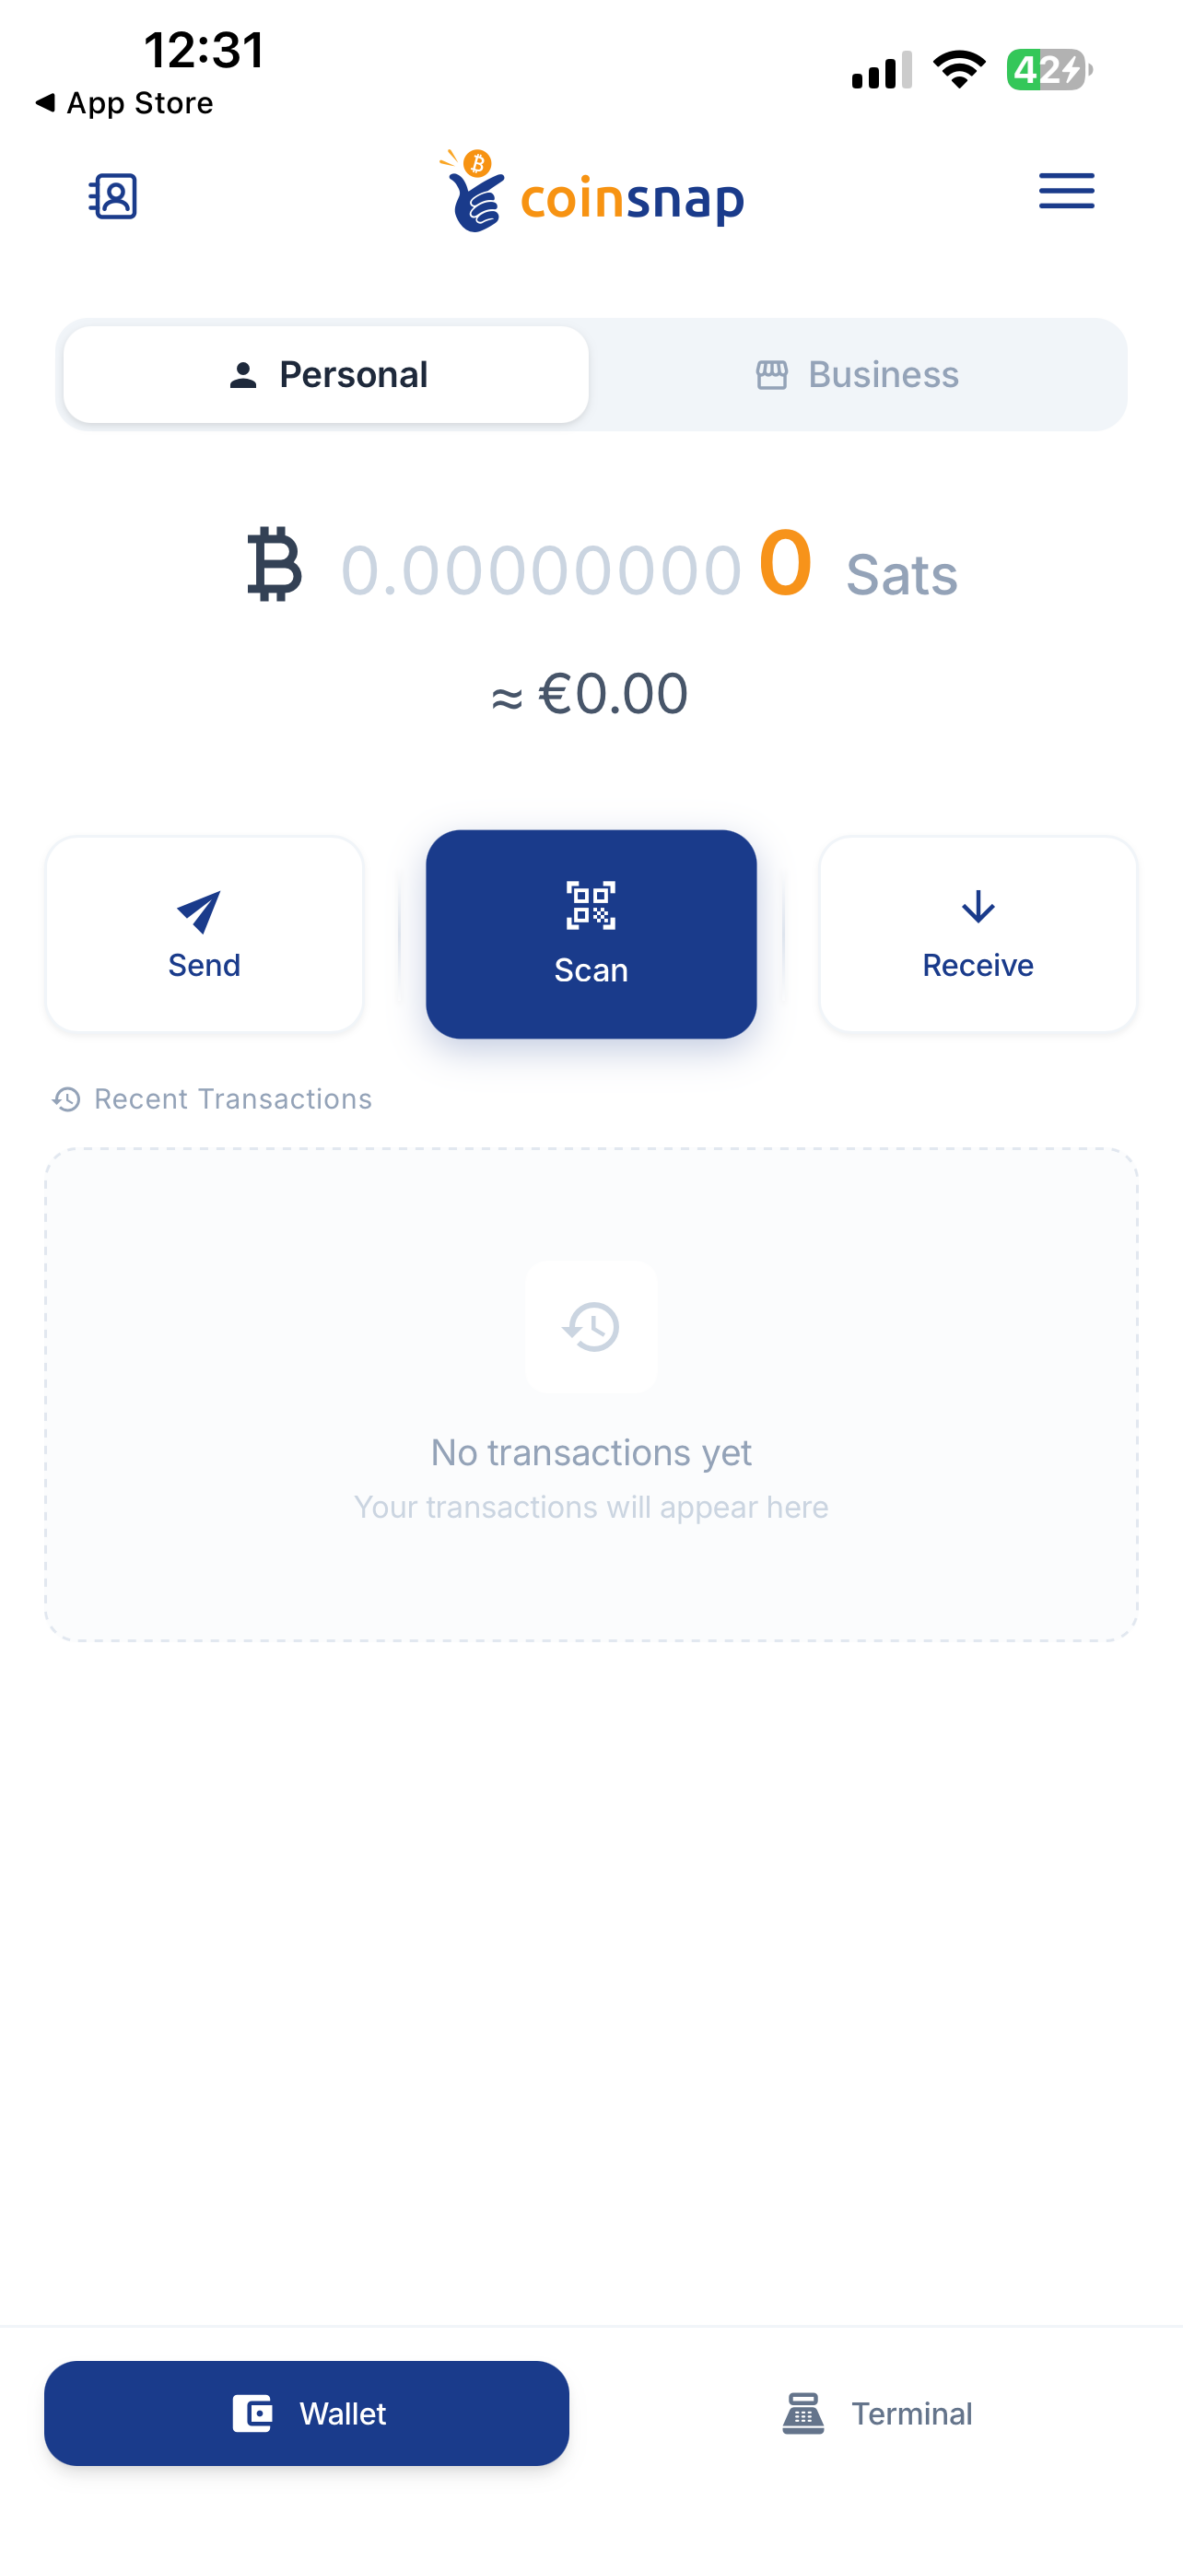
Coinsnap Bitcoin Wallet Personal account showing Bitcoin balance and Send, Scan, and Receive buttons

Here you can see your current Bitcoin balance as well as your recent transactions. Below your balance, you will find the three main wallet functions: Send, Scan, and Receive.

For a payment presented as a QR code, tap Scan.

Step 2: Generate the Bitcoin Payment Request

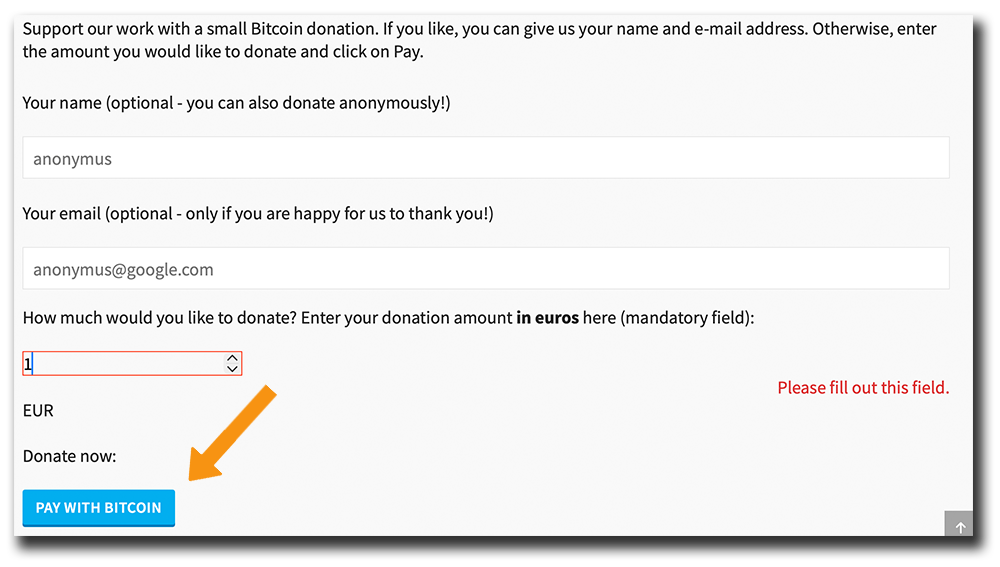
At checkout, the merchant, website, or payment recipient will usually provide a Bitcoin payment request. In our example, we enter a €1 donation and click Pay with Bitcoin.

Bitcoin donation form with Pay with Bitcoin button to generate a Bitcoin payment request

Step 3: Find the Bitcoin Payment QR Code

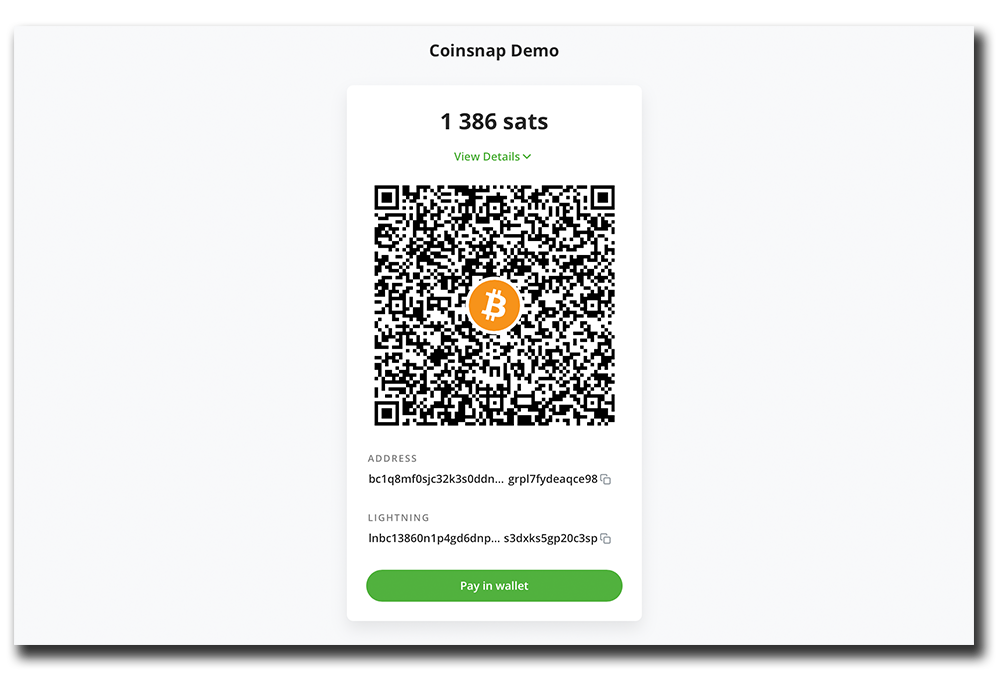
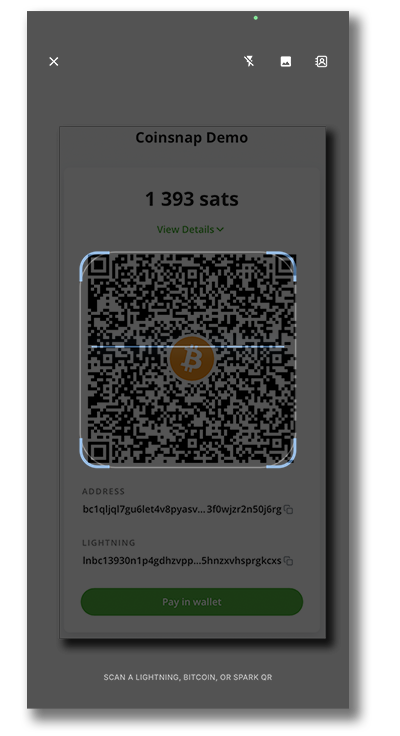
The payment page now displays a QR code containing the payment information. In this example, the €1 donation corresponds to 1,393 sats.

Bitcoin payment request showing a QR code for a 1,393 sats payment

You do not need to copy the Bitcoin address or Lightning invoice manually. Simply leave the QR code visible on the screen and scan it with your Coinsnap Wallet.

Step 4: Scan the QR Code

Back in your Coinsnap Wallet, tap Scan to open the QR code scanner.

Point your smartphone camera at the payment QR code. The wallet automatically recognizes the Bitcoin or Lightning payment information contained in the code.

Coinsnap Bitcoin Wallet scanning a Bitcoin Lightning payment QR code

Step 5: Review and Confirm the Payment

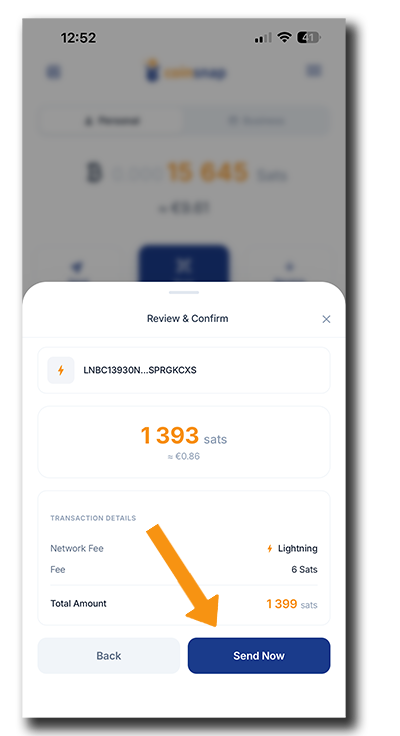
Once the QR code has been scanned, the wallet displays the payment details before anything is sent.

Check the payment amount and network fee. In our example, the payment is 1,393 sats, with a 6 sats Lightning fee, resulting in a total of 1,399 sats.

If everything is correct, tap Send Now.

Coinsnap Bitcoin Wallet confirming a 1,393 sats Lightning payment before sending

Step 6: Payment Sent

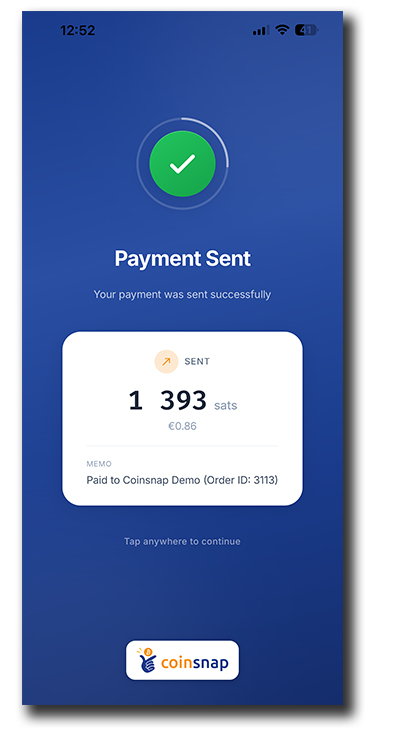
That’s it. The Coinsnap Wallet confirms that your payment was sent successfully.

Lightning payments are generally completed within seconds, so there is normally no need to wait for blockchain confirmations.

Coinsnap Bitcoin Wallet showing successful Bitcoin Lightning payment of 1,393 sats

Step 7: The Recipient Confirms the Payment

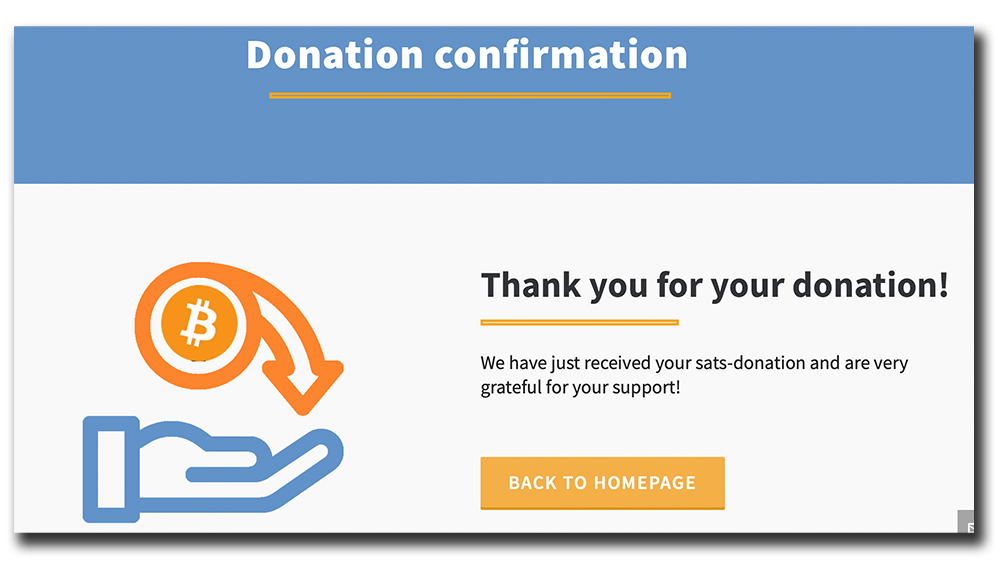
The recipient’s website can immediately recognize the successful payment. In our example, the donation page displays its confirmation as soon as the Lightning payment arrives.

Bitcoin donation confirmation after successful Lightning payment with Coinsnap Wallet

Step 8: Check Your Updated Wallet Balance

Return to your Coinsnap Wallet and you will see the payment in your recent transactions. Your Bitcoin balance has been reduced by the payment amount plus the applicable Lightning network fee.

The transaction is now part of your wallet history, so you can always review your sent and received payments directly in the app.

Coinsnap Bitcoin Wallet showing updated balance after sending a Lightning payment

Your first Bitcoin payment – as simple as a scan and a few taps

As you can see, paying with Bitcoin is as simple as scanning a QR code and confirming the payment with a few taps. There are no bank details to enter, no card numbers to type in, and no complicated technical steps. With Lightning, the payment reaches the recipient within seconds – and your Coinsnap Wallet immediately shows the completed transaction.

RECEIVE BITCOIN WITH YOUR COINSNAP WALLET

The Coinsnap Wallet makes it easy to send and receive Bitcoin. After sending a payment in the first part of this guide, let’s now look at how to accept one.

You can create a payment request directly in the app and let the sender scan your QR code, or simply share your Lightning Address. In the following steps, we’ll show you how to accept Bitcoin with your Coinsnap Wallet and see the incoming payment appear in your wallet.

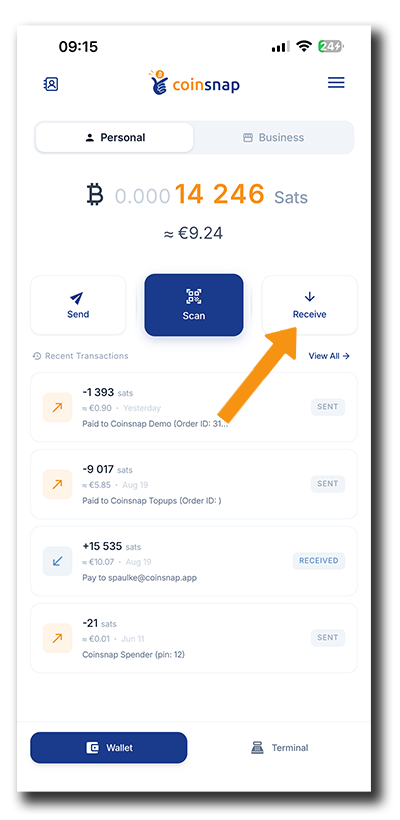
Step 1: Tap Receive

Open your Coinsnap Wallet and select the Personal or Business account you want to receive the Bitcoin payment with. Then tap Receive below your wallet balance.

Coinsnap Bitcoin Wallet showing the Receive button to accept a Bitcoin payment

Step 2: Set the Amount and Payment Reference

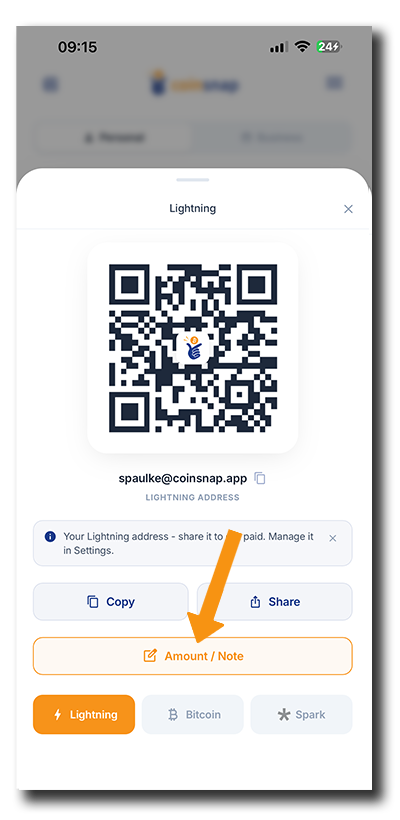
Your Lightning receive screen opens and displays your Lightning Address and QR code. If you simply want someone to send Bitcoin to your Lightning Address, you can share this QR code directly.

To request a specific amount, tap Amount / Note, enter the amount and, if desired, a payment reference, then tap Generate Invoice.

Coinsnap Bitcoin Wallet Lightning receive screen with Amount / Note highlighted to set a payment amount and reference

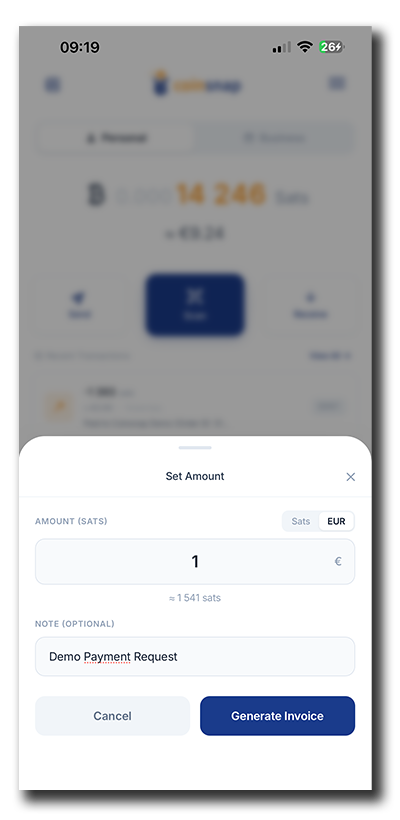
Step 3: Enter the Amount and Payment Reference

Enter the amount you want to receive. You can choose whether to enter the amount in sats or EUR – the wallet automatically displays the corresponding value in the other currency.

Optionally, enter a payment reference so you can identify the payment later in your transaction history.

When everything is correct, tap Generate Invoice to create the Lightning payment request.

Coinsnap Bitcoin Wallet Lightning receive screen with Amount and Note button highlighted

Step 4: Share the Payment Request

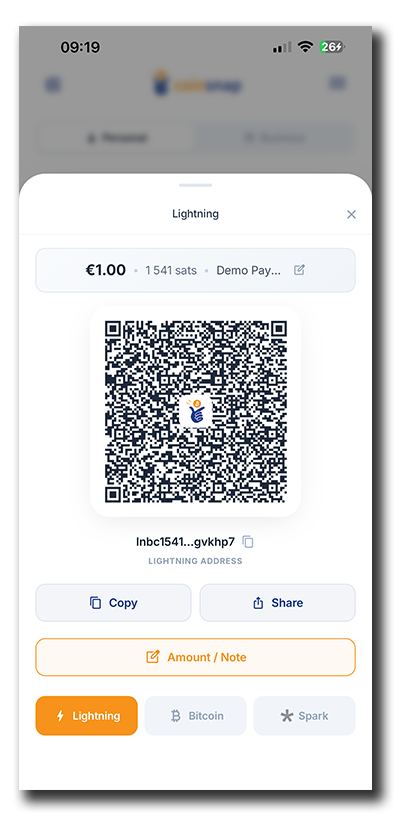
Your Coinsnap Wallet now generates a Lightning payment request for the amount you entered. The amount, its current value in sats, and your payment reference are displayed above the QR code.

Coinsnap Bitcoin Wallet showing a Lightning QR code for a €1 payment request

To receive the payment, you now have three ways to share the payment request with the payer:

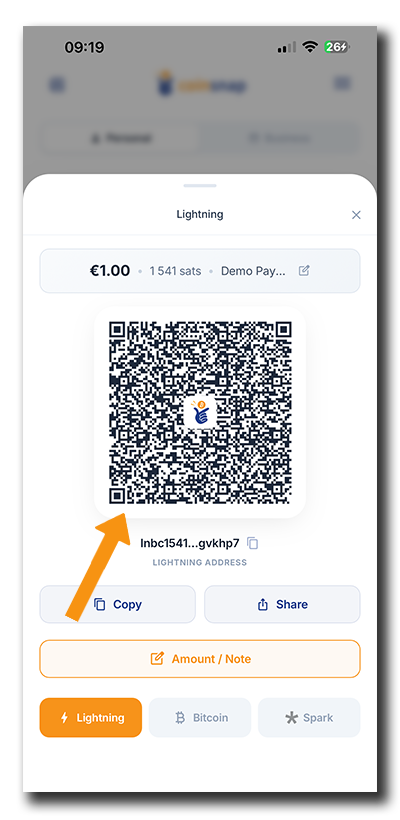
Show the QR code

If the payer is with you, simply show them the QR code on your screen. They can scan it directly with their Bitcoin or Lightning wallet and make the payment.

Coinsnap Bitcoin Wallet showing a Lightning payment QR code for the payer to scan

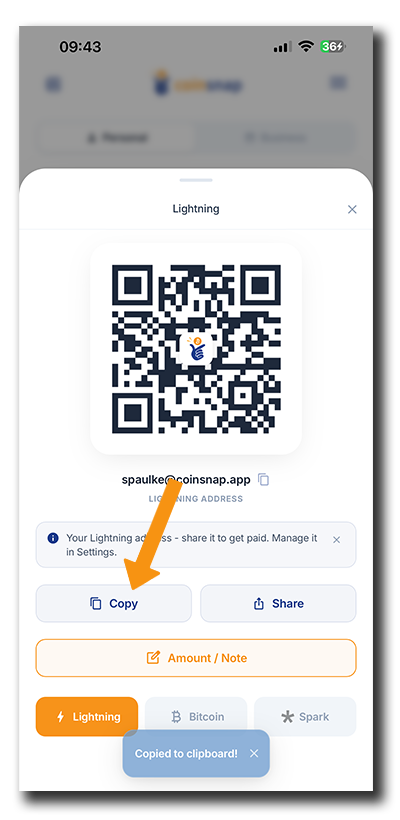
Copy the payment request

If the payer is somewhere else, tap Copy to copy the Lightning payment request. You can then paste and send it using email, a messaging app, or any other communication method you prefer.

oinsnap Bitcoin Wallet Copy button for copying a Lightning payment request to the clipboard

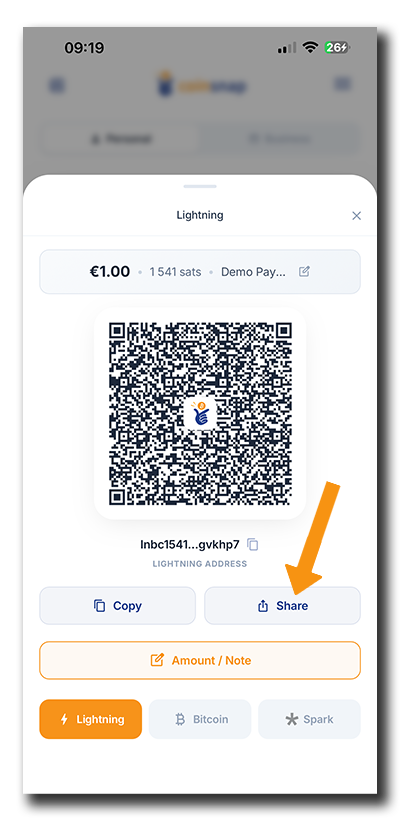
Share the payment request

Tap Share to open your smartphone’s sharing options and send the payment request directly using the available messaging, social media, email, or other sharing apps.

Coinsnap Bitcoin Wallet Share button for sending a Lightning payment request to the payer

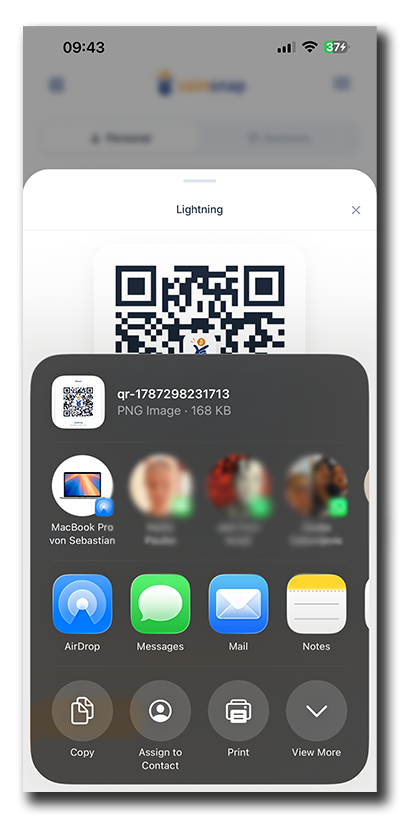
After tapping Share, your smartphone’s standard sharing menu opens. The payment QR code is prepared as an image and can now be sent directly to the payer using any of the sharing options available on your phone.

Simply select the app or contact you want to use – for example Messages, Mail, AirDrop, or another installed messaging or social media app. The payer receives the QR code and can scan it with their Bitcoin wallet to complete the payment.

Smartphone sharing menu for sending a Coinsnap Bitcoin Lightning payment QR code

As soon as the sender scans the QR code you’ve shown or sent them and approves the payment, the requested Bitcoin will be credited to your Coinsnap Wallet.

SEND AND RECEIVE BITCOIN – IT REALLY IS THAT SIMPLE

As you’ve seen, you can send and receive Bitcoin with the Coinsnap Wallet without any technical Bitcoin knowledge. To pay, scan a QR code, check the amount, and confirm. To get paid, create a payment request and show, copy, or share it with the payer.

With Lightning, payments arrive within seconds, while your wallet keeps your balance and transaction history right at your fingertips. No bank details, card numbers, Lightning node, or complicated configuration are required.

Whether you’re sending Bitcoin to someone or accepting a payment yourself, the Coinsnap Wallet turns everyday Bitcoin payments into what they should be: quick, convenient, and easy to use.

FREQUENTLY ASKED QUESTIONS ABOUT SENDING AND RECEIVING BITCOIN


The Complete Coinsnap Bitcoin Wallet Guide

Everything you need to get started with the Coinsnap Bitcoin Wallet, Bitcoin POS, and the business management tools behind it is covered in our four-part Coinsnap Bitcoin Wallet Guide.

From installing your wallet and setting up your first POS and terminals to managing sales, transactions, orders, fees, accounting, and reporting, we have broken the complete process down into four practical step-by-step guides:

  1. Coinsnap Bitcoin Wallet Setup: Install and Set Up Your Wallet — Install your Coinsnap Wallet, create your personal and business Lightning addresses, and get ready to receive Bitcoin.
  2. How to Send and Receive Bitcoin with the Coinsnap Wallet — Pay for something with Bitcoin, or create a payment request for someone to pay you.
  3. Coinsnap Bitcoin POS Setup: How to Set Up Your POS, Terminals and Products — Create your POS, connect your terminals, and configure your product catalogue.
  4. Coinsnap POS Dashboard: The Cockpit of Your Bitcoin Business — Monitor your Bitcoin business, manage transactions and orders, choose how you receive your funds, and prepare the records you need for accounting and reporting.

From your first wallet setup to your first Bitcoin sale – and from that sale to your accounting records – these four guides give you everything you need to run your Bitcoin POS business with Coinsnap.

How to Top Up Your Coinsnap Credit

Why does Coinsnap use a prepaid credit balance?

If you want to know how to top up your Coinsnap credit, it helps to first understand why Coinsnap uses a prepaid credit balance in the first place.

What is Coinsnap credit?
Coinsnap credit is a prepaid balance merchants use to pay Coinsnap’s 1% transaction fee. Because Bitcoin payments are forwarded directly from the customer to the merchant’s wallet, Coinsnap never holds the payment and cannot deduct its fee from it. Instead, the fee is deducted from the merchant’s prepaid Coinsnap credit after each successful transaction.

Coinsnap never takes possession of the Bitcoin your customers pay you. When a customer makes a Bitcoin or Lightning payment, Coinsnap processes the payment request and forwards the payment directly from the customer to your connected Bitcoin wallet. Your Bitcoin does not pass through a Coinsnap account.

For this service, Coinsnap charges a 1% fee on successfully processed Bitcoin payments. Because Coinsnap never holds your Bitcoin, it cannot simply deduct this fee from the payment before sending it to you.

This is why Coinsnap uses a prepaid credit balance. As a merchant, you deposit credit into your Coinsnap account in advance. After each successful transaction, the 1% Coinsnap fee is deducted from this balance.

Your Coinsnap credit therefore contains only funds used to pay Coinsnap fees. It never contains the Bitcoin payments you receive from your customers.

Note: When you open your Coinsnap account, Coinsnap gives you €5 of free starting credit. With Coinsnap’s 1% transaction fee, that is enough to process €500 worth of Bitcoin sales before you need to top up your credit for the first time.

If you don’t have a Coinsnap account yet, here’s how to open one in less than a minute!

Step 1: Open your Coinsnap balance

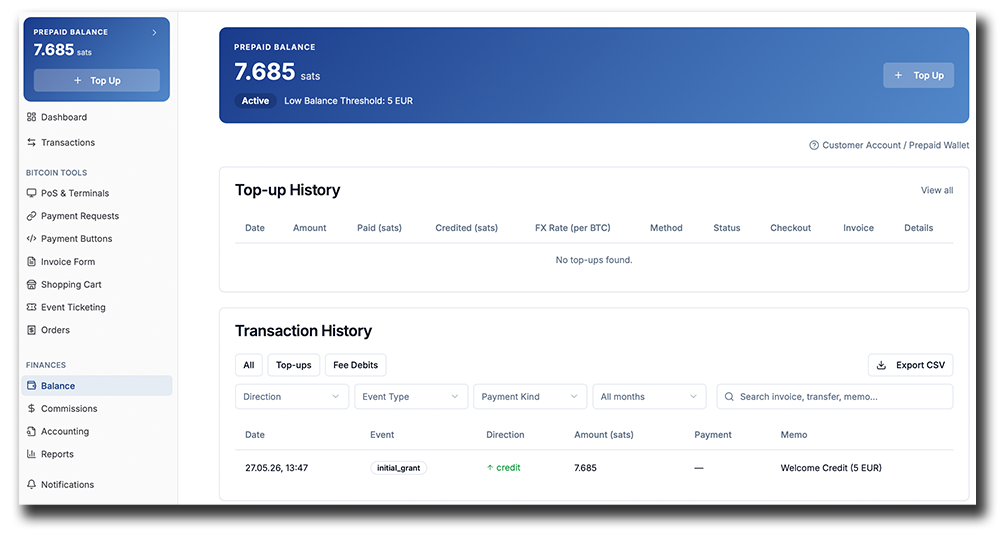
Log in to your Coinsnap account and go to Finances → Balance. Here you can see your current Coinsnap credit balance and start a new top-up.

Coinsnap Balance page showing the prepaid credit balance, Top Up button, top-up history and transaction history.

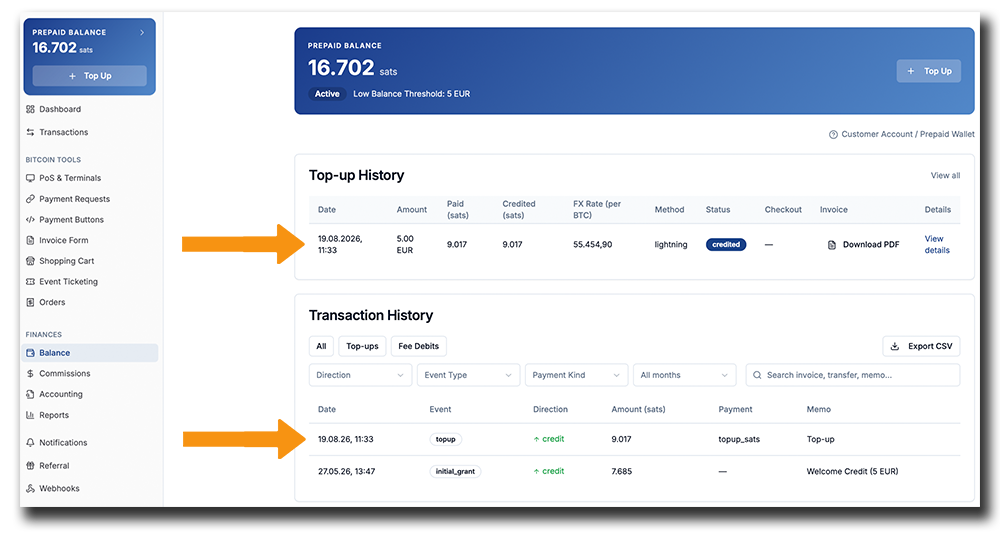
The Balance page gives you an overview of your prepaid Coinsnap credit. At the top, you can see your current balance in sats and the Top Up button. Below, the Top-up History shows previous credit deposits, while the Transaction History records top-ups and fee deductions from your balance.

Step 2: Add credit to your balance

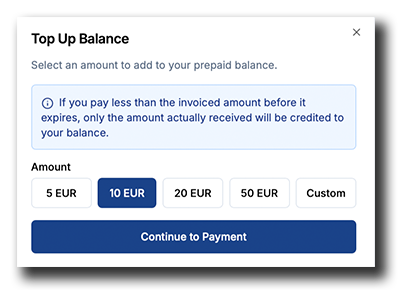
Click Top Up to open the Top Up Balance window. Choose how much credit you want to add to your prepaid balance: €5, €10, €20 or €50. If you want to add a different amount, select Custom and enter the amount yourself.

Coinsnap top-up dialog for selecting a prepaid balance amount before paying Bitcoin fees.

Remember that with Coinsnap’s 1% transaction fee, every euro of credit covers €100 in Bitcoin sales. A €10 top-up, for example, is enough for €1,000 in sales, while €50 covers €5,000. Before choosing your top-up amount, consider how much Bitcoin sales volume you expect over the next few weeks and add at least 1% of that expected sales volume to your Coinsnap credit.

Once you have selected your amount, click Continue to Payment.

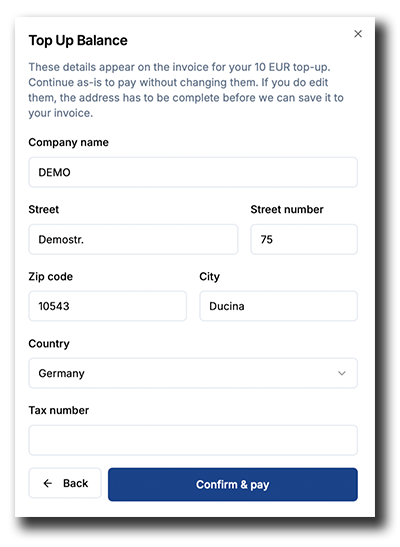
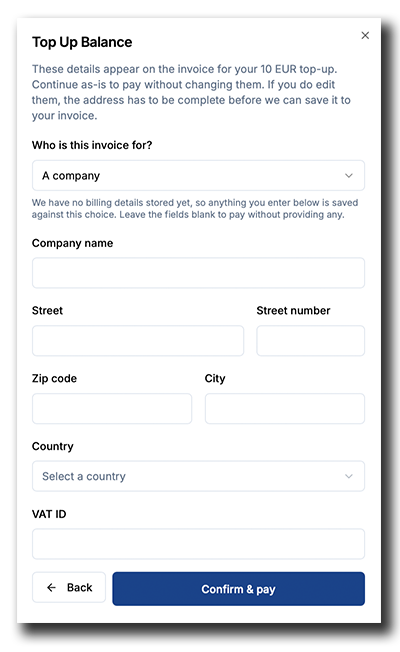
Before creating the top-up payment, Coinsnap displays the company and address information that will appear on the invoice. Check the information and, if necessary, complete or update it. You can also enter your VAT ID. Then click Confirm & pay.

Coinsnap POS Dashboard top-up form for confirming company and invoice details before payment.

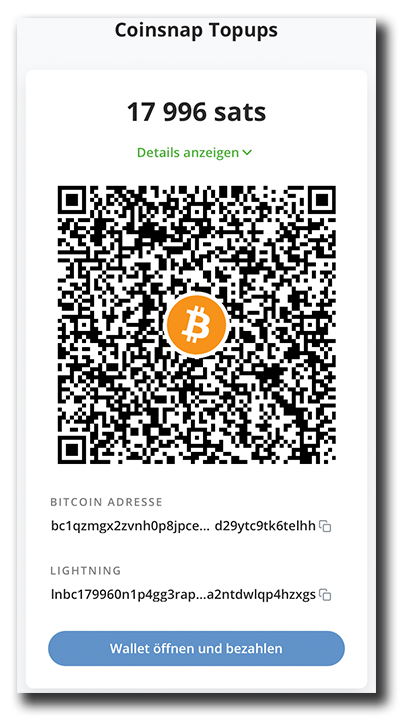
Coinsnap then creates a Bitcoin payment request for the selected top-up amount. You can pay it with Bitcoin on-chain or Lightning, either by scanning the QR code or by opening a compatible Bitcoin wallet directly.

Coinsnap top-up payment screen with Bitcoin QR code and options to pay the prepaid balance via Bitcoin or Lightning.

Once the payment has been received, the corresponding amount is credited to your prepaid balance and becomes available for future Coinsnap fees. You can also see your completed top-up in the Top-up and Transaction History, where all credit deposits to your Coinsnap account are recorded.

Successful Coinsnap credit top-up shown in the Balance page, with the €5 payment recorded in Top-up History and Transaction History.

Frequently Asked Questions About Coinsnap Credit

Coinsnap POS Dashboard: The Cockpit of Your Bitcoin Business

Introduction: The Coinsnap POS Dashboard

Your Coinsnap POS is set up. Your terminals are active. Your products are ready – and customers are paying you with Bitcoin. So what happens behind the counter once your Bitcoin POS business is up and running?

This third and final part of our Coinsnap POS Wallet Guide is about exactly that.

While the Coinsnap Wallet and its terminals handle your day-to-day sales, the Coinsnap POS Dashboard is the cockpit of your Bitcoin business. It gives you the information and tools you need to stay on top of your sales, transactions, costs and business performance – and to turn your Bitcoin payment data into the documentation required for bookkeeping, accounting and tax reporting.

This guide therefore assumes that you have already installed your Coinsnap Wallet and configured your POS and terminals. As part of this setup, you have already created your Coinsnap account. This account is also your browser-based Coinsnap POS Dashboard – the business back office for the POS Wallet and terminals we are looking at in this guide. If you haven’t completed the setup yet, start with Parts 1 and 2 of our Coinsnap POS Wallet Guide.

In this article, we concentrate exclusively on what happens after your POS starts generating business: monitoring your sales and transactions, understanding your business numbers, and creating the records you need for accounting and tax reporting.

What is the Coinsnap POS Dashboard?
The Coinsnap POS Dashboard is the browser-based business back office for merchants using the Coinsnap POS Wallet. It gives you an overview of Bitcoin sales and transactions, shows payment and performance data, helps you manage Coinsnap fees, and provides the records you need for bookkeeping, accounting, and tax reporting.

At a Glance: What Can You Do with the Coinsnap POS Dashboard?

Quick Facts

In short: your terminals are where you sell; the Coinsnap POS Dashboard is where you keep control of the business those sales generate.

Coinsnap POS Dashboard: Always Know How Your Bitcoin Business Is Performing

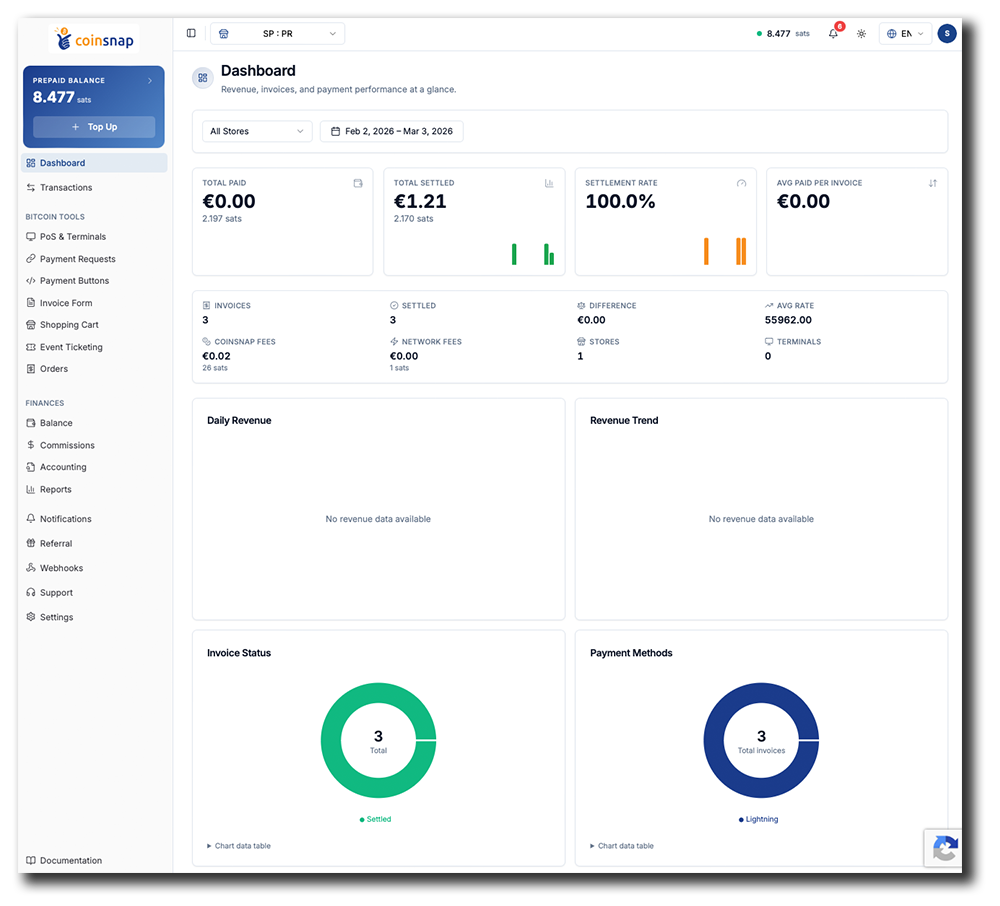
By default, the Coinsnap POS Dashboard shows the key business figures for all your stores over the last month, giving you an immediate overview of your Bitcoin POS activity.

Coinsnap POS Dashboard showing Bitcoin sales, transactions, settlements, fees, revenue, and payment performance.

If you want to analyse a specific store or a different period, simply use the store selector and date filter above the Dashboard. The displayed figures and charts will then update to match your selection.

You can see how much your customers have paid, how much has been settled, your settlement rate, average payment value, number of invoices, Coinsnap fees and network fees.

The visual reports underneath take you beyond the individual payment. Daily Revenue and Revenue Trend show how your Bitcoin sales are developing over time, while Invoice Status and Payment Methods provide additional insight into how customers are paying.

Instead of checking individual terminals to understand what happened during the day, week or month, the Dashboard gives you the numbers you need to assess your Bitcoin POS business from one place.

Transactions: Find and Document Every Payment in your Coinsnap POS Dashboard

The Transactions section gives you a detailed record of the payment activity generated by your Coinsnap business. While the main Dashboard shows your overall sales and payment performance, Transactions lets you drill down to the individual payment level.

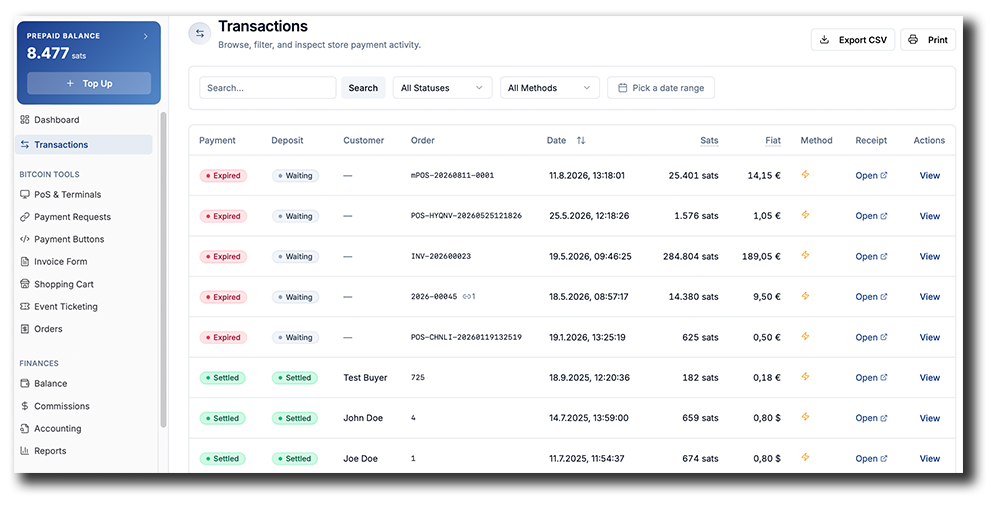
Coinsnap POS Dashboard Transactions screen showing Bitcoin payments, payment status, sats and fiat amounts, receipts, filters, and CSV export.

For every transaction, you can see its payment and deposit status, customer and order information, date and time, amount in sats, corresponding fiat value, payment method, and receipt. Click View to inspect the details of a particular transaction.

The search and filter functions at the top help you find exactly the transactions you need. You can search for a specific payment or order, filter by payment status or payment method, or select a specific date range. This is useful when checking a customer payment, researching an individual sale, or reviewing transactions for a particular accounting period.

The Receipt link provides access to the receipt associated with a transaction. For further business processing and documentation, you can also print the transaction overview or export the transaction data as a CSV file. This makes the Transactions section particularly useful when payment information needs to be reviewed outside Coinsnap or passed on for further processing.

POS & Terminals: Your Connection to the Point of Sale

POS & Terminals is where the Dashboard connects with the actual selling environment: your POS configurations, terminals and product catalogue.

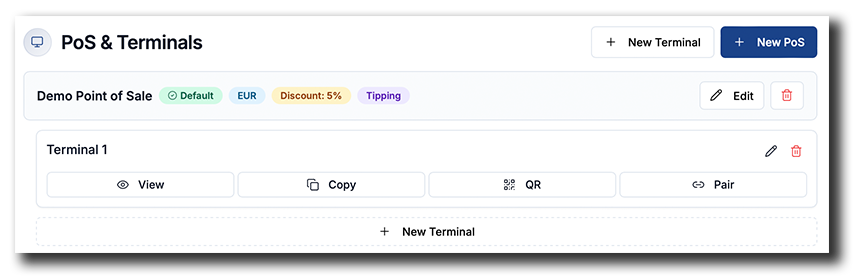
Coinsnap Bitcoin POS setup completed with the new Demo Point of Sale and Terminal 1 displayed in the Dashboard.

We won’t cover these functions again here. Part 2 of the Coinsnap POS Wallet Guide explains step by step how to configure your POS, connect terminals and create your product catalogue.

→ Read Part 2: Coinsnap Bitcoin POS Setup: How to Set Up Your POS, Terminals and Products

Once that setup is complete, the remaining sections of the Dashboard help you manage the business those terminals generate.

Orders: Keep Track of What You Sold

While Transactions gives you the payment record, Orders shows you the business transaction behind the payment: what you sold, when you sold it, how much the order was worth, and its current status.

In practical business terms, the two sections serve different purposes: Transactions keeps you up to date on your Bitcoin cash flow, while Orders gives your logistics and fulfilment teams the information they need to process, prepare, and deliver customer orders efficiently.

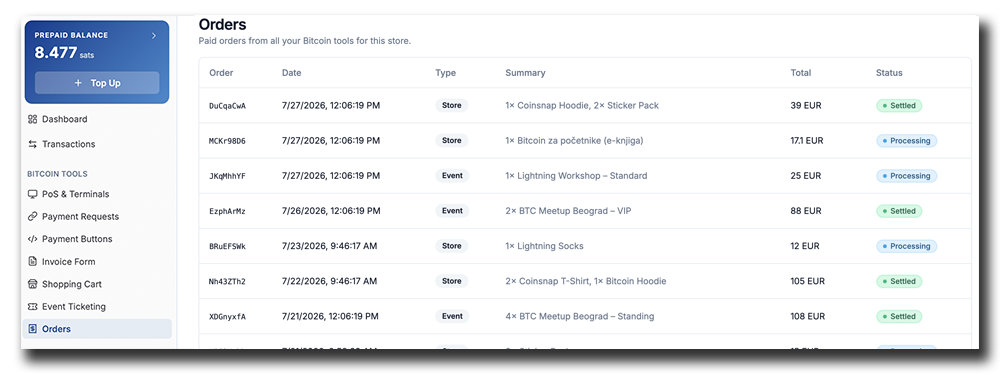
Open Orders under Bitcoin Tools in the Coinsnap POS Dashboard. The Orders overview lists all paid orders generated by your Coinsnap POS Wallet and any other Coinsnap Bitcoin Tools you use for the selected store..

For each order, you can see the order number, date, type, summary, total amount, and status. The Type column also shows where the order originated – for example, from a store or an event – while the Summary gives you an immediate overview of the products, services, or tickets included in the order.

Coinsnap POS Dashboard Orders overview showing order dates, types, purchased products, totals, and order status.

This makes Orders particularly useful when you need to answer the business question behind a Bitcoin payment: What exactly did I sell?

Check the Details of an Order

Click an order in the overview to open its detailed view.

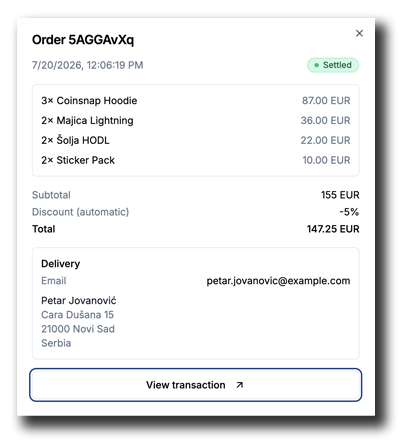
Coinsnap now shows you the individual products or services included in the order, together with their quantities and prices. You can also see the subtotal, any discount applied, and the final order total.

If customer or delivery information was collected with the order, it is displayed here as well. This gives you the information you need to identify the customer and, where applicable, process or fulfil the order.

The status displayed at the top lets you see the current state of the order at a glance.

Coinsnap order details showing purchased products, prices, discount, total, delivery information, and transaction link.

Connect the Order with Its Bitcoin Payment

The order and its payment remain directly connected in the Coinsnap Dashboard. At the bottom of the order details, click View transaction to open the corresponding Bitcoin transaction.

This lets you move directly from the commercial side of the sale to its payment record whenever you need to verify or investigate it.

The distinction between the two Dashboard sections is simple:

Transactions tells you how the money is flowing. Orders tells you what needs to be fulfilled.

Together, they let you trace a sale from the products or services purchased all the way to the corresponding Bitcoin payment – while giving both your financial and operational teams the information they need to do their jobs.

Balance: Keep Your Coinsnap Fees Funded

Coinsnap is strictly non-custodial. When a customer pays you with Bitcoin, the payment goes directly from the customer’s wallet to your merchant wallet. Coinsnap never receives, holds, or takes custody of your Bitcoin.

This also means that Coinsnap cannot simply deduct its service fee from your incoming payments. Instead, Coinsnap uses a prepaid balance from which the fees for successfully processed payments are deducted.

When you open a Coinsnap account, Coinsnap provides you with an initial prepaid credit that covers the Coinsnap fees for your first €500 in Bitcoin sales. This means you can start accepting Bitcoin payments immediately without having to fund your fee balance first.

Once this initial credit has been used, you need to keep sufficient credit in your Coinsnap account to cover future Coinsnap fees.

Check and Top Up Your Prepaid Balance

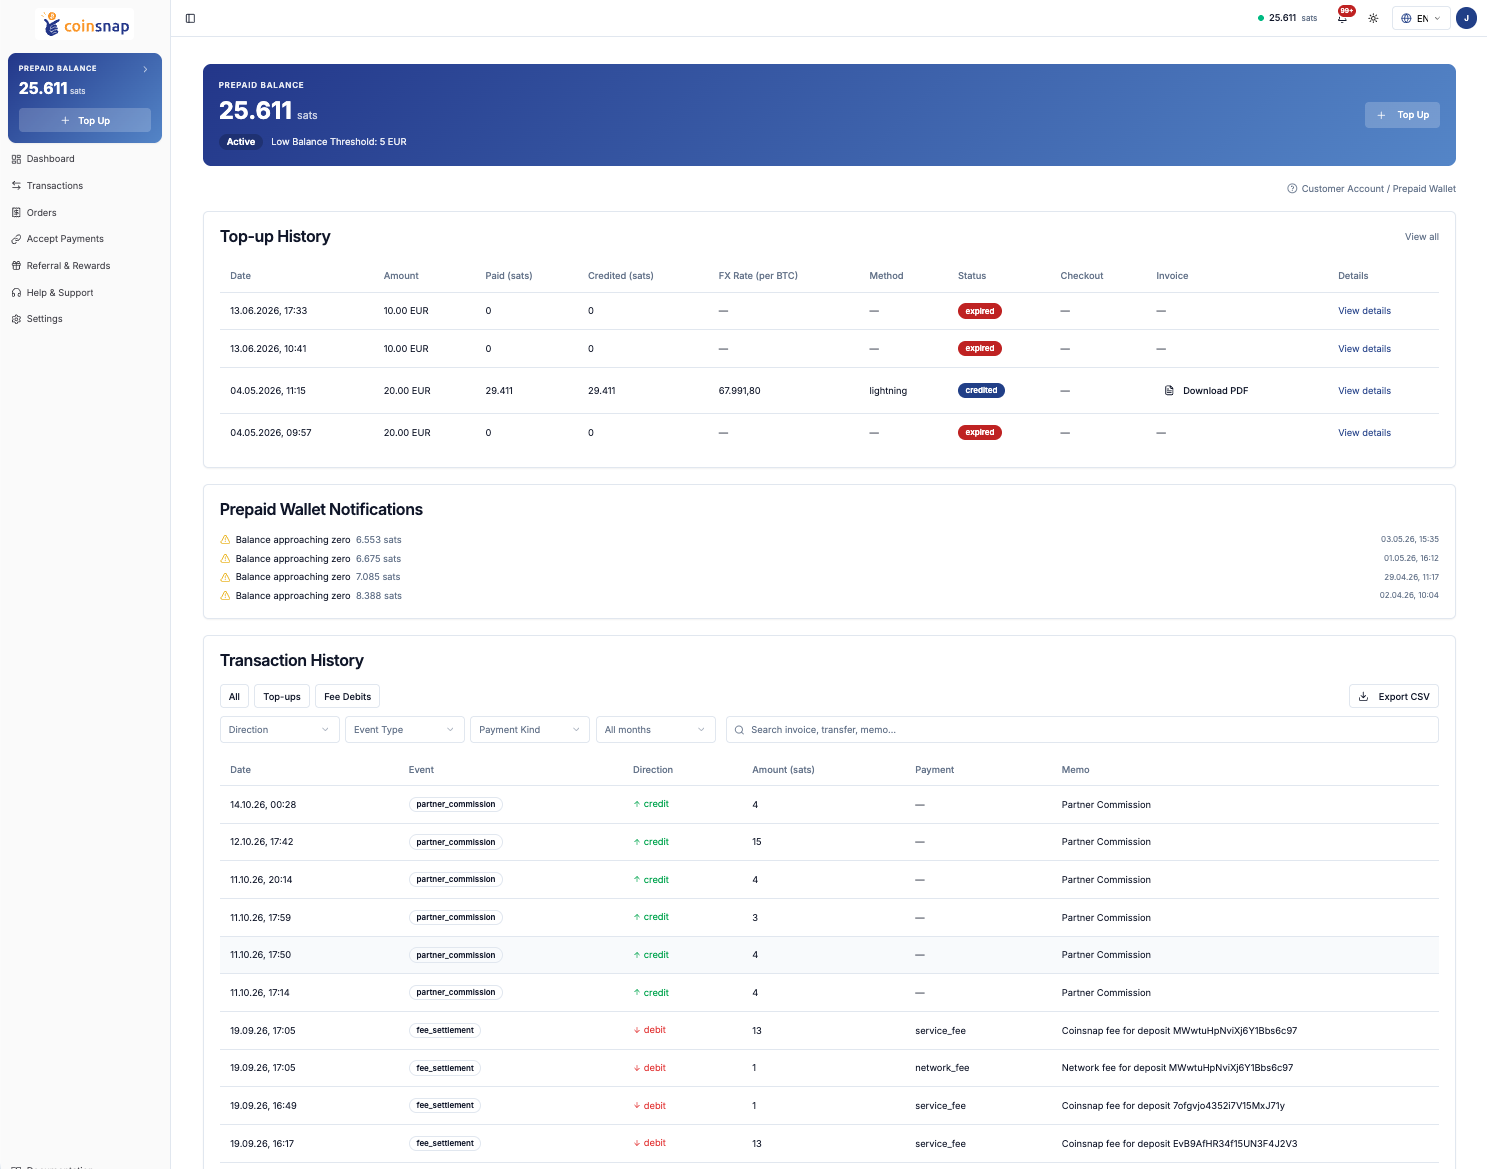
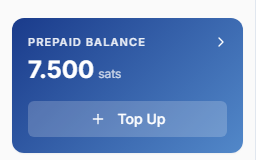
Your current prepaid balance is always visible in the blue Prepaid Balance box at the top left of the Coinsnap Dashboard. Open Balance under Finances for a detailed view of your fee account.

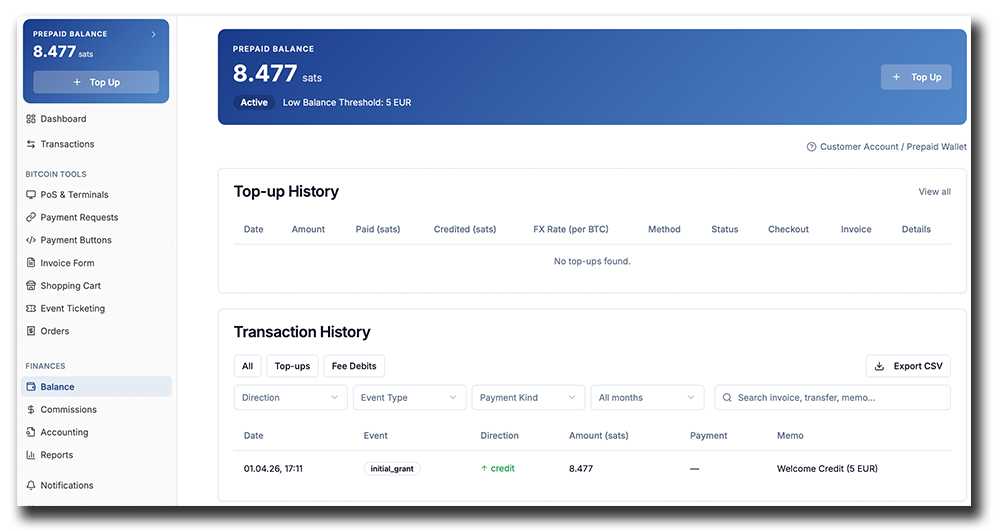
Coinsnap POS Dashboard Balance section showing prepaid fee balance, top-up history, transaction history, and fee debits.

Here you can see your current prepaid balance and account status as well as your Top-up History and Transaction History. The transaction history documents credits to the account and fee debits, so you can see how your prepaid balance changes over time. You can also filter the history or export the data as a CSV file.

If you need these records for your bookkeeping or tax declarations, you can export your complete top-up and fee transaction history as a CSV file at any time and pass it on to your accountant or tax adviser.

To add credit, click Top Up either in the blue Prepaid Balance box in the Dashboard navigation or at the top right of the Balance page.

Coinsnap then asks you how much you want to add. You can select one of the predefined amounts – €5, €10, €20 or €50 – or enter a custom amount. Click Continue to Payment to proceed.

Coinsnap top-up dialog for selecting a prepaid balance amount before paying Bitcoin fees.

Before creating the top-up payment, Coinsnap displays the company and address information that will appear on the invoice. Check the information and, if necessary, complete or update it. You can also enter your VAT ID. Then click Confirm & pay.

Coinsnap POS Dashboard top-up form for confirming company and invoice details before payment.

Coinsnap creates a Bitcoin payment request for the selected top-up amount. You can pay it with Bitcoin on-chain or Lightning, either by scanning the QR code or by opening a compatible Bitcoin wallet directly.

Coinsnap top-up payment screen with Bitcoin QR code and options to pay the prepaid balance via Bitcoin or Lightning.

Once the payment has been received, the corresponding amount is credited to your prepaid balance and becomes available for future Coinsnap fees.

Important: The prepaid balance shown in your Coinsnap Dashboard is not the balance of your merchant Bitcoin wallet. Your customer payments go directly to your wallet; the prepaid balance is used exclusively to pay the fees for using Coinsnap.

This system allows Coinsnap to charge for its service without ever taking custody of the Bitcoin your customers pay you.

Commissions: See What You Earn from Referrals

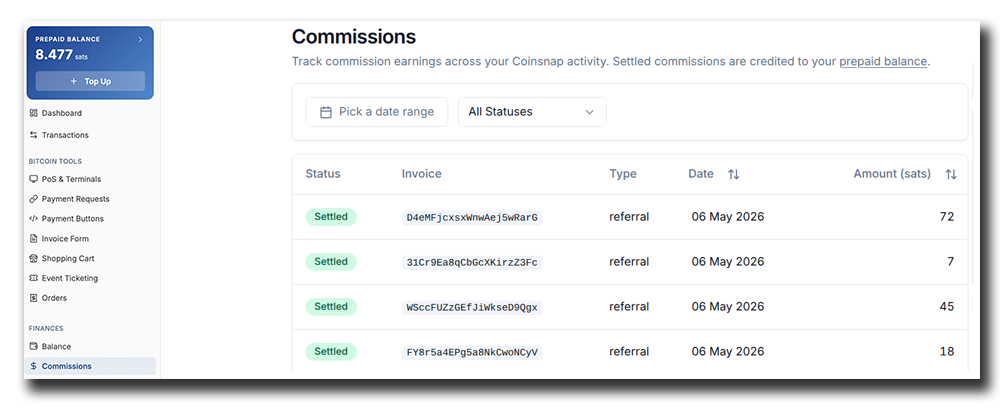
If you use your Coinsnap referral code to recommend Coinsnap to other merchants, Commissions shows the commissions generated by those referrals.

The section gives you an overview of your referral earnings:

Coinsnap POS Dashboard Commissions section for tracking referral commission earnings by date, status, and amount.

→ Learn more about the Coinsnap Referral Program

Accounting: Bring Your Bitcoin Sales into Your Bookkeeping

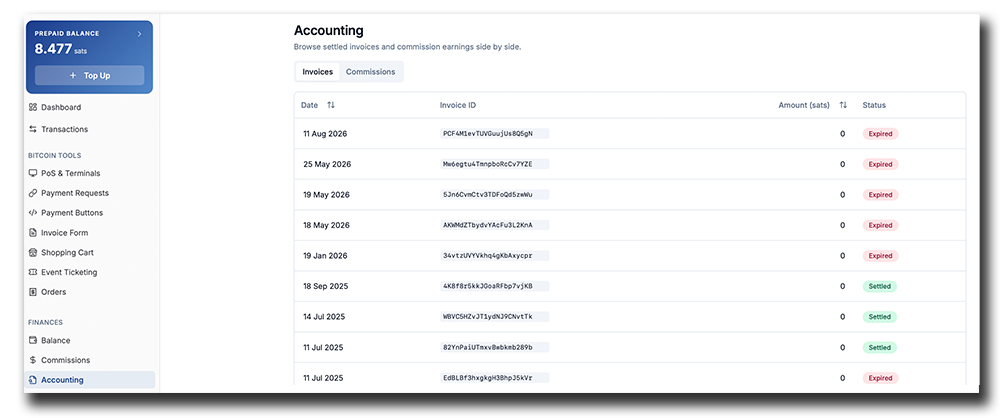
Accepting a Bitcoin payment and accounting for the resulting sale are two different business processes.

The Accounting section helps bridge that gap.

Coinsnap POS Dashboard Accounting section showing settled invoices and commission earnings with dates, invoice IDs, amounts, and status.

It provides the transaction information generated by your Coinsnap business in a form that can be used for your bookkeeping and financial administration. This allows you to transfer the relevant information from your Bitcoin POS operation into your normal accounting processes or make it available to your accountant or bookkeeper.

Your accountant does not need to work at your POS terminal to understand your Bitcoin sales. The Dashboard provides the business records behind them.

Reports: Document Your Bitcoin Business for Accounting and Taxes

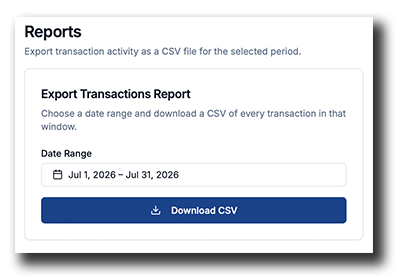
While the Dashboard helps you monitor your business and Transactions lets you inspect individual payments, Reports provides the bigger picture for a defined reporting period.

Coinsnap POS Dashboard Reports section for selecting a date range and downloading Bitcoin transaction data as a CSV file.

This is particularly useful when your Bitcoin sales need to leave the operational environment of the POS and become part of your regular business documentation.

Reports can support periodic bookkeeping, management reporting, year-end accounting and the preparation of information required by your accountant or tax adviser for tax declarations.

Important: Coinsnap provides the payment records and reports that can support your accounting, tax reporting and other documentation requirements. The accounting and tax treatment itself depends on the rules applicable to your business and jurisdiction.

Setting: Choose How You Receive Your Bitcoin Sales

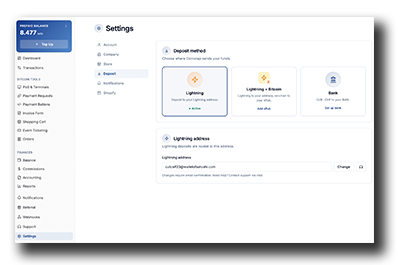
Once customers start paying through your Coinsnap POS, you need to decide where Coinsnap should send the funds you receive. Go to Settings → Deposit in your Coinsnap Dashboard to choose and configure your deposit method.

Coinsnap gives you three options. With Lightning, your Lightning payments are sent directly to the Lightning address you have configured. This is the simplest option if you want to receive and keep your sales via Lightning.

Coinsnap POS Dashboard Deposit settings with Lightning selected as the active payment deposit method.

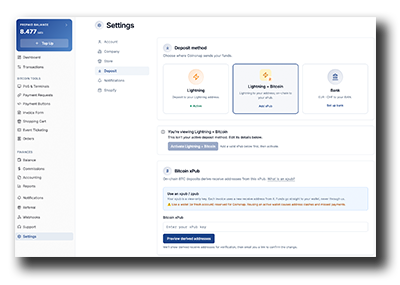
Choose Lightning + Bitcoin if you also want to accept Bitcoin on-chain. Lightning payments continue to go to your Lightning address, while on-chain payments are sent directly to addresses derived from the xPub you provide. This allows your POS to accept both payment methods while the funds still go directly to wallets you control.

Coinsnap POS Dashboard Deposit settings for receiving payments via Lightning and Bitcoin on-chain with an xPub.

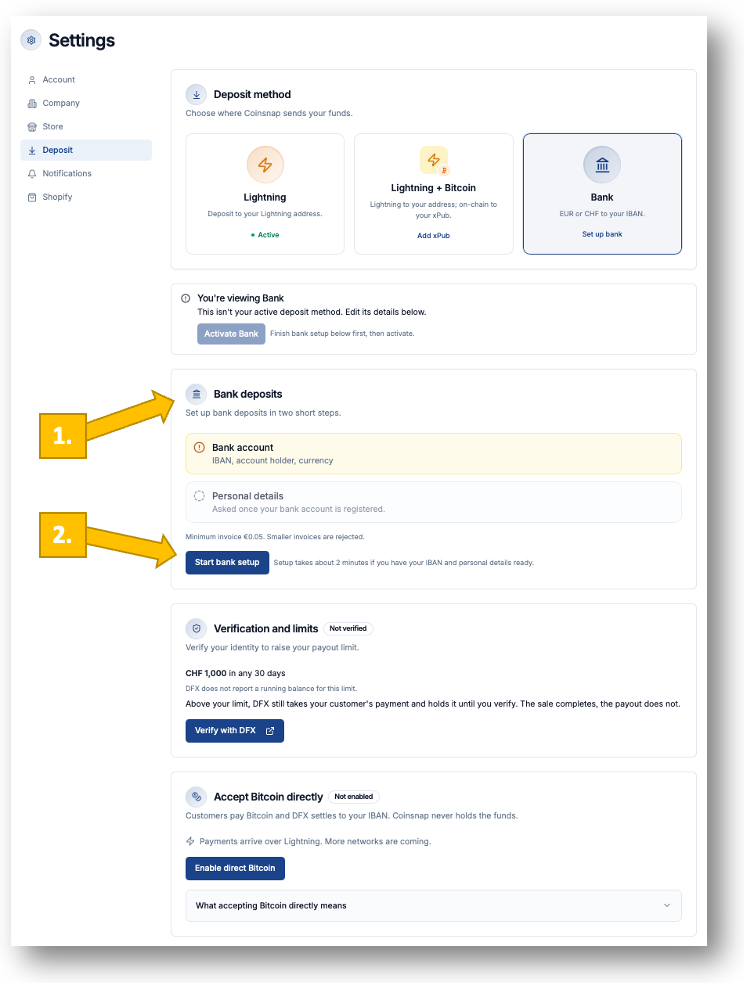
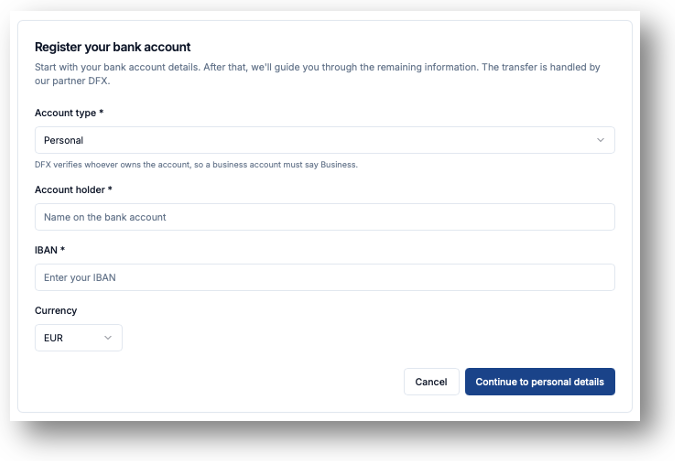
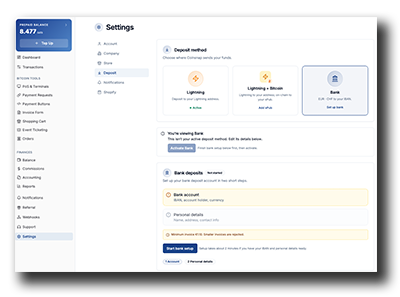
The third option is Bank. This is for merchants who want to convert their Bitcoin sales into fiat and receive EUR or CHF directly to their IBAN. Coinsnap works with external off-ramp partners such as DFX, Bringin and Wave for this purpose. Instead of keeping the received Bitcoin, the off-ramp converts the payment and settles the corresponding fiat amount to your bank account according to the conditions of the selected service.

Coinsnap POS Dashboard Bank deposit settings for settling Bitcoin payments to a EUR or CHF bank account.

Whichever route you choose, you configure it under Settings → Deposit. Select the deposit method you want to use, enter the required wallet, xPub or bank information, and activate it. The currently active deposit method is clearly marked in the Dashboard, and you can return here whenever you need to change how your Coinsnap payments are settled.

Where does Coinsnap send my Bitcoin payments?
You decide where your Coinsnap sales are sent under Settings → Deposit. You can receive payments via Lightning, accept both Lightning and Bitcoin on-chain, or use a supported off-ramp solution to convert Bitcoin payments and settle them to your bank account in EUR or CHF.

From Bitcoin Sale to Business Record: Your Complete Workflow – in your Coinsnap POS Dashboard

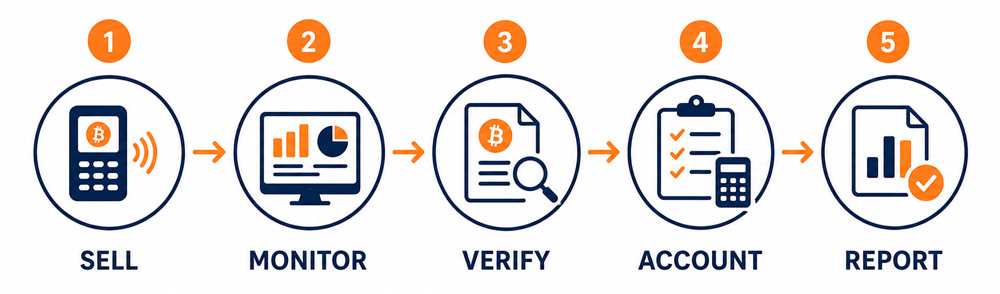
Once your POS and terminals are running, the Coinsnap POS Wallet and Dashboard form one continuous business process: Your Coinsnap terminal(s) takes care of the payment at the counter. The Coinsnap POS Dashboard gives you the cockpit you need to manage the business behind it.

Coinsnap POS workflow from Bitcoin sale to business reporting: Sell, Monitor, Verify, Account, and Report.

SELL: Accept the customer’s Bitcoin payment with your Coinsnap terminal.

MONITOR: Use the Dashboard to see sales, settlements, costs and performance.

VERIFY: Use Transactions whenever you need the details of an individual Bitcoin payment.

ACCOUNT: Use the accounting data generated by your Coinsnap business for bookkeeping and financial administration.

REPORT: Create the records your business, accountant or tax adviser needs for the relevant reporting period.

Conclusion: A Bitcoin Wallet Built for Business

The Coinsnap Wallet starts as something deliberately simple: a modern Bitcoin wallet that lets you receive and send Bitcoin without making everyday payments unnecessarily complicated.

But for merchants, that is only the beginning.

Activate the merchant features and the same wallet becomes a complete Bitcoin POS environment built around the way a business actually works. You can create POS locations and terminals, build product catalogues, accept Bitcoin at the counter, and keep track of the orders those sales generate. Your Dashboard then gives you the business side of every payment: sales performance, transactions, orders, settlements, fees, accounting data and reports.

And you decide what happens to the money.

Receive your sales directly to your Lightning wallet. Add Bitcoin on-chain settlement to a wallet you control through your xPub. Or use the bank settlement option when your business needs EUR or CHF instead of Bitcoin.

At the same time, Coinsnap remains strictly non-custodial. Customer payments are not collected in a Coinsnap merchant account waiting for you to withdraw them. They go directly to the destination you have configured. Even Coinsnap’s own fees are handled separately through the prepaid balance precisely so that Coinsnap does not have to take its fee out of money it holds on your behalf.

That combination is what makes the Coinsnap POS Wallet different.

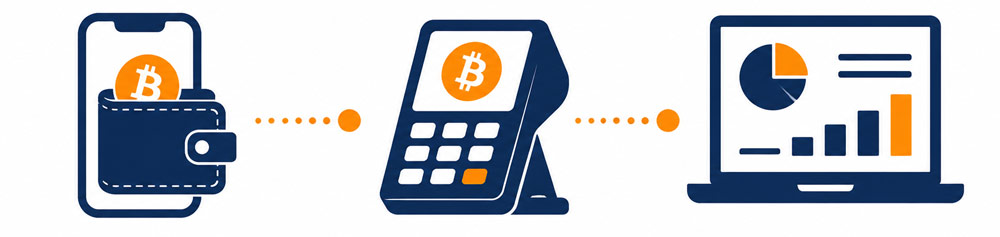
A wallet in your pocket. A Bitcoin terminal at your counter. A business cockpit in your browser.

Coinsnap POS Wallet, Bitcoin payment terminal, and POS Dashboard illustrating the complete merchant payment and business workflow.

The interface remains simple enough to take a Bitcoin payment in seconds, while behind it sits the infrastructure a serious merchant needs to turn those payments into an actual business process – from selling and monitoring to verification, fulfilment, accounting and reporting.

Coinsnap was not designed by taking a conventional payment processor and adding a Bitcoin button. It was designed around Bitcoin and around the merchant. The result is a POS Wallet in which payment, self-controlled settlement and business administration work together as one system – without forcing the merchant to become a Bitcoin technician just to accept Bitcoin.

That is ultimately what this three-part Coinsnap POS Wallet Guide has been about:

Install your wallet. Set up your business. Start selling. And let Coinsnap take care of the business infrastructure behind your Bitcoin payments.

FAQ: Using the Coinsnap POS Dashboard


The Complete Coinsnap Bitcoin Wallet Guide

Everything you need to get started with the Coinsnap Bitcoin Wallet, Bitcoin POS, and the business management tools behind it is covered in our four-part Coinsnap Bitcoin Wallet Guide.

From installing your wallet and setting up your first POS and terminals to managing sales, transactions, orders, fees, accounting, and reporting, we have broken the complete process down into four practical step-by-step guides:

  1. Coinsnap Bitcoin Wallet Setup: Install and Set Up Your Wallet — Install your Coinsnap Wallet, create your personal and business Lightning addresses, and get ready to receive Bitcoin.
  2. How to Send and Receive Bitcoin with the Coinsnap Wallet — Pay for something with Bitcoin, or create a payment request for someone to pay you.
  3. Coinsnap Bitcoin POS Setup: How to Set Up Your POS, Terminals and Products — Create your POS, connect your terminals, and configure your product catalogue.
  4. Coinsnap POS Dashboard: The Cockpit of Your Bitcoin Business — Monitor your Bitcoin business, manage transactions and orders, choose how you receive your funds, and prepare the records you need for accounting and reporting.

From your first wallet setup to your first Bitcoin sale – and from that sale to your accounting records – these four guides give you everything you need to run your Bitcoin POS business with Coinsnap.

Coinsnap Bitcoin POS Setup: How to Create Your Point of Sale, Add Products and Configure Terminals

Introduction

Coinsnap Bitcoin POS Setup is the second step in getting your business ready to accept Bitcoin and Lightning payments. After installing and configuring your Coinsnap Wallet, it’s time to create the Point of Sale (POS) your staff will use to sell products and process customer payments.

In this guide, we’ll walk through the three building blocks that make up every Coinsnap merchant setup:

  • Creating your Point of Sale (POS)
  • Adding one or more payment terminals
  • Building your product catalogue
App or dashboard?
You can set up and manage your POS, terminals and product catalogue either in the Coinsnap app or in the dashboard of your Coinsnap account. Both give you access to the same essential setup options. However, especially when creating product categories, adding products and configuring your POS for the first time, working on a computer with the larger screen of the dashboard is much more convenient than doing it on a smartphone. That’s why this guide shows you how to complete your Coinsnap Bitcoin POS Setup in the dashboard. Don’t have a Coinsnap account yet? You’ll need one to make the most of your Coinsnap POS and access all its merchant features. See how to register and open your Coinsnap account in just a minute.

By the end of this tutorial, you’ll have a fully configured Bitcoin POS that is ready to accept both Bitcoin and Lightning payments from your customers.

Whether you’re running a café, restaurant, retail store, market stall or service business, the setup process only takes a few minutes and requires no technical expertise.

This article is the second part of our Coinsnap Merchant Setup series. In the previous guide, you learned how to install and configure your Coinsnap Wallet. In this guide, you’ll set up your business for accepting payments. Finally, in the third and last article of this series, Coinsnap POS Dashboard: The Cockpit of Your Bitcoin Business, we’ll show you how to monitor transactions, manage products and terminals, review sales reports, and make the most of your Coinsnap merchant account.

At a Glance

What is Coinsnap Bitcoin POS Setup?

Coinsnap Bitcoin POS Setup is the process of configuring your business to accept Bitcoin and Lightning payments with Coinsnap. It includes creating a Point of Sale (POS), adding one or more payment terminals, and building a product catalogue. Once these three steps are complete, your business is ready to accept secure Bitcoin payments in-store.

Quick Facts

Feature Description
Setup Time 5–10 minutes
Technical Skills None required
Payment Methods Bitcoin & Lightning
Devices Smartphones and tablets
Multiple Terminals ✔ Yes
Product Catalogue ✔ Included
Best For Retail, cafés, restaurants, market stalls, service businesses

Key Takeaway

A Coinsnap Bitcoin POS consists of three simple components: your Point of Sale, one or more payment terminals, and your product catalogue. Once configured, you can immediately start accepting Bitcoin and Lightning payments.

Understand Your Coinsnap Bitcoin POS

Before creating your first Point of Sale (POS), it’s helpful to understand how the Coinsnap merchant system is structured.

Your Coinsnap Bitcoin POS is the central hub of your Bitcoin business. It stores your product catalogue, business settings and all payment data generated through the terminals connected to that POS. Every Bitcoin and Lightning payment accepted by your staff is automatically assigned to the appropriate terminal and consolidated within your POS.

More importantly, your POS provides the foundation for the powerful Coinsnap Dashboard, where you can monitor sales, review transactions, analyse payment activity, export accounting data and access the information you need to run your business efficiently. Managing your bookkeeping and tax reporting for Bitcoin payments becomes just as straightforward as managing any other payment method.

Think of your Bitcoin Point of Sale as the operational centre of your Bitcoin related business. It organises everything your staff needs to accept Bitcoin payments, while giving you complete visibility into your business performance.

Unlike many traditional POS systems, most businesses only need one Coinsnap Point of Sale. Whether you operate a café, restaurant, retail store, market stall or service business, a single POS can support multiple payment terminals simultaneously. You decide how many terminals you need—one for each checkout counter, one for every employee, one for mobile staff, or any other setup that best matches your daily operations.

Of course, your Coinsnap Wallet can also manage multiple Point of Sale systems. This is ideal if your business operates several stores, restaurants, cafés or market locations, or if you simply want to keep different business units separate. Each POS maintains its own terminals, product catalogue and payment data while remaining conveniently managed from the same Coinsnap Wallet and Dashboard.

Now that you understand how a Coinsnap Point of Sale is structured, let’s create your first POS. Once it’s set up, we’ll show you how to add and configure payment terminals in the next step.

Create Your First POS in the Coinsnap Dashboard

1: Start the POS Setup in Your Coinsnap Dashboard

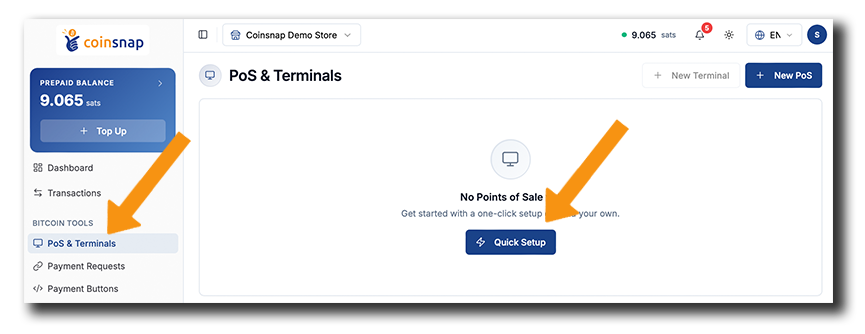
Log in to your Coinsnap Account Dashboard and select PoS & Terminals from the navigation menu on the left. If you haven’t created a Point of Sale yet, the page will show that no POS is currently available.

Click Quick Setup to start creating and configuring your first Point of Sale. Alternatively, you can click + New PoS in the top-right corner.

Coinsnap Bitcoin POS setup in the Dashboard: Open PoS & Terminals and click Quick Setup to create your first Point of Sale.

2: Open Your Point of Sale Settings

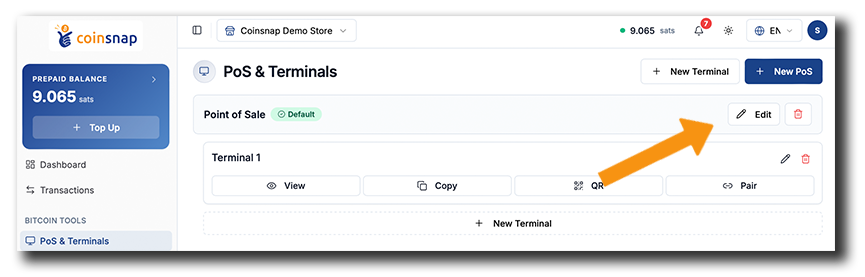
Once the setup is complete, your new Point of Sale appears in the PoS & Terminals overview together with its first terminal.

Click Edit in the Point of Sale field to open the POS configuration. There, you will customize your Point of Sale, including its name, currency, payment settings, product categories, and product catalogue.

Coinsnap Bitcoin POS setup in the Dashboard: Click Edit on your Point of Sale to open and customize the POS settings.

3: Configure Your Point of Sale

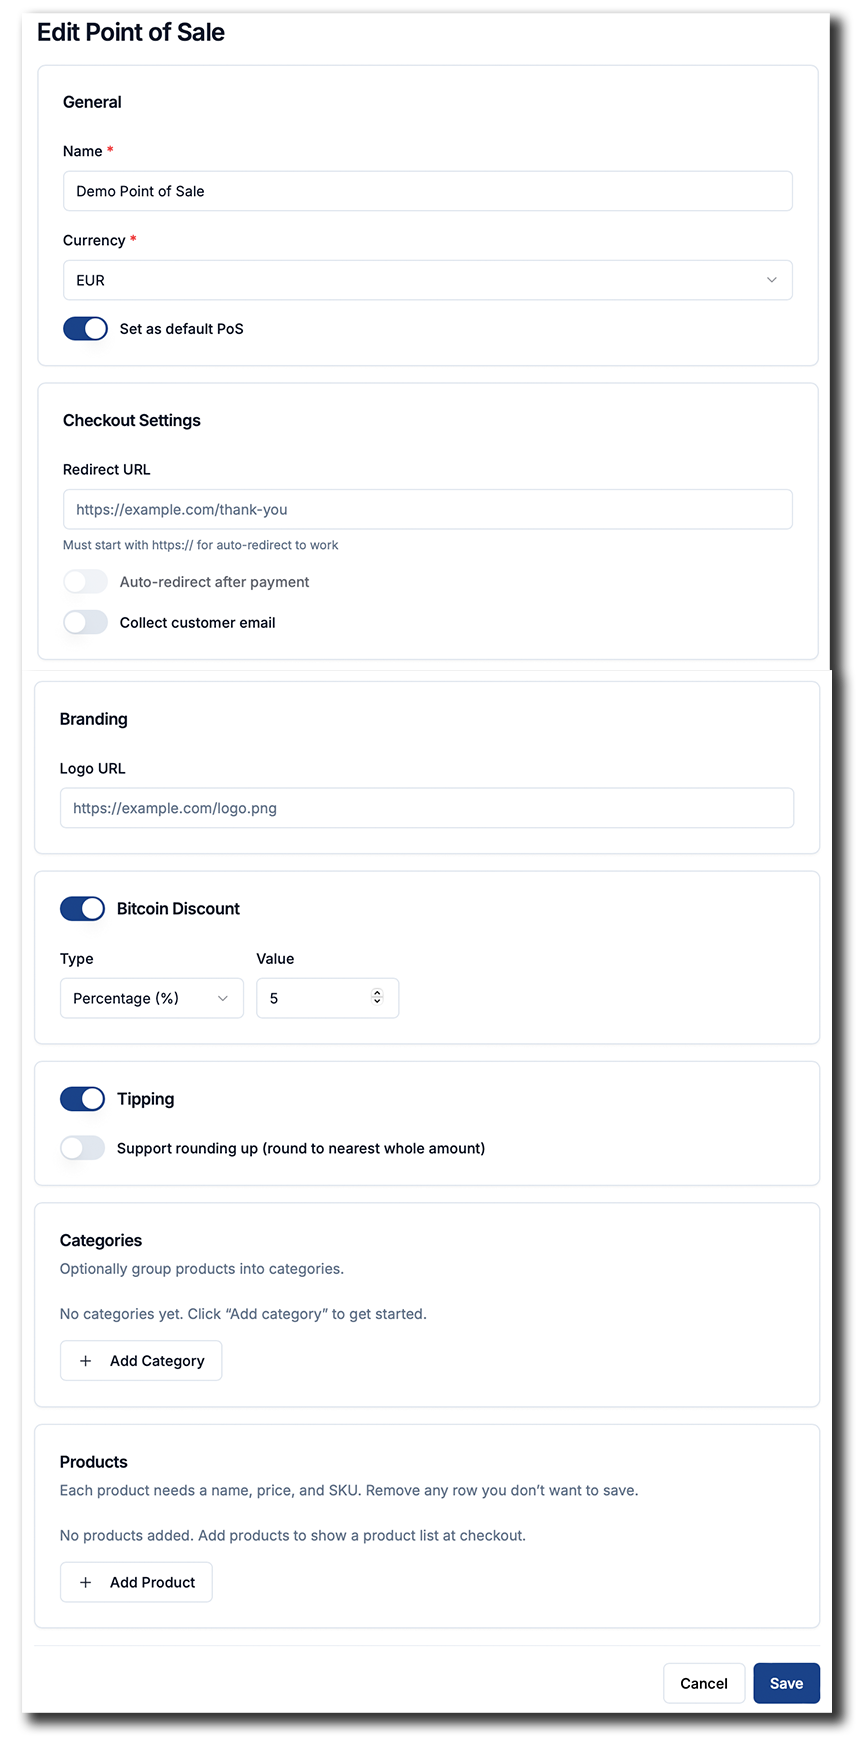
The Edit Point of Sale page contains all the settings you need to customize your POS for your business.

Coinsnap Bitcoin POS setup: Configure the POS name, currency, checkout options, branding, Bitcoin discount, tipping, product categories and products in the Dashboard.

Start by entering a recognizable name, selecting your preferred currency, and deciding whether this should be your default POS. You can then configure optional checkout settings, such as a redirect URL, automatic redirection after payment, and collecting the customer’s email address.

You can also add your logo, offer customers a Bitcoin discount, and enable tipping, including the option to round up the payment amount.

Further down the page, you can create product categories and add individual products to build your product catalogue. (You’ll find detailed instructions on how to set up your product catalogue below.)

Once you’ve configured your POS, click Save to apply your settings.

Your First Point of Sale Is Ready

Congratulations! Your first Point of Sale — Demo Point of Sale — has now been created and configured successfully. It is automatically connected to your Coinsnap account and is also available in the Business section of your Coinsnap Wallet app.

Coinsnap Bitcoin POS setup completed with the new Demo Point of Sale and Terminal 1 displayed in the Dashboard.

However, a POS alone cannot accept payments. To start selling products and accepting Bitcoin and Lightning payments, you need to connect at least one payment terminal to your POS.

In the next section, we’ll show you how to create and configure your first Coinsnap Terminal, so you can start accepting customer payments in your business.

Create and Configure Your First Terminal

Your Point of Sale is now ready, but it can’t accept customer payments until you connect at least one payment terminal.

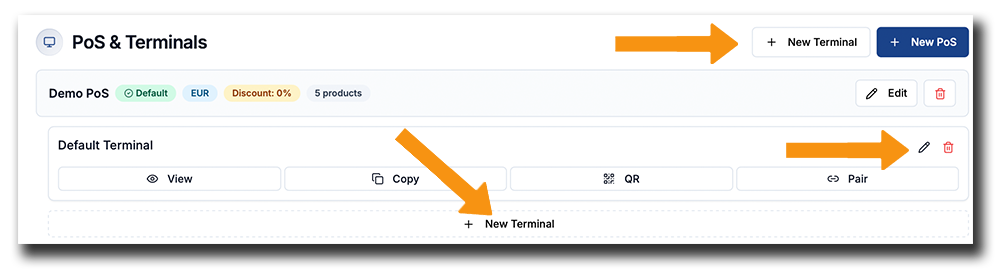
To add another terminal to your POS, click + New Terminal. You can use either the button at the top right of the PoS & Terminals page or the + New Terminal button directly below your existing terminal. Then enter a name for the new terminal and save it.

To change the name or settings of the default terminal click the pencil icon on the right of the respective terminal.

Coinsnap Bitcoin POS dashboard showing how to create a new terminal or edit an existing terminal.

How to configure your terminal

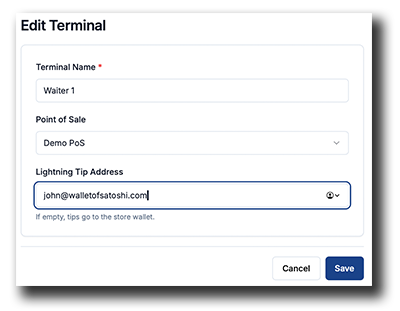
In the next screen, you can configure your terminal and assign it to the appropriate Point of Sale.

Coinsnap Bitcoin POS Edit Terminal screen for setting the terminal name, Point of Sale and Lightning Tip Address.

Enter a descriptive Terminal Name, such as Waiter 1, and select the Point of Sale the terminal should belong to.

You can also enter a Lightning Tip Address for this specific terminal. Tips received through the terminal will then be sent directly to this Lightning address. This is useful, for example, if each waiter should receive their own tips. If you leave the field empty, tips will be sent to the store wallet instead.

Click Save to finish configuring your terminal.

Your terminal is ready

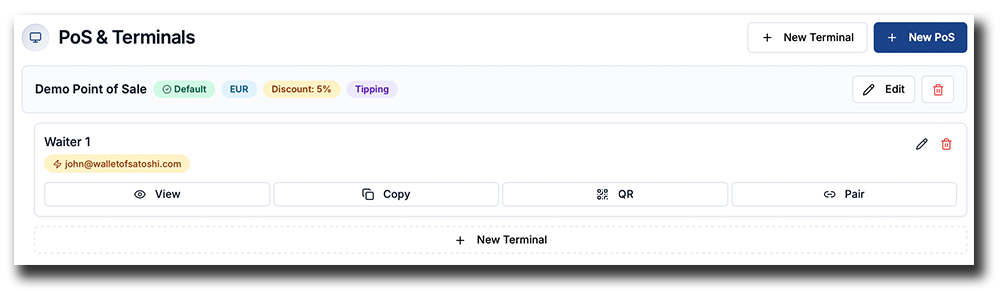
Your newly configured terminal now appears under its assigned Point of Sale.

Coinsnap Bitcoin POS dashboard showing the configured Waiter 1 terminal with its Lightning Tip Address and terminal options.

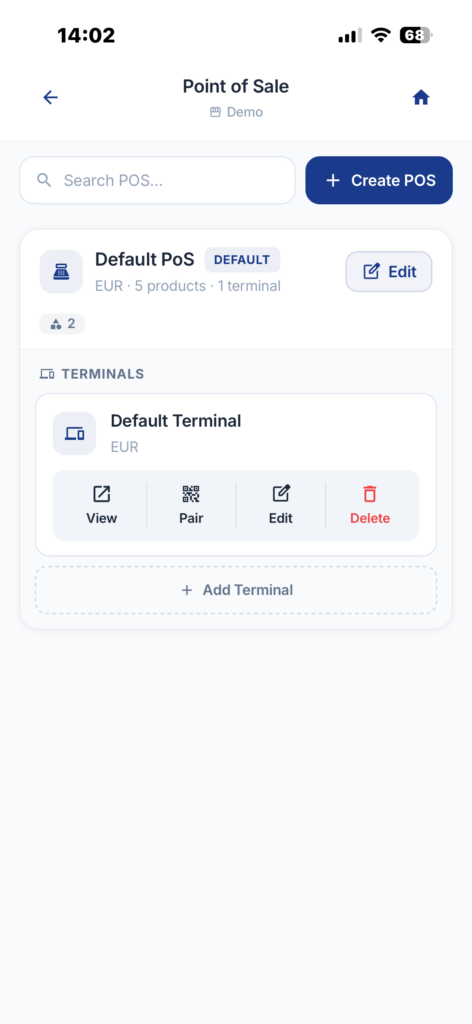
From here, you can view, copy, display the QR code or pair the terminal with a device. You can also edit the terminal at any time using the pencil icon or add additional terminals with + New Terminal.

At the end of this guide, we’ll show you how to assign individual, personal terminals to your employees.

Find and Use a Terminal in the App

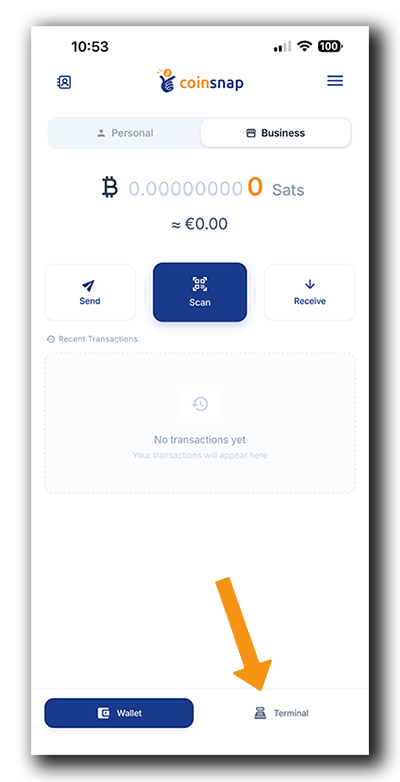
Your Coinsnap Terminal is always just one tap away. From the Business section of your Coinsnap Wallet, tap Terminal in the bottom navigation bar to open your payment terminal.

Coinsnap Terminal: Open the Terminal section from the Business wallet to start accepting Bitcoin payments.

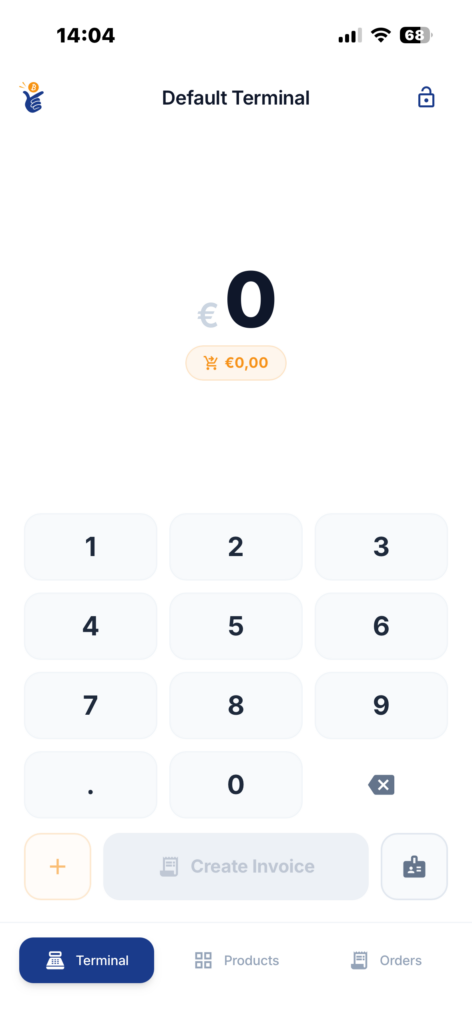
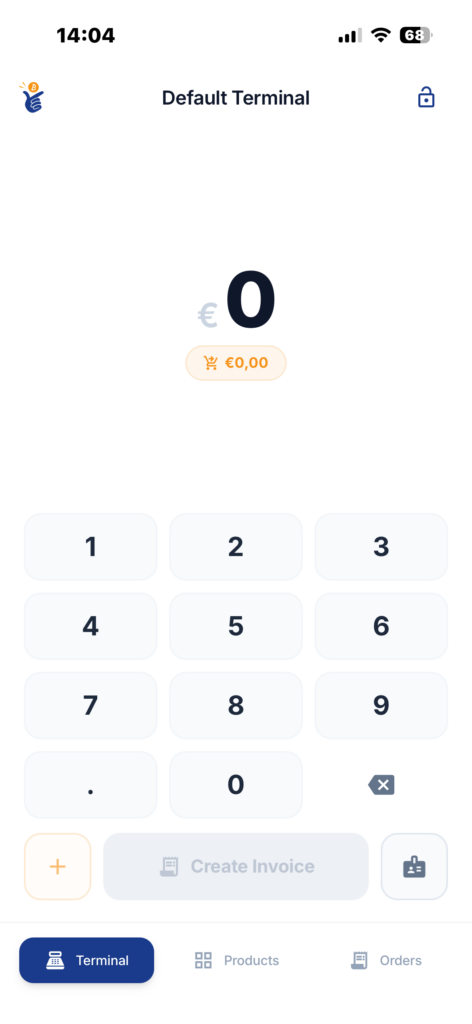
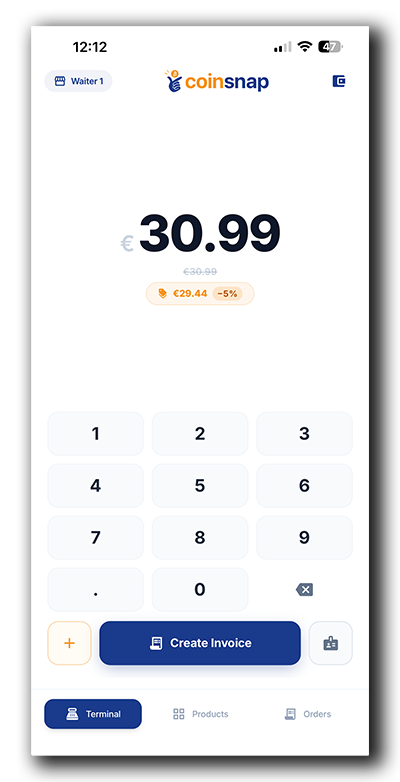
The terminal is where your staff accepts Bitcoin and Lightning payments from customers. Depending on how you’ve configured your Point of Sale, you can either enter the payment amount manually using the built-in keypad or select products directly from your product catalogue. Once the sale is complete, tap Create Invoice to generate a Bitcoin or Lightning payment request for your customer.

Coinsnap Terminal ready to accept Bitcoin and Lightning payments using the keypad or product catalogue.

If your business operates multiple terminals, each employee simply opens the Terminal section on their assigned device. Every terminal automatically uses the products, pricing and settings inherited from its linked Point of Sale, ensuring a consistent checkout experience across your entire business.

In the next section, we’ll show you how to create a product catalogue, organize your products into categories, and make your terminal even faster and easier to use.

Create Your Product Catalogue

With your Point of Sale and payment terminal now configured, the final step is creating your product catalogue. By organizing your products into categories and adding them to your POS, you can complete customer purchases with just a few taps instead of entering payment amounts manually, making checkout faster, easier and less prone to errors.

Two Ways to Create Your Product Catalogue

Coinsnap gives you two convenient ways to create and manage your product catalogue.

The recommended method is to use the Coinsnap Dashboard in your web browser. Creating products on a desktop or laptop is faster and more comfortable, especially if you’re adding many products, categories or prices. The larger screen and full keyboard make it easy to build and maintain even extensive product catalogues.

Alternatively, you can create and edit your product catalogue directly in the Coinsnap Wallet app on your smartphone or tablet. This is particularly useful when you’re on the go or only need to add or update a few products.

Both methods are fully synchronized. Any changes you make in the Coinsnap Dashboard are immediately available in your mobile app, and vice versa.

We’ll now show you how to create product categories and products in your Coinsnap dashboard.

Create Your Product Catalogue in the Coinsnap Dashboard

The Coinsnap Dashboard is the fastest and most convenient way to build your product catalogue. Using a desktop or laptop computer, you can quickly create product categories, add products, set prices, and keep your catalogue organized. Any changes you make in the dashboard are automatically synchronized with your Coinsnap Wallet, making them immediately available on all payment terminals connected to your Point of Sale.

1: Open the PoS & Terminals Section

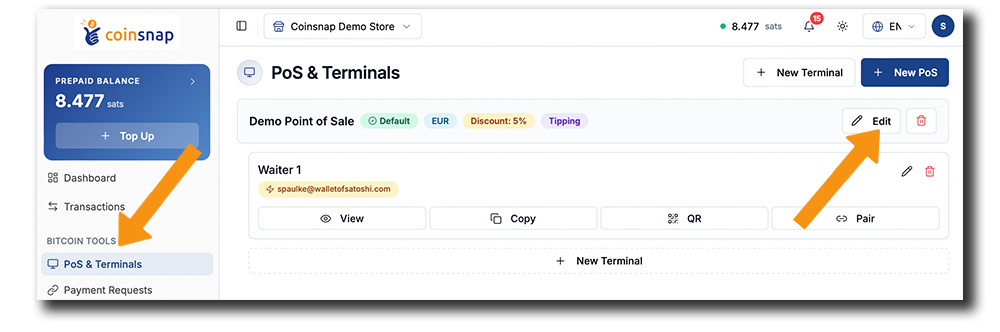
After signing in to your Coinsnap Dashboard, open PoS & Terminals from the navigation menu on the left-hand side. This section gives you a complete overview of all your Point of Sale systems and payment terminals.

Coinsnap Dashboard: Open the PoS & Terminals section and click "Edit" on your Point of Sale to configure your product catalogue.

Then click the Edit button in the Point of Sale panel to open its configuration page, where you will create and manage your product catalogue.

2: Create Your First Product Category

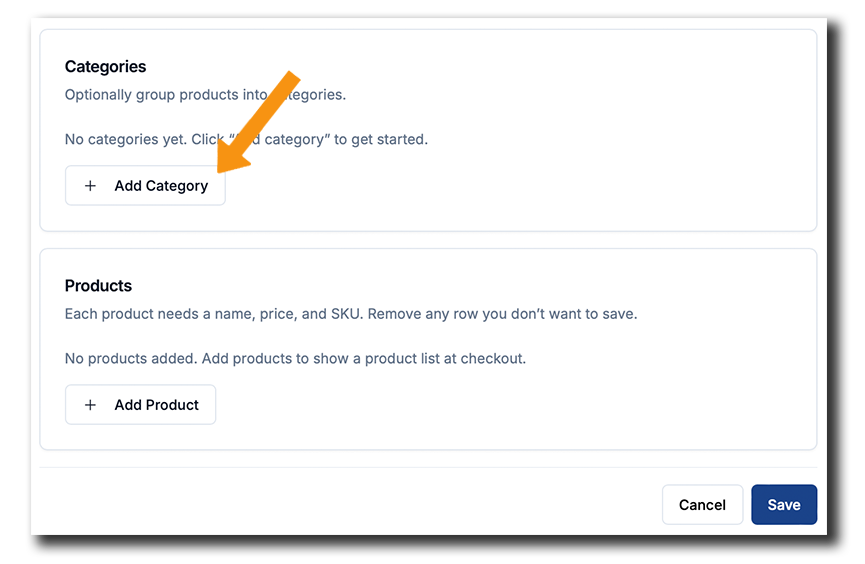
Scroll down to the Categories section of the Point of Sale configuration page.

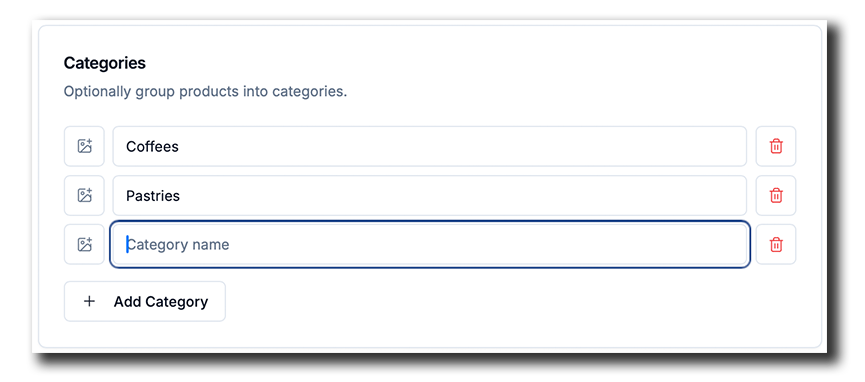
To create your first product category, click + Add Category.

Coinsnap Dashboard: Scroll to the Categories section and click "Add Category" to organize your product catalogue.

Now simply enter the names of the product categories you want to use in your Point of Sale.

Coinsnap Dashboard: Create product categories such as Coffees and Pastries to organize your product catalogue.

Categories help organize your products and make them easier to find during checkout. For example, a café might create categories such as Coffee, Tea, Soft Drinks, and Pastries, while a retail store could use categories like Clothing, Accessories, or Electronics.

4: Add Your Products

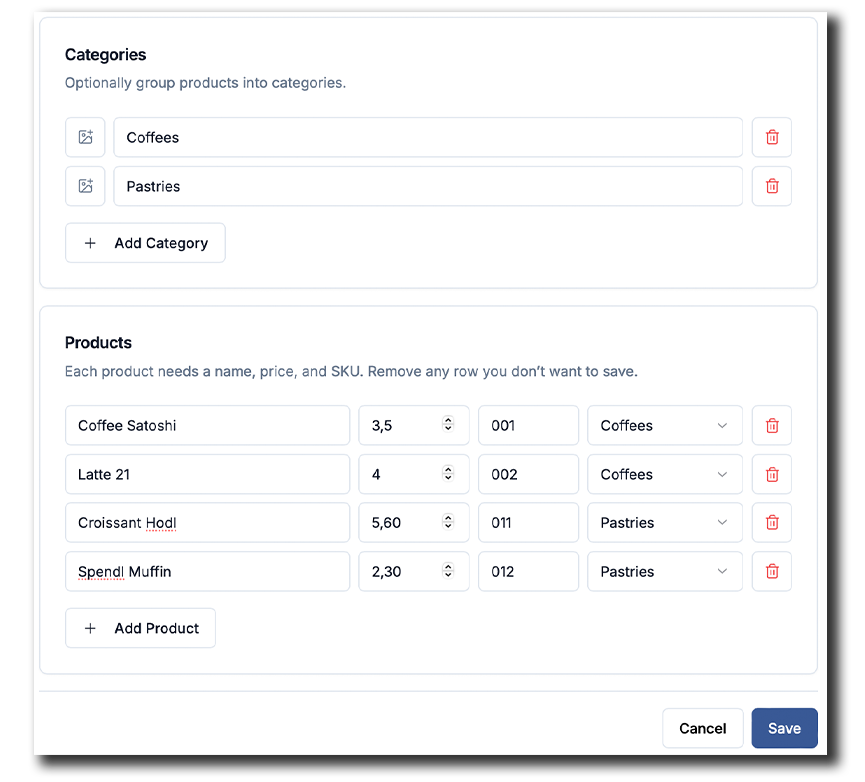
Now, for each product, enter a product name, price, and a unique SKU (Stock Keeping Unit). Then assign the product to one of the categories you created.

Repeat this process for all the products you want to sell. Once you’ve finished, click Save.

Coinsnap Dashboard: Add products with names, prices, SKUs and categories to build your Bitcoin POS product catalogue.

Your complete product catalogue will be synchronized automatically with all terminals connected to this Point of Sale, allowing your staff to select products with a single tap during checkout.

5: Choose a Suitable Product Icon

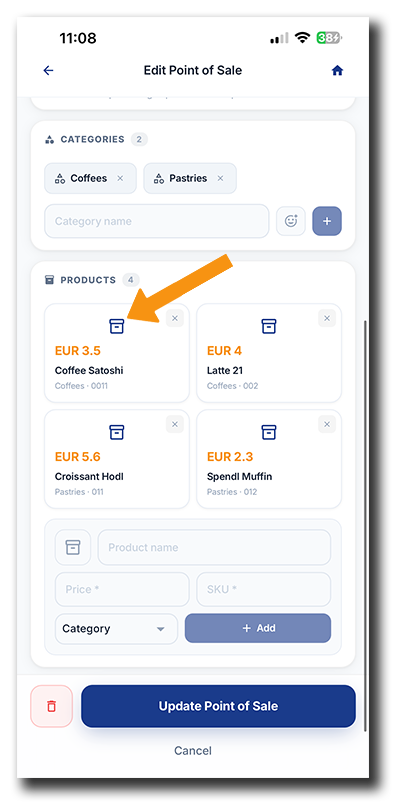
This step needs to be completed in the Coinsnap Wallet app. Go to Settings → Merchant Account → Manage PoS → Edit PoS. Then scroll down to the Products section and tap the icon above the product name you want to change.

Coinsnap Wallet app showing where to tap a product icon to change it in the Bitcoin POS product catalogue.


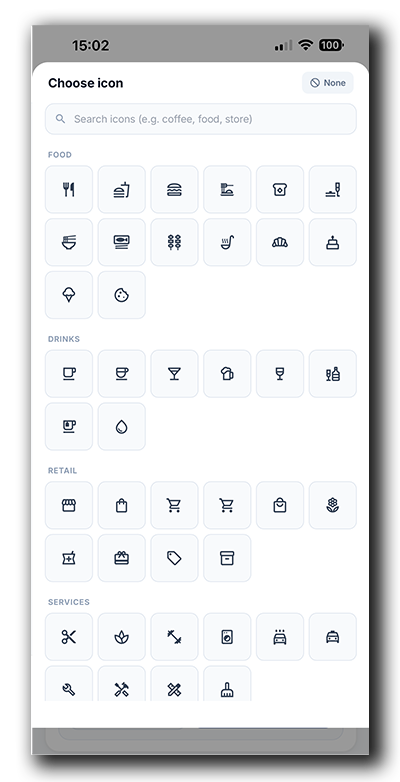
You will see an icon selector offering a range of icons organized into categories such as Food, Drinks, Retail, and Services. Simply tap the icon that best represents your product. You can also use the search field to quickly find a suitable icon.

Coinsnap POS product icon selector with icons for food, drinks, retail products and services.

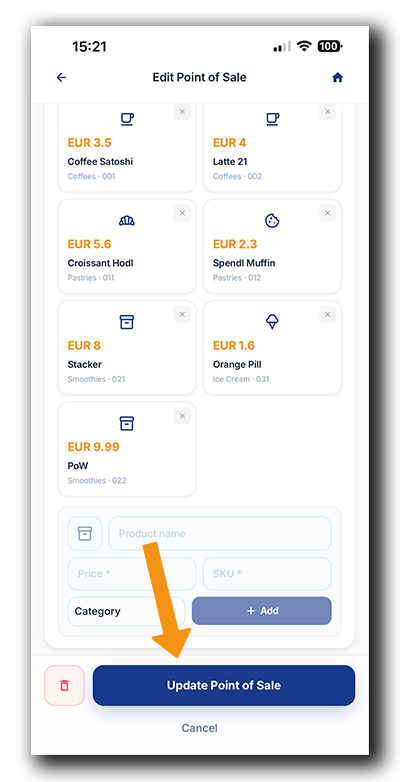
Once your categories and products are complete, tap Update Point of Sale to save your changes and make the updated catalogue available in your terminal.

Coinsnap Bitcoin POS app: Save newly created products and categories by tapping Update Point of Sale.

You’re now ready to use your terminal and start selling your products for Bitcoin!

3: See Your Product Icons in the Terminal

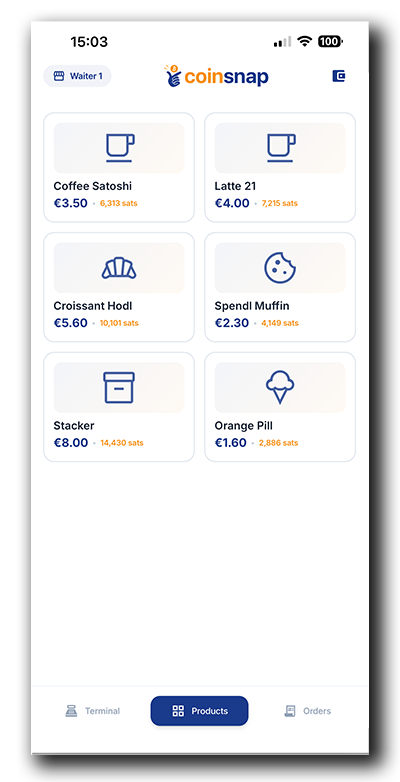
Once you’ve assigned your icons and saved your Point of Sale settings, open Terminal → Products. Your products are now displayed with their individual icons, names, prices, and current Bitcoin values.

The visual product cards make it much easier to identify and select items quickly during checkout—especially when you’re working with a larger product catalogue.

Coinsnap Bitcoin POS terminal showing a product catalogue with individual product icons, names, prices and Bitcoin values.

Start Selling with Your New Product Catalogue

Your product catalogue is now complete and ready to use.

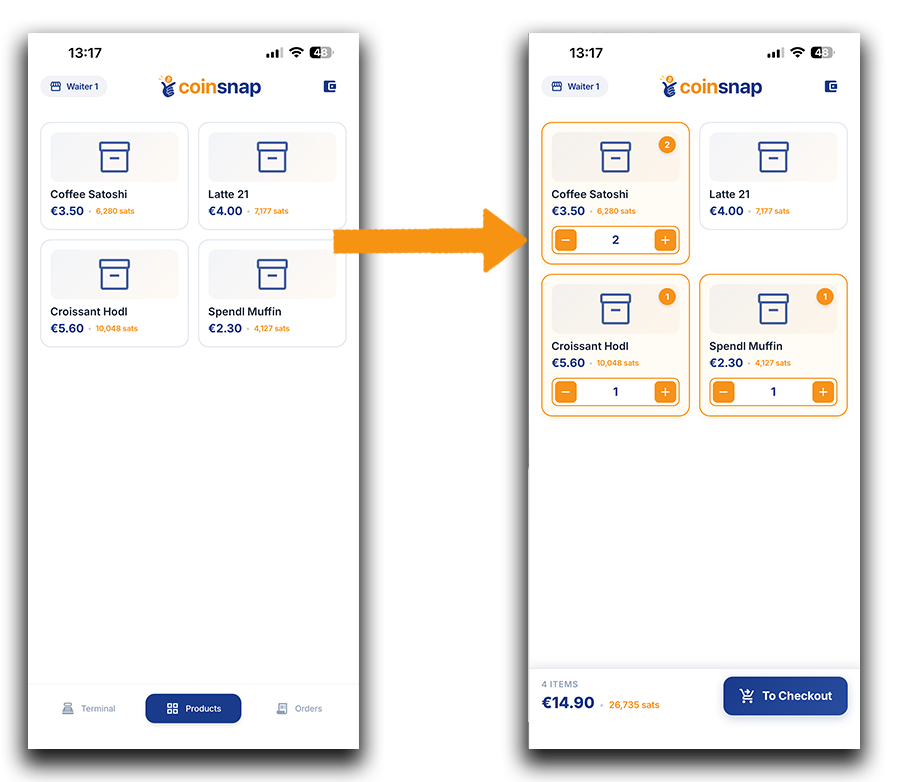
Open the Business section of your Coinsnap Wallet and tap Terminal in the bottom navigation bar. The keypad will open. Tap Products at the bottom of the screen to access your product catalogue.

You will now see your newly created product categories and products. Simply select the desired items with a single tap and generate a Bitcoin or Lightning payment request for your customer (just click To Checkout on the bottom right).

Coinsnap Bitcoin POS terminal displaying a synchronized product catalogue and a completed customer order ready for checkout.

Congratulations! Your Coinsnap Bitcoin Point of Sale is now fully configured and ready for business.

Assign a Personal Terminal to a Staff Member

Once you have created terminals for your staff members, you can pair each terminal with the staff member’s own smartphone. You can do this directly in the Coinsnap Wallet app, so your staff members do not have to come to the office. Pairing can be completed right at the workplace, wherever your staff actually use their terminals.

Step 1: Select the terminal you want to assign

In your Coinsnap Wallet app, go to Settings → Merchant Account → Manage PoS and open the Point of Sale containing the terminal you want to assign.

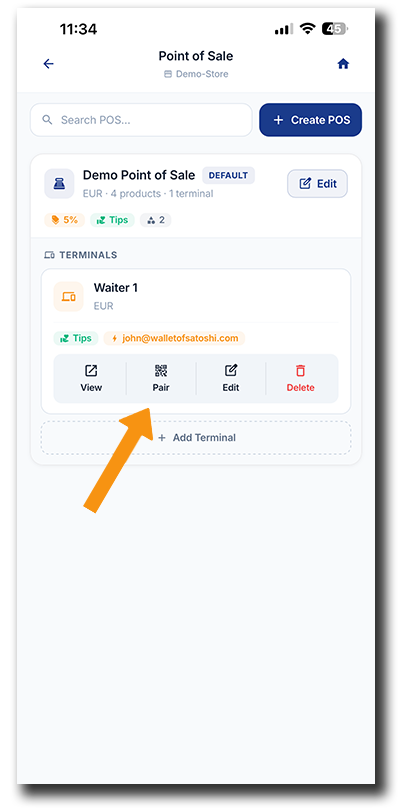
Under Terminals, find the staff member’s terminal and tap Pair.

Coinsnap Wallet app showing the Pair button for assigning the Waiter 1 Bitcoin POS terminal to a staff member.

Step 2: Pair the staff member’s device

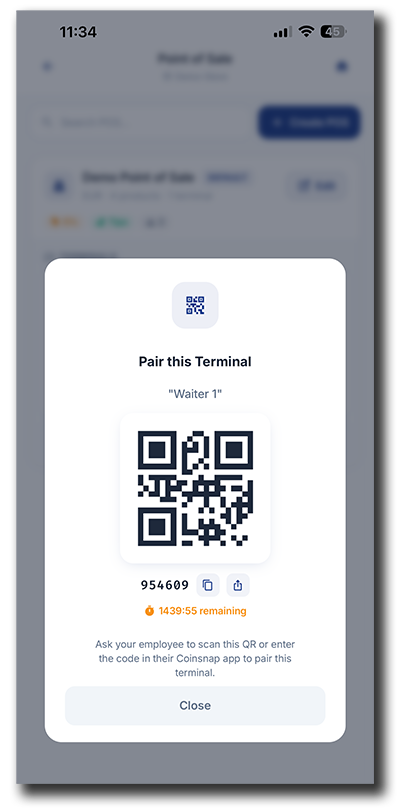
The app now displays a QR code and pairing code for the selected terminal.

Ask your staff member to scan the QR code with their smartphone camera. Alternatively, they can enter the displayed pairing code to connect their device to the terminal.

Coinsnap Wallet app displaying a QR code and pairing code for connecting the Waiter 1 POS terminal to a staff member’s smartphone.

The pairing code is temporary, so the staff member should complete the pairing while the code is still active. 

Step 3: Open the personal terminal on the staff member’s smartphone

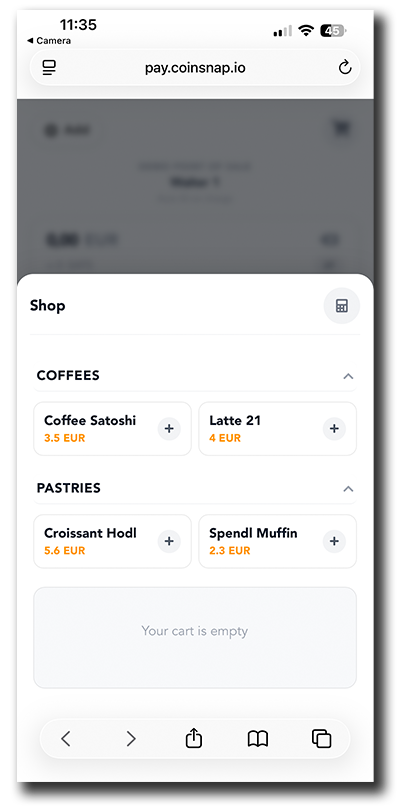
After scanning the QR code, the staff member’s personal Coinsnap POS terminal opens on their smartphone and is ready to use. 

The terminal is browser-based, so there is no additional app to install. We recommend that the staff member bookmarks the terminal page or adds it to their browser favorites so they can quickly return to their personal terminal whenever they need it.

The terminal displays the product catalogue you configured for the POS. The staff member can now select products, add them to the cart and generate Bitcoin or Lightning payment requests for customers.

Browser-based Coinsnap Bitcoin POS terminal on a staff member’s smartphone showing product categories, products and prices.

Once paired, each staff member can use their own terminal on their own device, while all payments and transactions remain associated with the corresponding Point of Sale in your Coinsnap merchant account. And if you entered the staff member’s personal Lightning address in the Tipping settings, they will even receive their tips directly in their personal Lightning wallet.


The Complete Coinsnap Bitcoin Wallet Guide

Everything you need to get started with the Coinsnap Bitcoin Wallet, Bitcoin POS, and the business management tools behind it is covered in our four-part Coinsnap Bitcoin Wallet Guide.

From installing your wallet and setting up your first POS and terminals to managing sales, transactions, orders, fees, accounting, and reporting, we have broken the complete process down into four practical step-by-step guides:

  1. Coinsnap Bitcoin Wallet Setup: Install and Set Up Your Wallet — Install your Coinsnap Wallet, create your personal and business Lightning addresses, and get ready to receive Bitcoin.
  2. How to Send and Receive Bitcoin with the Coinsnap Wallet — Pay for something with Bitcoin, or create a payment request for someone to pay you.
  3. Coinsnap Bitcoin POS Setup: How to Set Up Your POS, Terminals and Products — Create your POS, connect your terminals, and configure your product catalogue.
  4. Coinsnap POS Dashboard: The Cockpit of Your Bitcoin Business — Monitor your Bitcoin business, manage transactions and orders, choose how you receive your funds, and prepare the records you need for accounting and reporting.

From your first wallet setup to your first Bitcoin sale – and from that sale to your accounting records – these four guides give you everything you need to run your Bitcoin POS business with Coinsnap.

How to Download, Install and Set Up the Coinsnap Bitcoin Wallet in Minutes

Introduction

Getting started with the Coinsnap Bitcoin Wallet only takes a few minutes. Whether you’re using an iPhone or an Android smartphone, the setup process is straightforward and requires no technical knowledge.

In this guide, we’ll walk you through every step—from downloading the app to creating your wallet and securing it with an optional backup. Once you’ve completed these steps, your wallet will be ready to receive Bitcoin payments via both the Lightning Network and the Bitcoin blockchain.

This guide covers only the wallet installation and initial setup. Creating a Point of Sale, adding products, and configuring payment terminals are covered in this tutorial.

How do I set up the Coinsnap Bitcoin Wallet?

Setting up the Coinsnap Bitcoin Wallet takes only a minute. Download the app from the Apple App Store or Google Play, create your wallet, choose a Personal and Business Lightning Address, and optionally secure your wallet with a Recovery Phrase. No email, no Lightning node, no blockchain synchronization, or any technical configuration is required.

Coinsnap Wallet features at a glance

Setup time Less than 2 minutes
Difficulty Beginner
Platforms iPhone & Android
Bitcoin Yes
Lightning Yes
Personal Wallet Included
Business Wallet Included
Personal Lightning Address Included
Business Lightning Address Included
Email required No (unless using merchant features)
Recovery Phrase Optional but highly recommended
Lightning node required No
Merchant features Included

Before You Begin

QR code to download the Coinsnap POS Wallet app for Android and iOS devices.
Download the Coinsnap POS Wallet for Android and iOS via QR code.

Before installing the Coinsnap Wallet, make sure you have:

  • an iPhone or Android smartphone
  • an internet connection
  • access to your email address
  • about five minutes of time

No Bitcoin experience is required.

Step 1: Download the Coinsnap Wallet

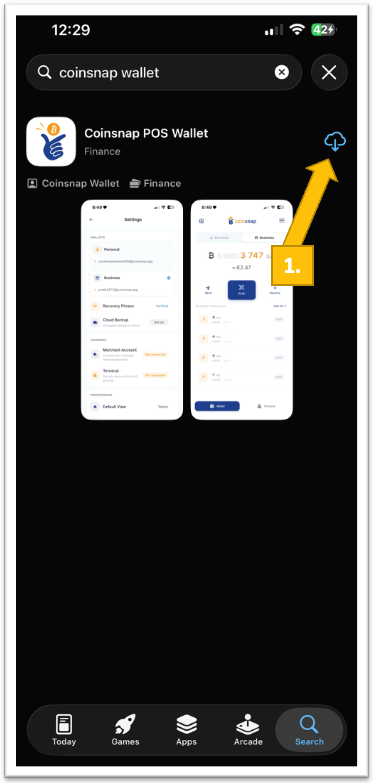
Download the Coinsnap Bitcoin Wallet from your device’s official app store. Simply scan the QR code above or search for “Coinsnap Bitcoin Wallet” in the Apple App Store or Google Play Store.

Coinsnap Bitcoin Wallet app listing in the Apple App Store with the download icon highlighted to show how to install the app on an iPhone.

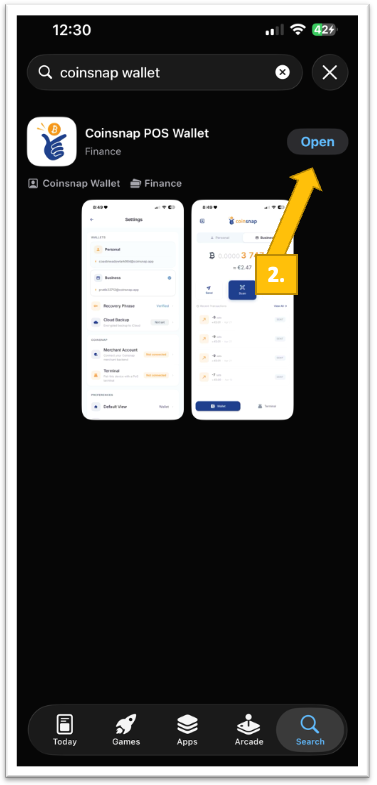
Tap install [1] and wait until the download has completed. Now launch the Coinsnap Bitcoin Wallet [2]:

Coinsnap Bitcoin Wallet app in the Apple App Store with the Open button highlighted, showing how to launch the app after installation.

Step 2: Create your wallet

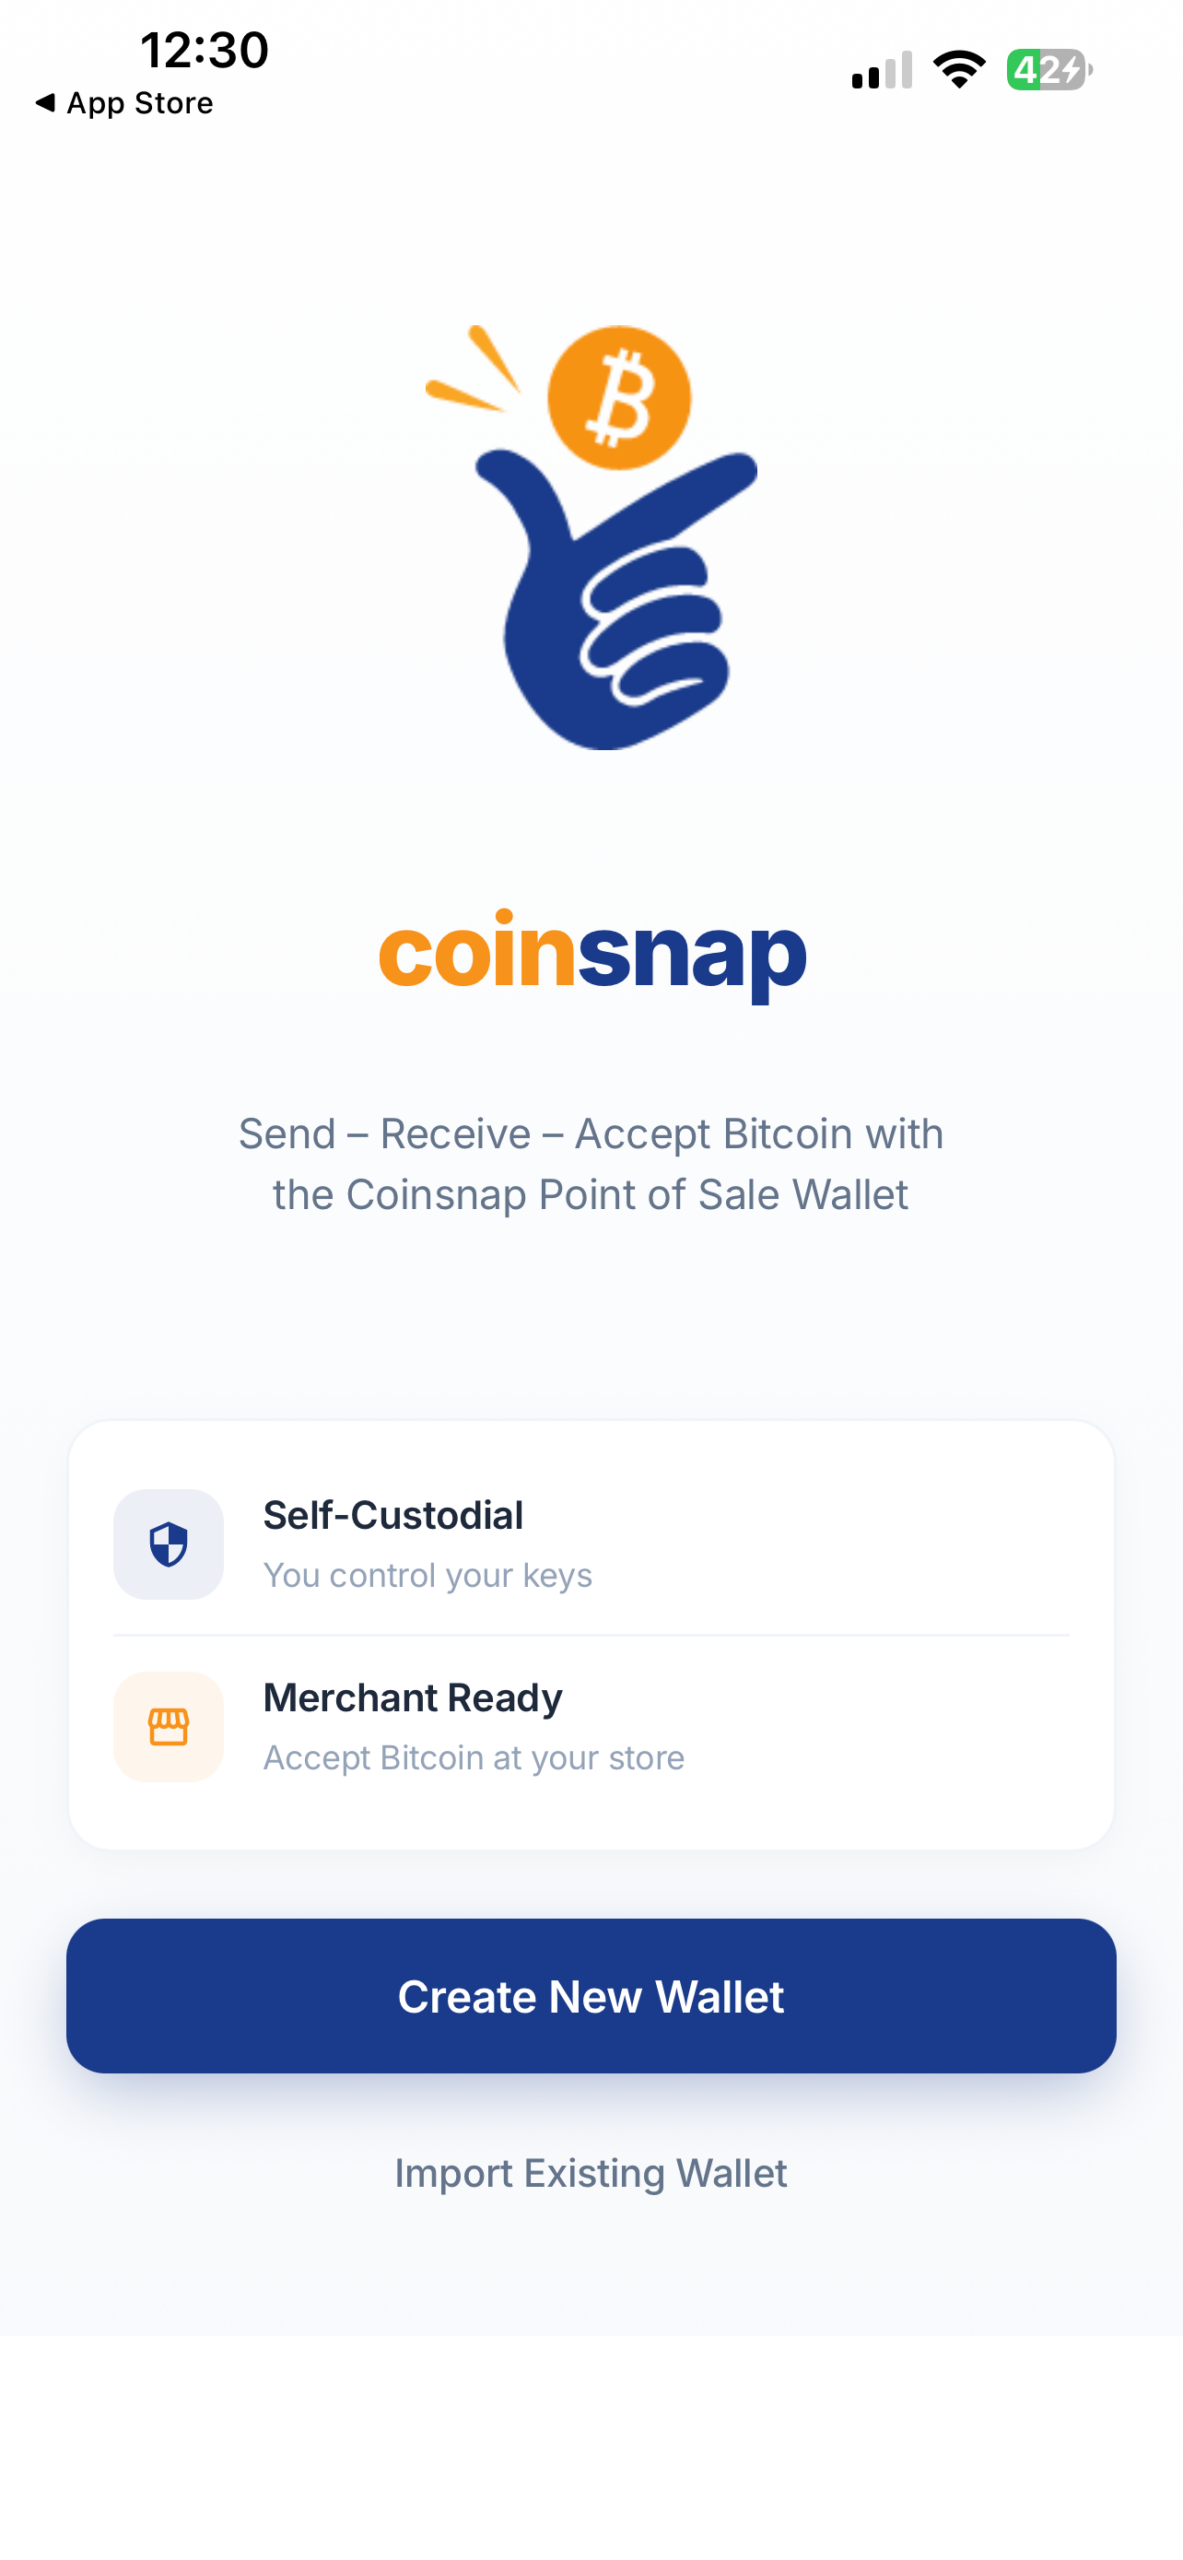
You’ll be welcomed by the start screen.

Coinsnap Bitcoin Wallet welcome screen with the Create New Wallet button, the first step in creating a new Bitcoin wallet.

Tap Create New Wallet.

Step 3: Choose Your Lightning Addresses

As part of the setup process, you’ll create two Lightning Addresses—one for your personal account and one for your business account.

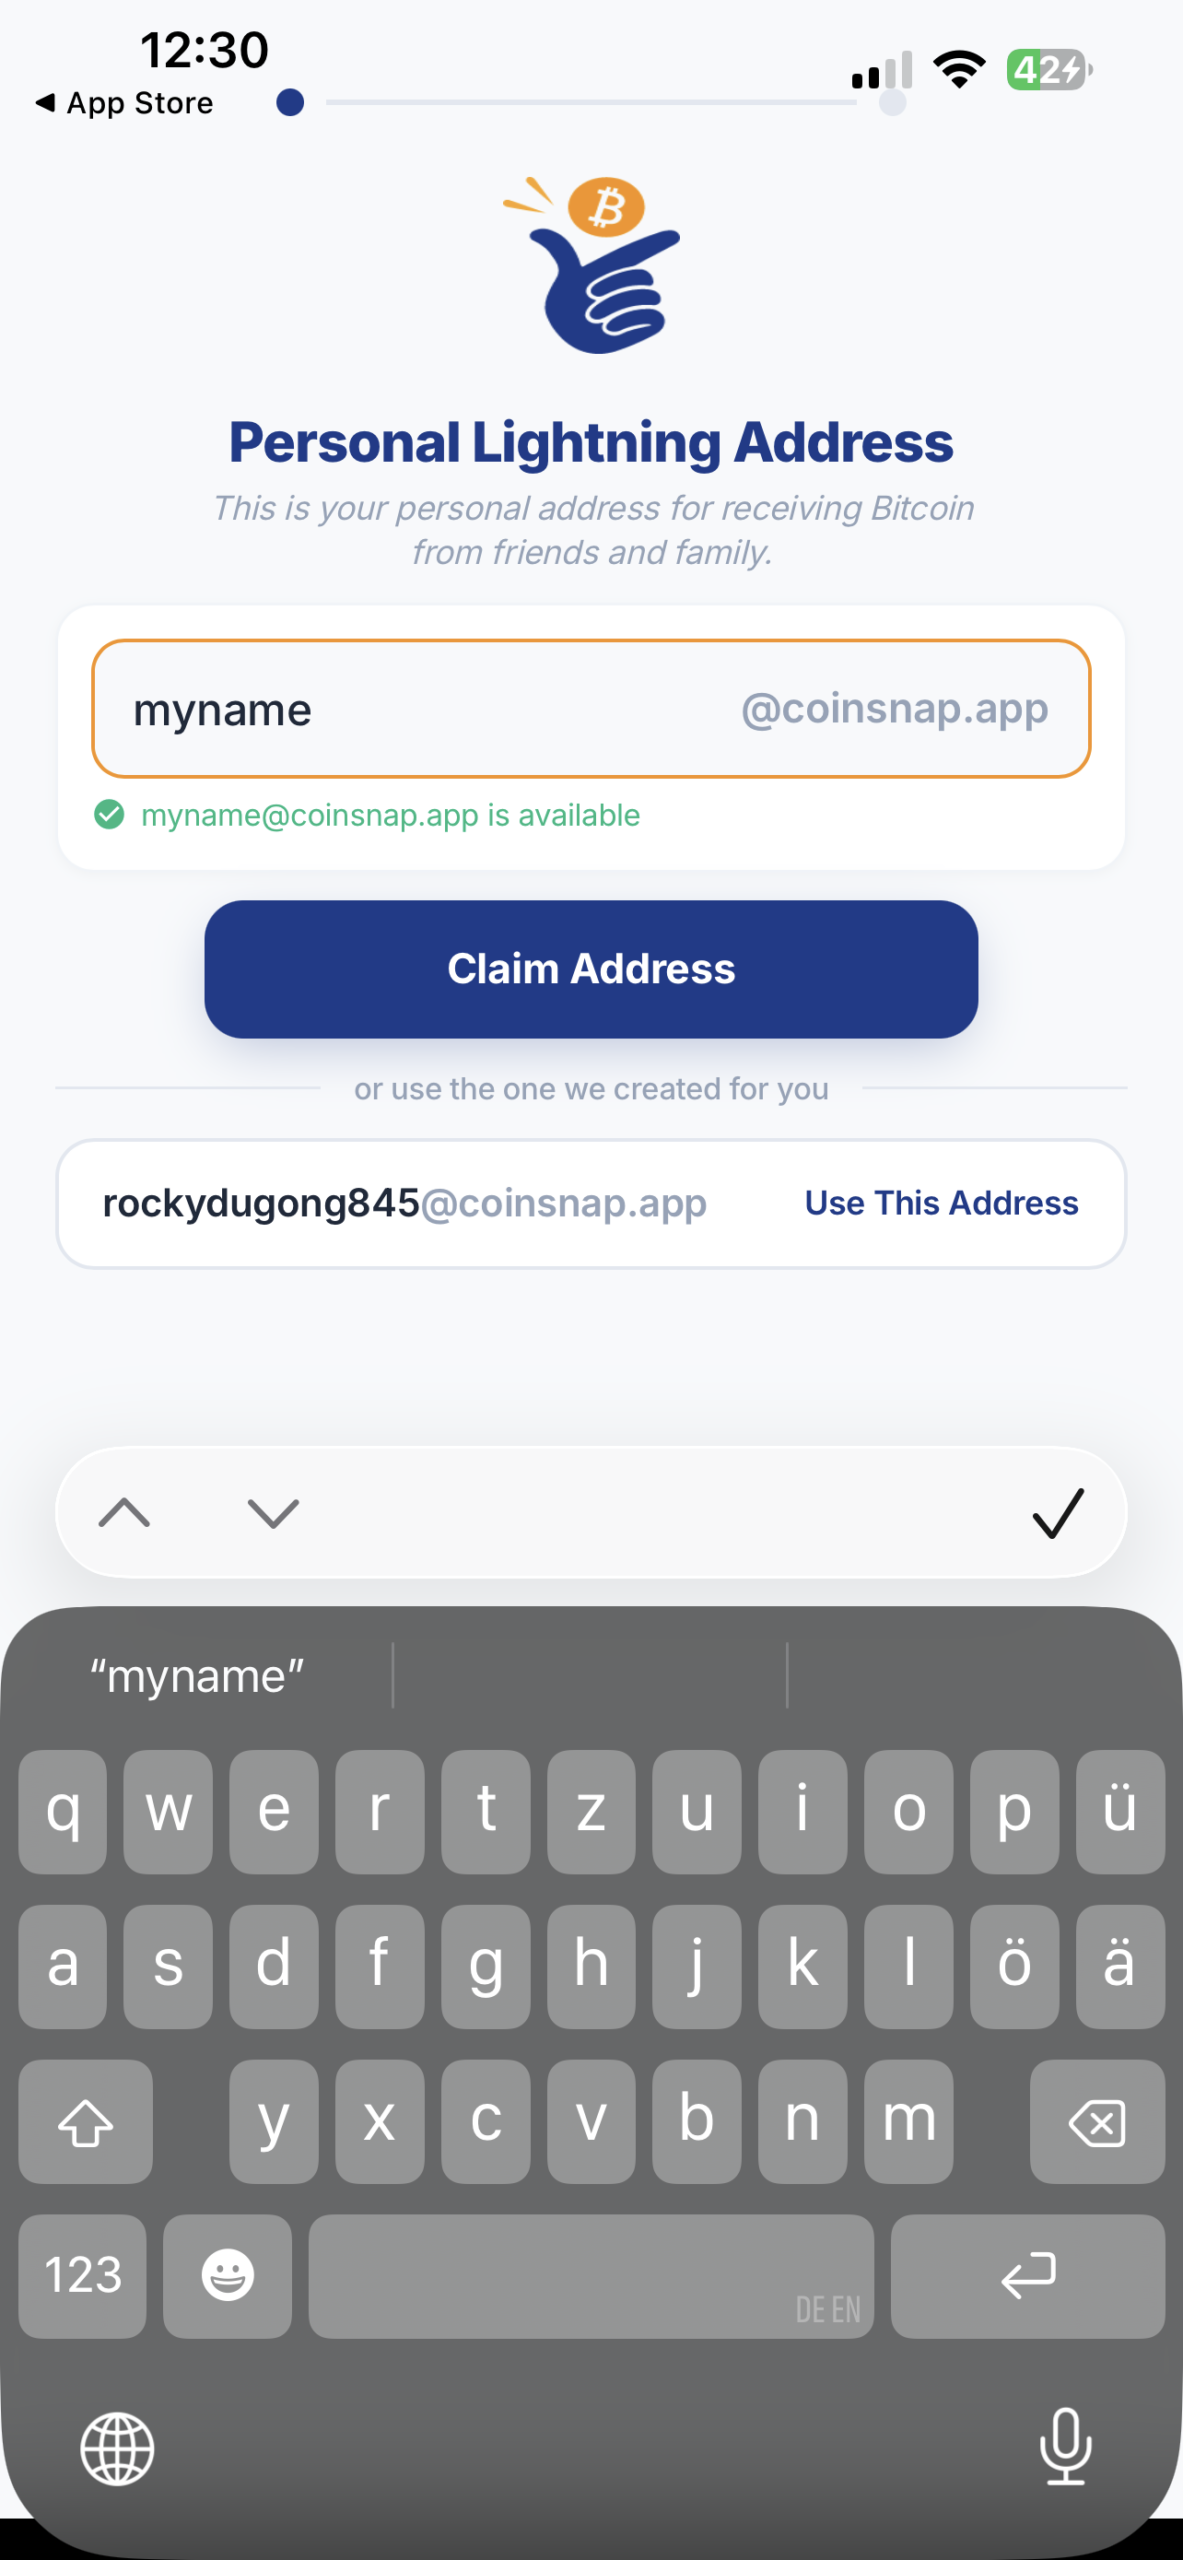
Personal Lightning Address

First, choose your Personal Lightning Address. This address is intended for receiving Bitcoin from friends, family, or anyone sending you a personal payment.

Simply enter your preferred username. If it’s available, tap Claim Address to reserve it. If your preferred name has already been taken, choose another one or use the automatically generated address suggested by the app.

Coinsnap Bitcoin Wallet setup screen for creating a personal Lightning Address by choosing a unique username ending in @coinsnap.app.

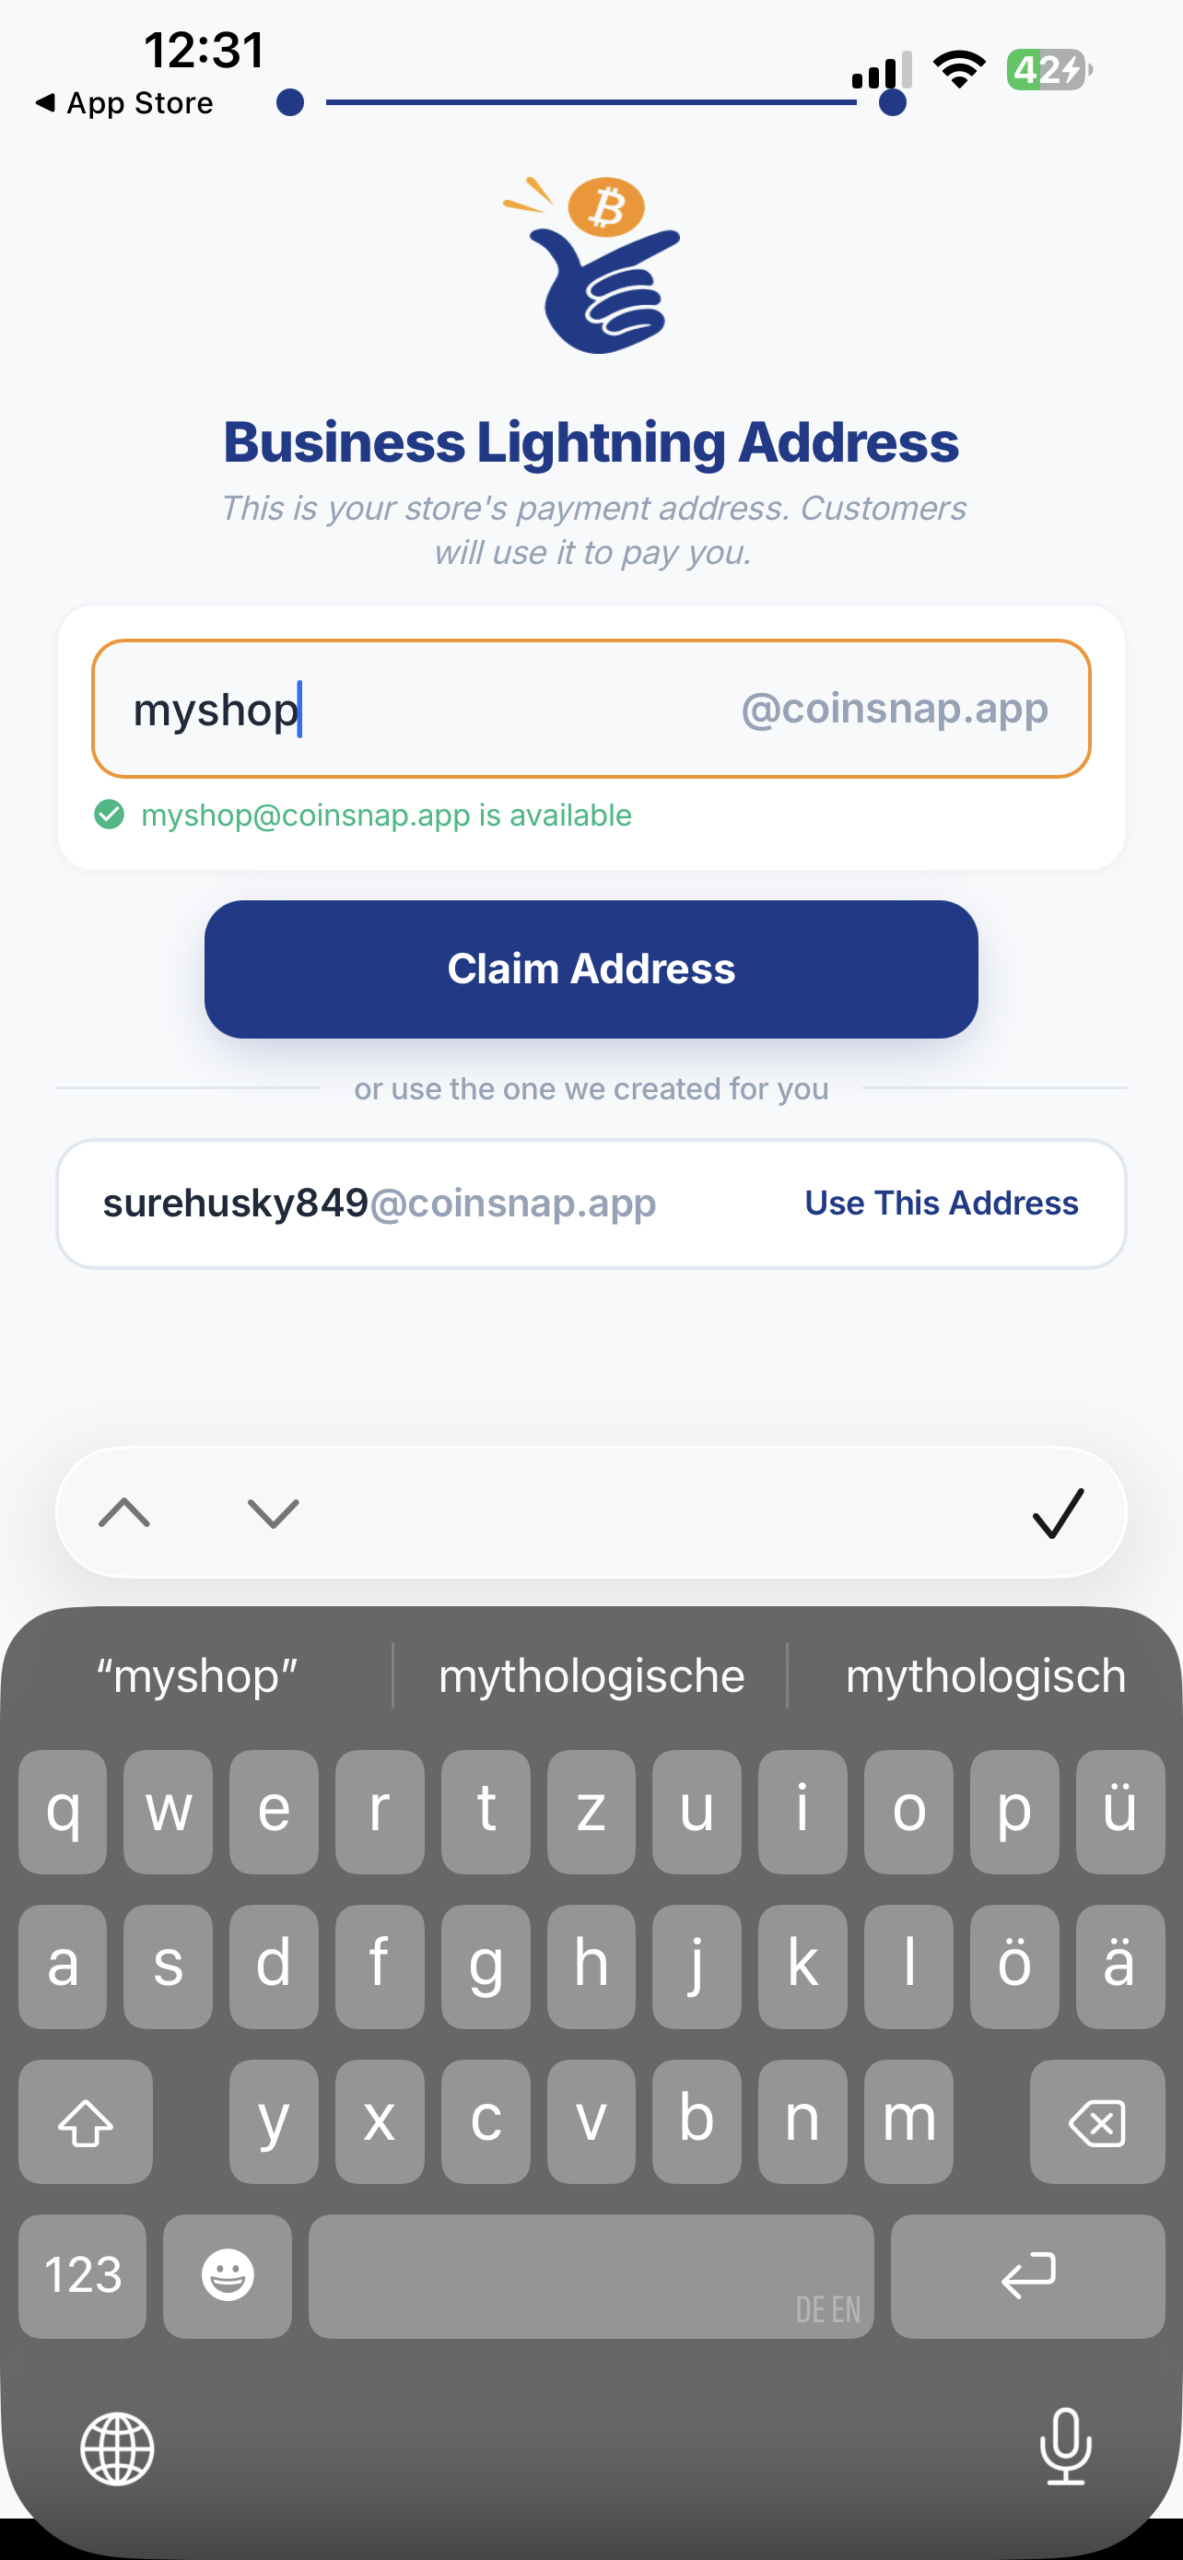
Business Lightning Address

Next, choose your Business Lightning Address. This is the payment address you’ll use to receive Bitcoin from customers through your business.

As with your personal address, enter your preferred business name, check its availability, and tap Claim Address. Alternatively, you can keep the automatically generated address.

Coinsnap Bitcoin Wallet setup screen for creating a business Lightning Address by selecting a unique @coinsnap.app payment address for customer payments.

Lightning Addresses work much like email addresses. Instead of sharing long Lightning invoices or payment strings, you can simply tell someone to send Bitcoin to addresses such as:

This makes receiving Bitcoin payments simple, memorable, and easy to share.

Your Coinsnap Wallet Is Ready

Once you’ve claimed your Lightning Addresses, your Coinsnap Bitcoin Wallet is fully set up and ready to use.

Your wallet includes two separate accounts:

  • Personal – for your private Bitcoin and Lightning transactions.
  • Business – for receiving and managing business payments.

In addition, Coinsnap automatically prepares the integrated merchant environment, including the Point of Sale (PoS) and terminal functionality. There is nothing you need to configure at this stage—we’ll cover these merchant features in a separate guide.

Your wallet is now ready to send and receive Bitcoin over the Lightning Network. No blockchain synchronization, Lightning node setup, or other technical configuration is required.

Coinsnap Bitcoin Wallet home screen showing Personal and Business accounts with options to send, receive, and scan Bitcoin Lightning payments.


Optional but Highly Recommended: Back Up Your Wallet

Your Coinsnap Bitcoin Wallet is now ready to use. Before you start receiving Bitcoin, you should create a secure backup of your wallet.

The backup consists of a Recovery Phrase (also called a Seed Phrase)—a list of secret words that can restore your wallet if your phone is ever lost, stolen, or damaged.

Important: Your Recovery Phrase is the master key to your Bitcoin. Anyone who knows these words can access your wallet. Never share them with anyone and never store them online.

Open the Wallet Settings

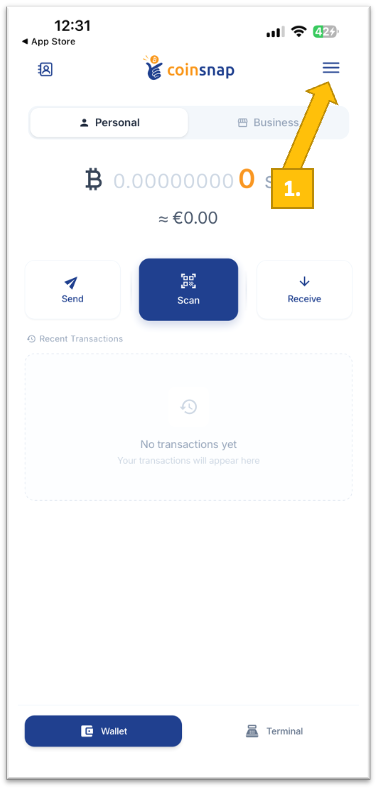
From the Wallet screen, tap the menu icon in the upper-right corner to open Settings [1].

Coinsnap Bitcoin Wallet dashboard with the menu icon highlighted, showing how to open the Settings menu to access wallet security and backup options.

Open the Recovery Phrase

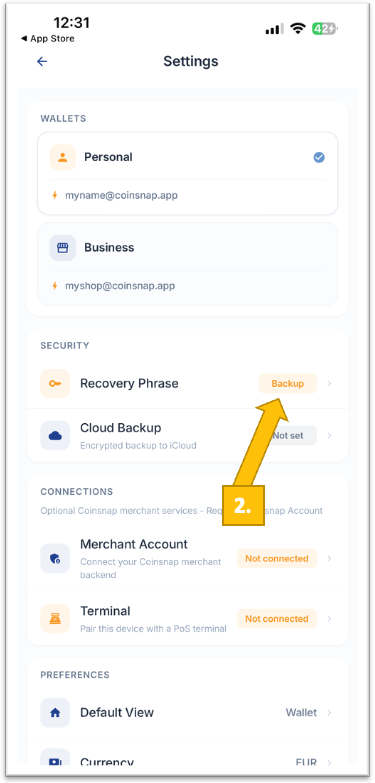
In Settings, locate the Recovery Phrase section under Security and tap Backup [2].

Coinsnap Bitcoin Wallet Settings screen with the Recovery Phrase backup option highlighted, showing how to access your wallet backup.

Verify and Store Your Recovery Phrase

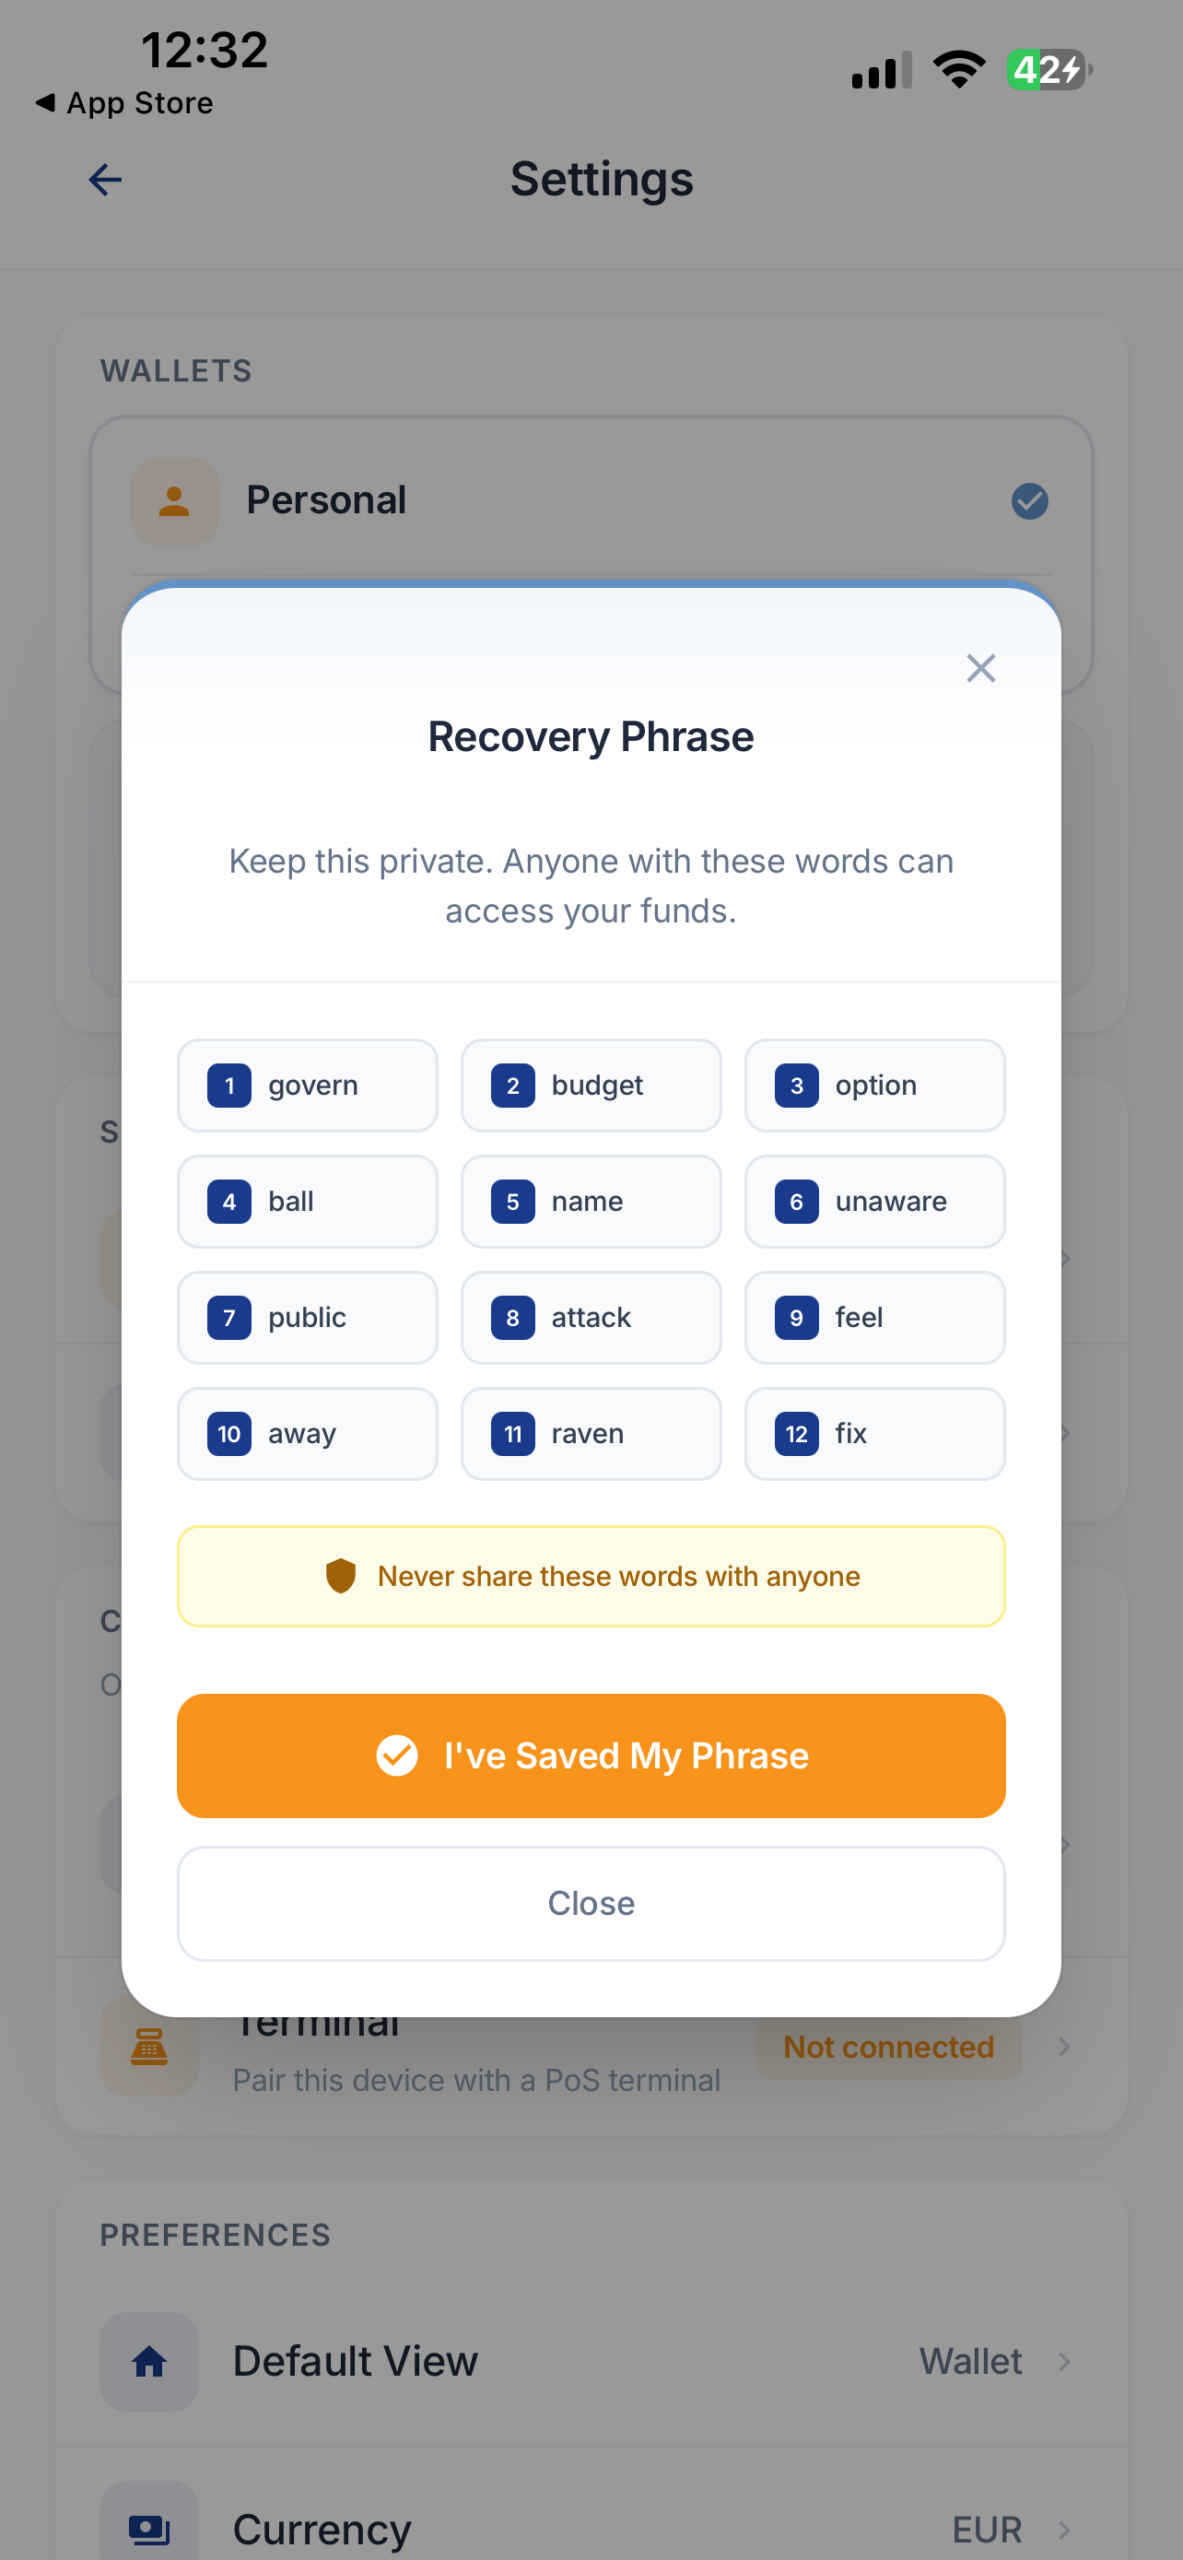
The wallet will display your Recovery Phrase:

Coinsnap Bitcoin Wallet Recovery Phrase screen displaying the 12-word seed phrase used to back up and restore the wallet.

You will then be asked to verify it – just enter the three respective words.

Then write the words down in the correct order and store them in a safe offline location, such as a secure drawer or a fireproof safe. Do not take screenshots, save the words in cloud storage, or send them by email or messaging apps.

Once you have successfully verified your Recovery Phrase, your wallet backup is complete.

Your Coinsnap Bitcoin Wallet Is Ready

Congratulations! Your Coinsnap Bitcoin Wallet is now fully configured and protected.

You can now:

  • Send and receive Bitcoin over the Lightning Network.
  • Use your Personal and Business Lightning Addresses.
  • Switch between your Personal and Business wallets.
  • Start using your wallet immediately.

In our next guide, we’ll show you how to set up your first Coinsnap Point of Sale, connect a terminal, and start accepting Bitcoin payments from customers.

All About the Coinsnap POS Wallet

Everything you need to get started with the Coinsnap Wallet, Bitcoin POS, and the business management tools behind it is covered in our three-part Coinsnap POS Wallet Guide.

From installing your wallet and setting up your first POS and terminals to managing sales, transactions, orders, fees, accounting, and reporting, we have broken the complete process down into three practical step-by-step guides:

  1. Coinsnap Bitcoin Wallet Setup: Install and Set Up Your Wallet — Install your Coinsnap Wallet, create your personal and business Lightning addresses, and get ready to receive Bitcoin.
  2. Coinsnap Bitcoin POS Setup: How to Set Up Your POS, Terminals and Products — Create your POS, connect your terminals, and configure your product catalogue.
  3. Coinsnap POS Dashboard: The Cockpit of Your Bitcoin Business — Monitor your Bitcoin business, manage transactions and orders, choose how you receive your funds, and prepare the records you need for accounting and reporting.

From your first wallet setup to your first Bitcoin sale – and from that sale to your accounting records – these three guides give you everything you need to run your Bitcoin POS business with Coinsnap.

Coinsnap Bitcoin Wallet Setup FAQ


The Complete Coinsnap Bitcoin Wallet Guide

Everything you need to get started with the Coinsnap Bitcoin Wallet, Bitcoin POS, and the business management tools behind it is covered in our four-part Coinsnap Bitcoin Wallet Guide.

From installing your wallet and setting up your first POS and terminals to managing sales, transactions, orders, fees, accounting, and reporting, we have broken the complete process down into four practical step-by-step guides:

  1. Coinsnap Bitcoin Wallet Setup: Install and Set Up Your Wallet — Install your Coinsnap Wallet, create your personal and business Lightning addresses, and get ready to receive Bitcoin.
  2. How to Send and Receive Bitcoin with the Coinsnap Wallet — Pay for something with Bitcoin, or create a payment request for someone to pay you.
  3. Coinsnap Bitcoin POS Setup: How to Set Up Your POS, Terminals and Products — Create your POS, connect your terminals, and configure your product catalogue.
  4. Coinsnap POS Dashboard: The Cockpit of Your Bitcoin Business — Monitor your Bitcoin business, manage transactions and orders, choose how you receive your funds, and prepare the records you need for accounting and reporting.

From your first wallet setup to your first Bitcoin sale – and from that sale to your accounting records – these four guides give you everything you need to run your Bitcoin POS business with Coinsnap.

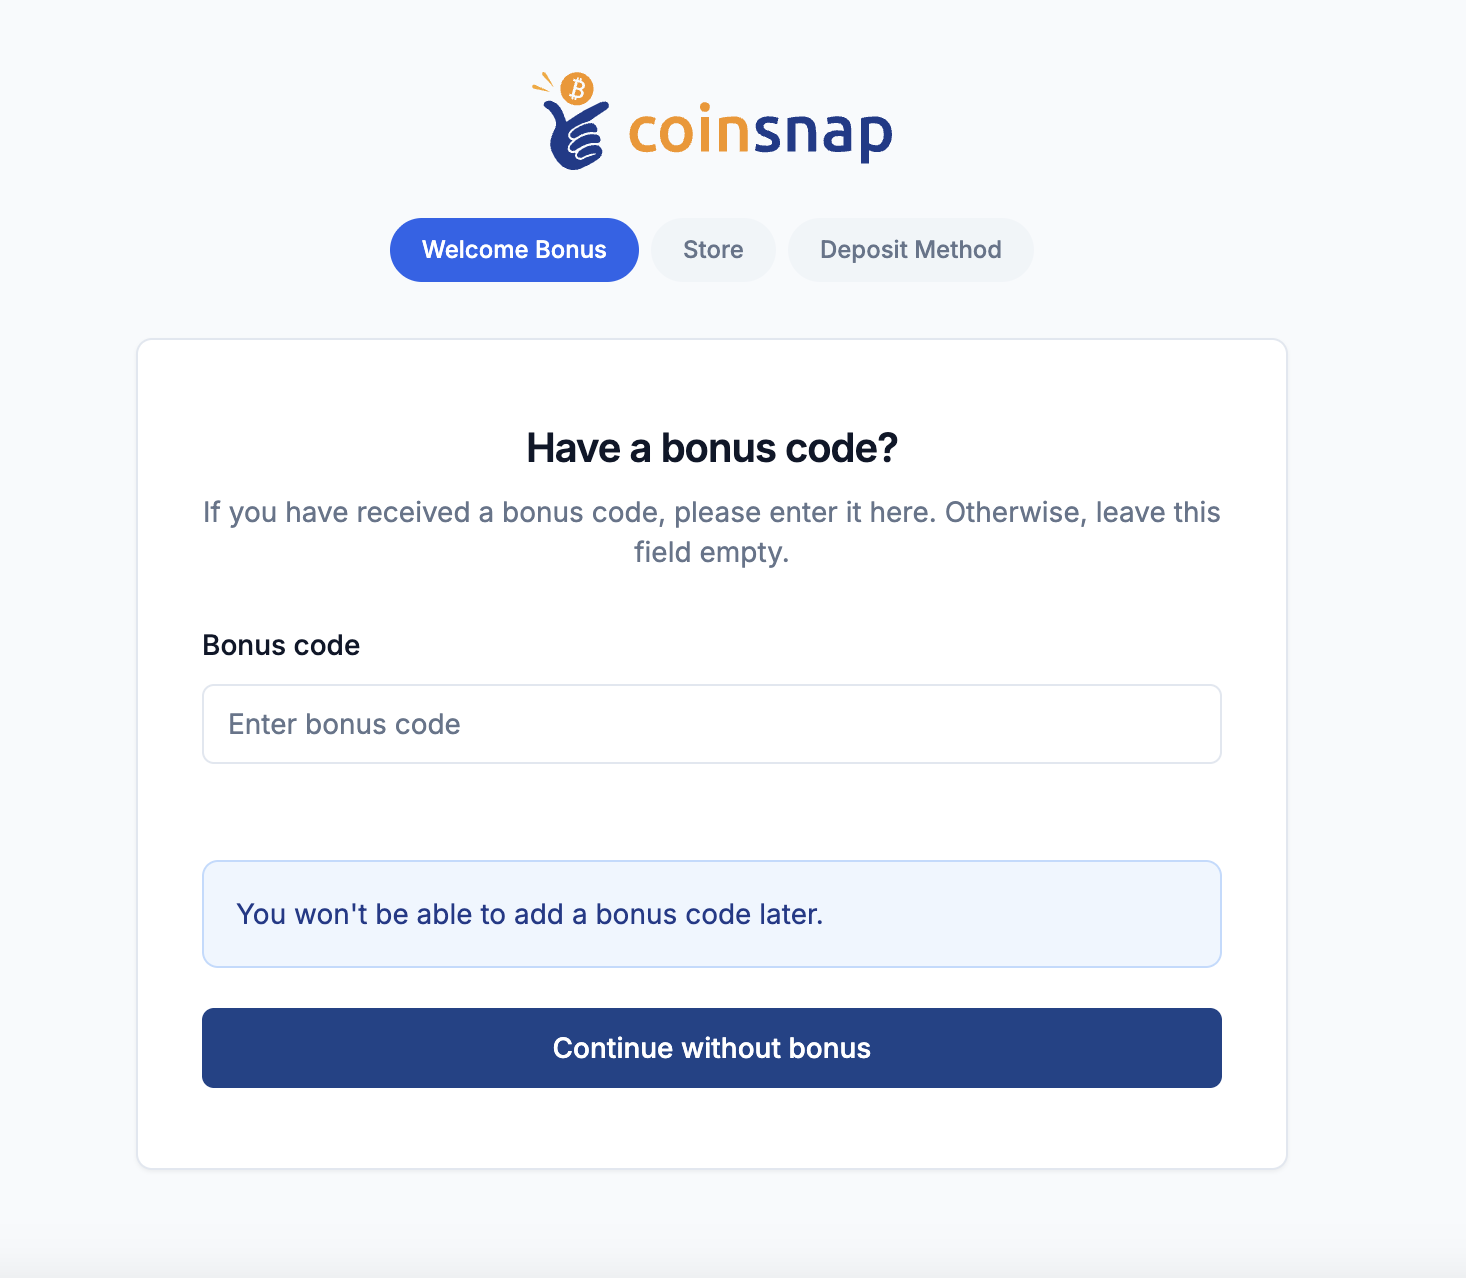
Refer a Customer and Earn Credit with Coinsnap

Refer a Customer and Earn Credit with Coinsnap

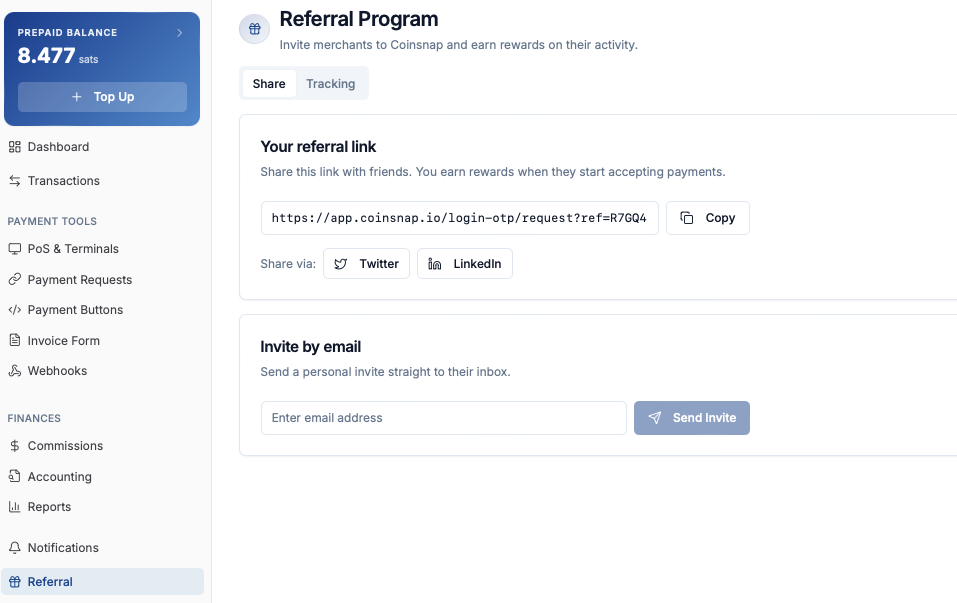
With the “Refer a Customer” program, Coinsnap rewards recommendations from its existing merchants. When you share Coinsnap with someone and a new merchant signs up through your personal referral link or referral code, both of you benefit.

How the Coinsnap Referral Program works

After registration, every Coinsnap merchant receives a personal referral link, which can be found in the Coinsnap dashboard under Finances → Referral.

Where to find your personal Coinsnap referral code

Here is an example of a referral link:

https://coinsnap.io/?ref=REFf5c17111c1

And here is the corresponding referral code:

REFf5c17111c1

You can share either the full link or just the code.

Automatic attribution via the referral link

When a new merchant visits the Coinsnap website through your personal referral link, the referral code is applied automatically. During sign-up, there is no need to enter the code manually.

The bonus credit for the new merchant and the attribution to you as the referrer are both handled automatically.

The benefit for the new merchant

When a new merchant signs up through your referral link, or enters your referral code during registration, they receive €5 in sats credited to their Coinsnap Customer Account.

Together with the regular €5 starting credit, the new merchant gets a total of €10 in credit to test Coinsnap more extensively.

This makes it easier to get started and gives new users more room to explore Coinsnap in practice.

The benefit for the referrer

Sharing your referral link or code also benefits you as the referrer.

Once the merchant you referred decides to continue using Coinsnap and tops up their own Coinsnap Customer Account with at least €5, you also receive €5 in sats credited to your own Customer Account.

This means Coinsnap rewards not only sign-ups, but also successful and active referrals.

Easy to share, rewarding for both sides

You can share your personal referral link directly or simply pass on the referral code. If the new merchant uses the link, the referral is tracked automatically. If they only use the code, they can enter it during registration.

This creates a simple referral model that benefits everyone involved: new merchants receive extra credit to get started, and existing merchants are rewarded for successful referrals.

How to Connect a Coinsnap Module to Your BTCPay Server (Step by Step)

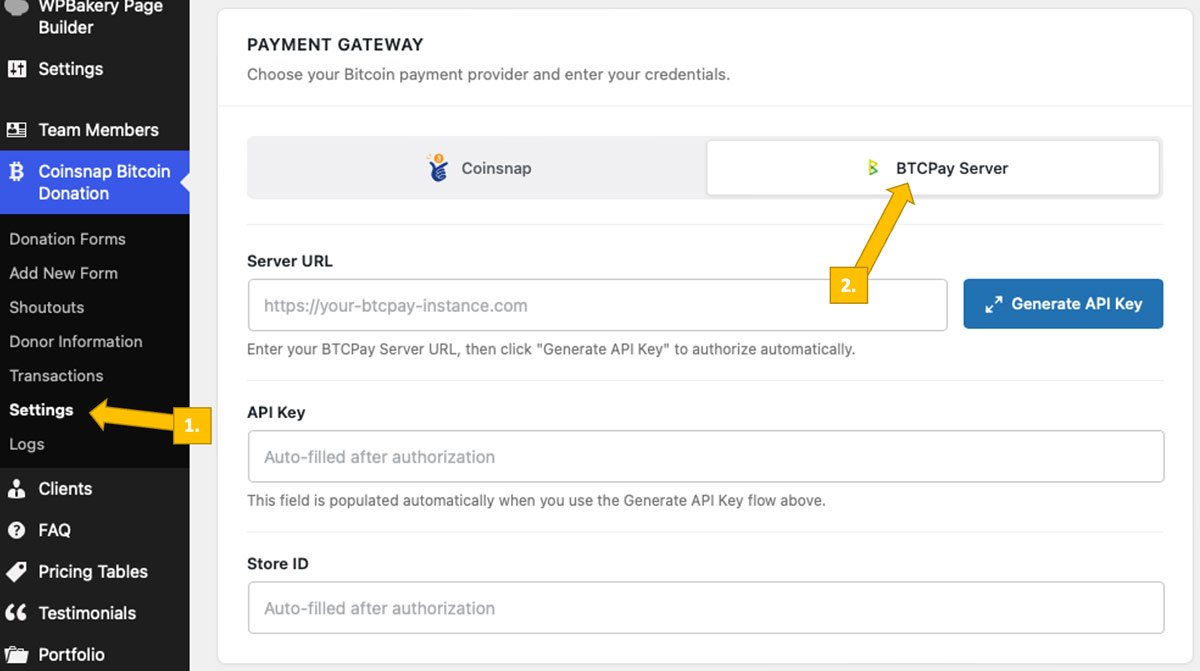
Step 1: Choose BTCPay Server as Your Payment Gateway

Go to your plugin settings [1], and choose BTCPay Server as your payment gateway [2].

Select BTCPay Server as your Bitcoin payment gateway

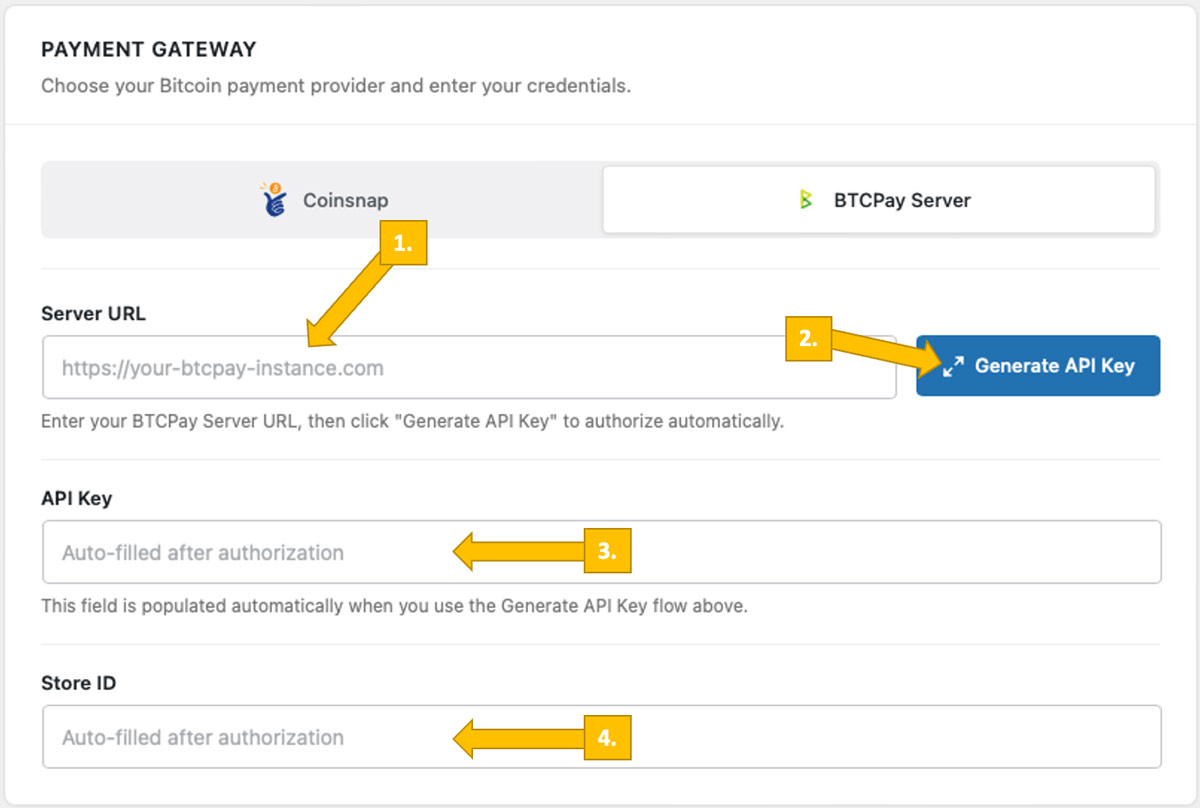
Step 2: Enter the Required BTCPay Server Credentials

Now you need to enter your BTCPay Server URL [1], generate an API Key [2], and enter your BTCPay Server Shop ID [3] and API Key [4]. If you follow the next step, Coinsnap’s BTCPay Server wizard will complete the final two tasks for you.

Set BTCPay Server credentials with the Coinsnap wizard

We’ll now show you how to get this done.

Step 3: Get Your BTCPay Store ID and Your BTCPay API Key Filled In

Log in to your BTCPay server.

Once you have done this, enter the URL of your BTCPay Server in the Server URL field [1, image above]. Next, click the Generate API Key button [2, image above]. This starts the BTCPay wizard, which automatically retrieves your BTCPay Store ID [3, image above] and API Key [4, image above] and fills them into your plugin settings.

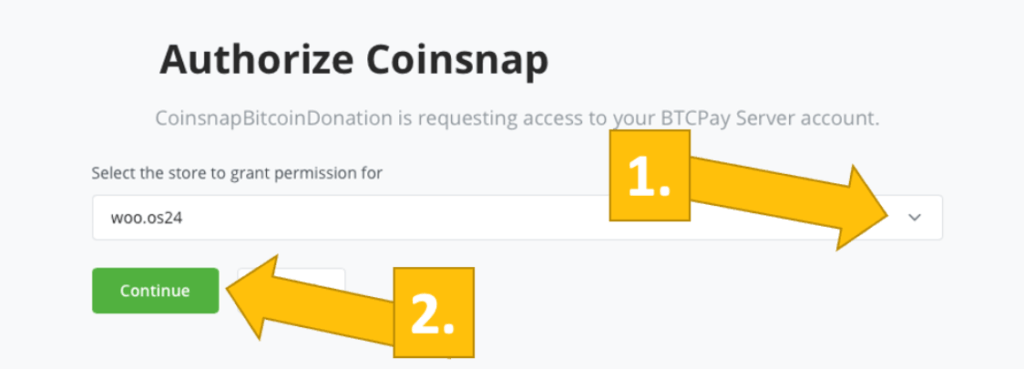
As soon as you enter your BTCPay Server URL, you will be redirected to your BTCPay Server. Select your Store [1] and then click Continue [2].

Authorize your new shop in your BTCPay server

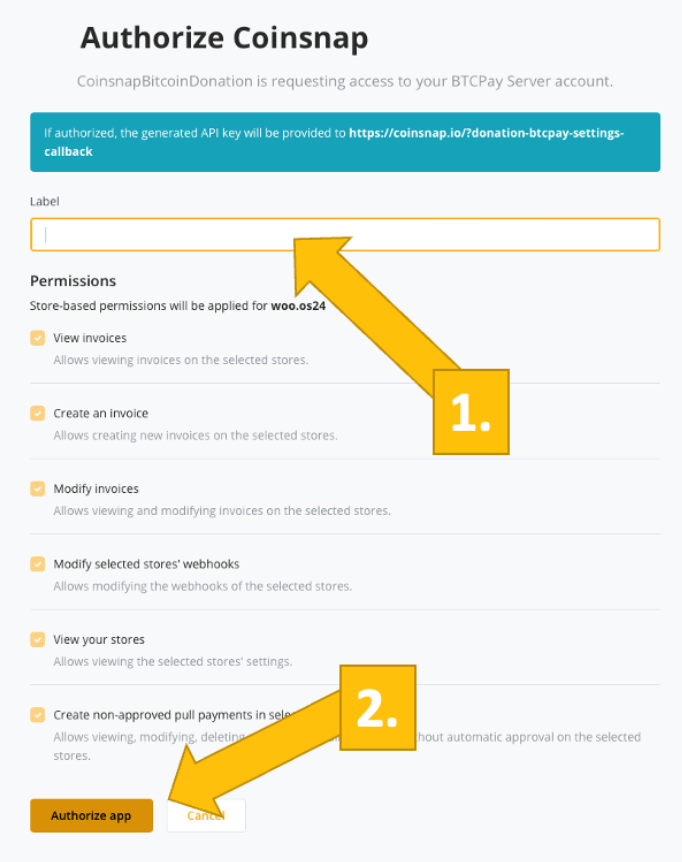
On the following screen, enter the name of your store at the top [1] and then click Authorize App [2].


Assign the necessary admissions for Coinsnap

Done

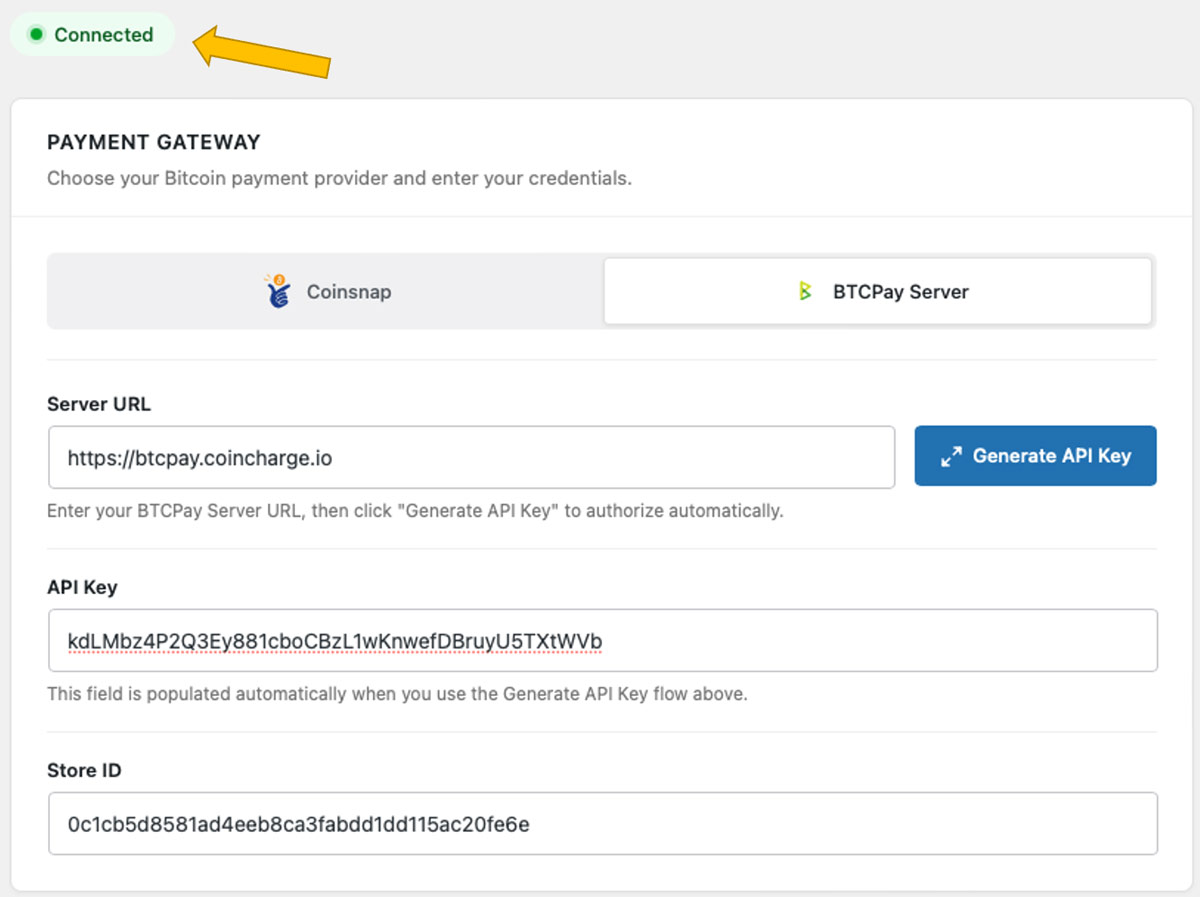
Your BTCPay Server is now successfully connected to your online store via the Coinsnap plugin. (Look for the green success indicator!)

BTCPay Server connection with Coinsnap plugin established

How to Connect Your Coinsnap Plugin With Your Coinsnap Account (Step by Step)

Prerequisites

Before you start to connect your Coinsnap plugin with your Coinsnap account, make sure the following requirements are met:

If you haven’t created a Coinsnap account yet, do that first and complete the initial setup (store name and wallet connection).

Step 1: Log in to Your WordPress Admin Area

Open your WordPress backend and navigate to Plugins to ensure the Coinsnap plugin you want to use is installed and activated.

Once activated, you’ll find a new Coinsnap entry in your WordPress menu or under the settings section of the specific plugin (for example: Donation, Invoice, Voting, Paywall, or Web POS).

Step 2: Open the Coinsnap Plugin Settings

Note: This guide applies to WordPress plugins only. If you use a different website platform, please refer to the relevant installation guide.

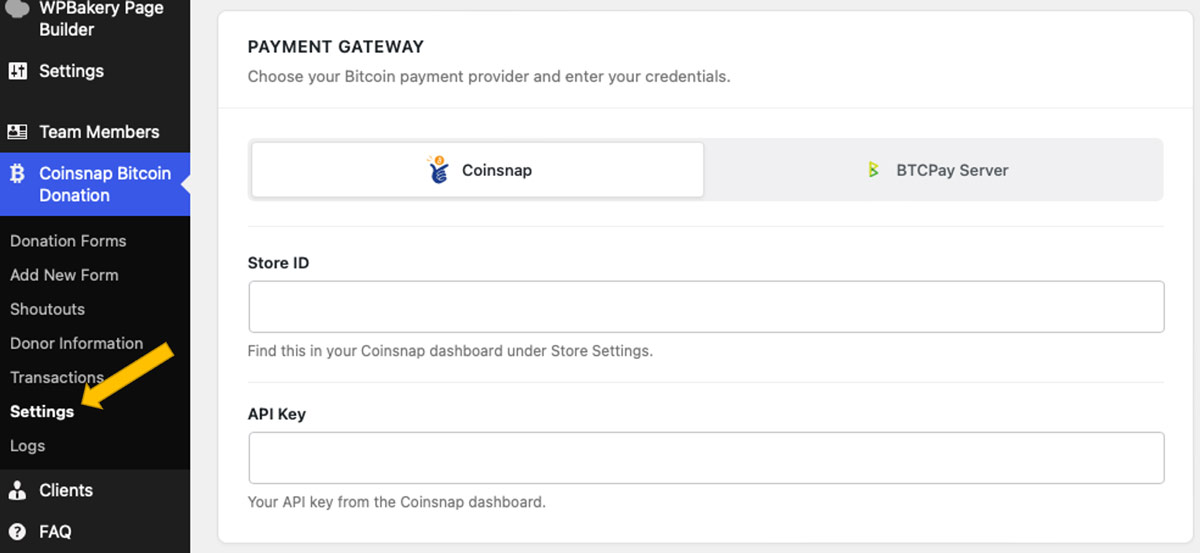
Find the plugin in the left sidebar of your WordPress dashboard and click Settings.

Connect your plugin with your Coinsnap account

Step 3: Connect the Plugin to Your Coinsnap Account

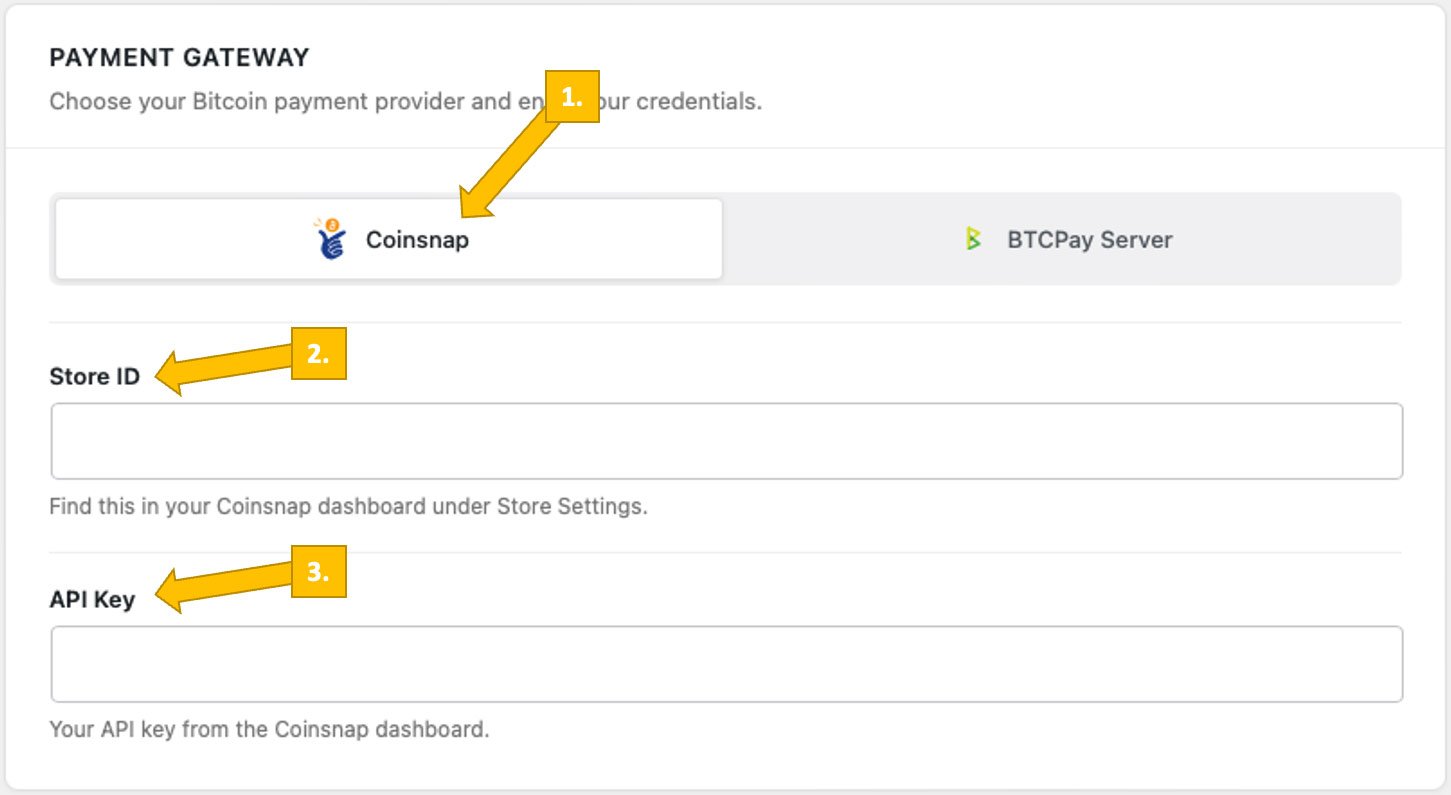
To connect your plugin to your Coinsnap account, select Coinsnap as your payment gateway [1], then enter your Coinsnap Store ID [2] and your Coinsnap API Key [3].

Enter Store ID and API Key to connect the plugin with your account

Step 4: How to Retrieve Your Coinsnap Store ID and Your API Key

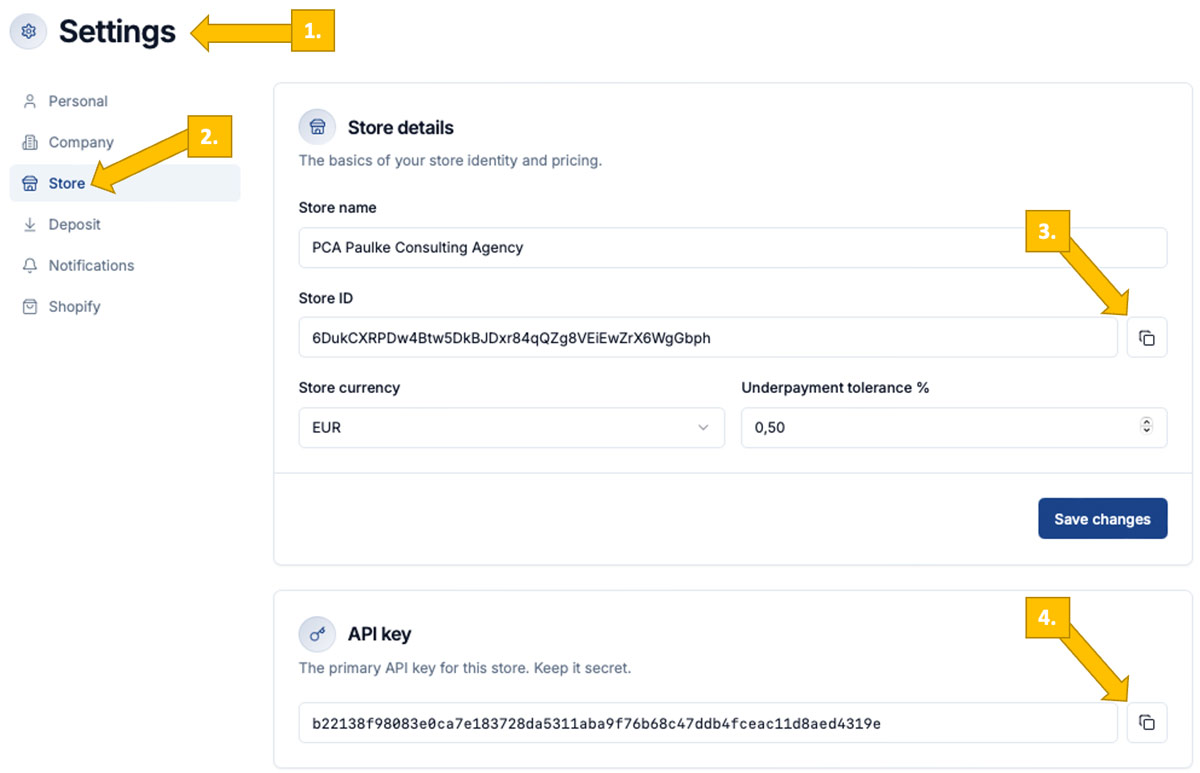
In your Coinsnap dashboard, go to Finances -> Settings [1], then Store [2]. Now you can copy your Store ID [3] and API Key [4].

How to retrieve Store ID and API Key in the Coinsnap dashboard

Step 5: Paste Store ID and API Key into plugin settings

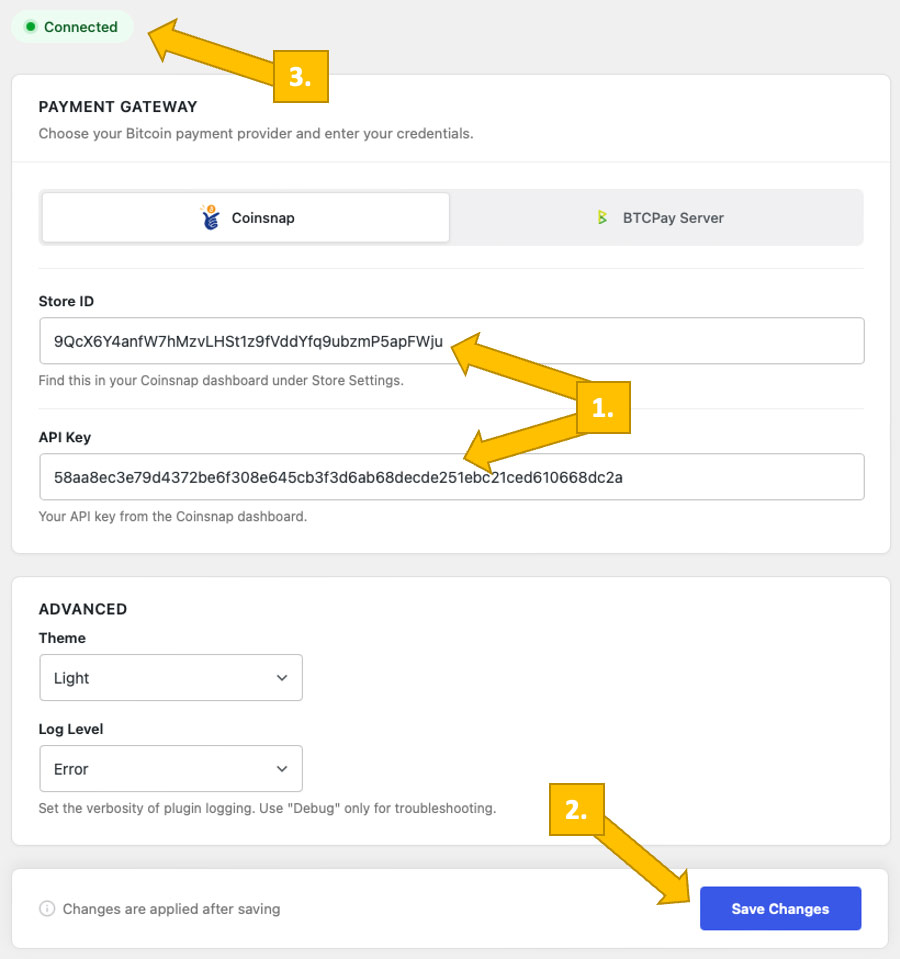
After copying the Store ID and API Key paste them into the respective fields in your plugin [1], then click Save [2]. After a few seconds, a small green success notice will appear [3].

Enter Store ID and API Key in your plugin settings

Next Steps

Your Coinsnap plugin is now connected to your payment gateway and ready to forward Bitcoin payments directly from your customer’s wallet to your own wallet.

We explain all additional settings—such as labels, texts, colors, and other customization options—in the user guides for the respective plugins.

How to Download a Coinsnap Module from Github (Step by Step)

Step 1: How to Find the Coinsnap Module You Need on GitHub

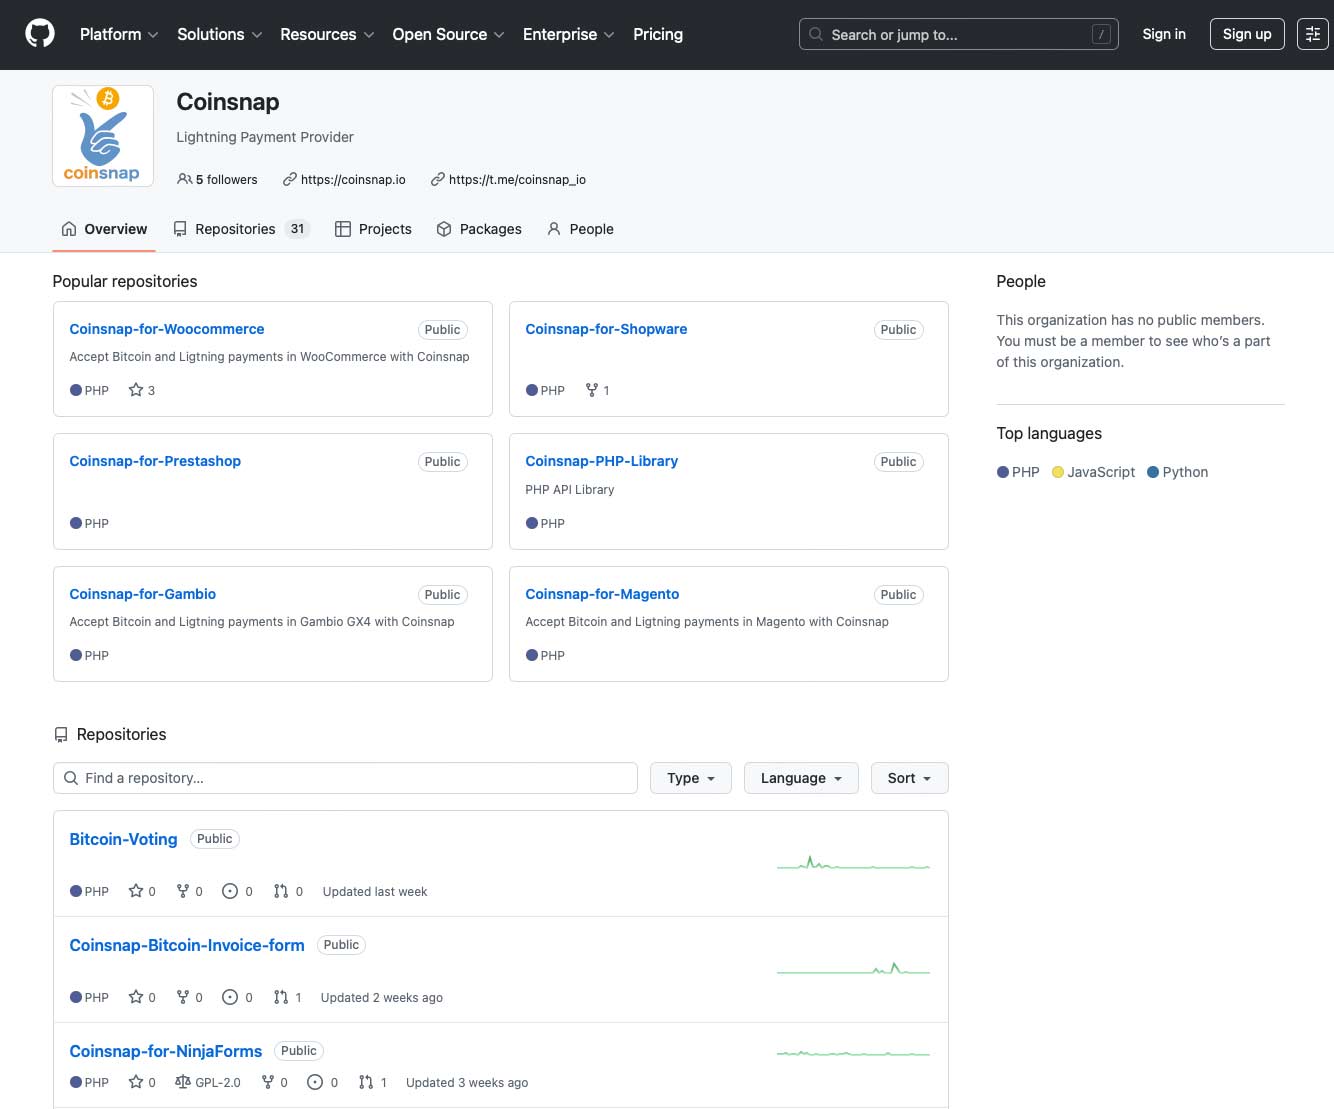
Open your web browser and go to github.com/coinsnap [1].

You will see a list of all Coinsnap repositories, each corresponding to a specific shop system or platform:

Github's Coinsnap repository - where you can download all Coinsnap Bitcoin payment modules

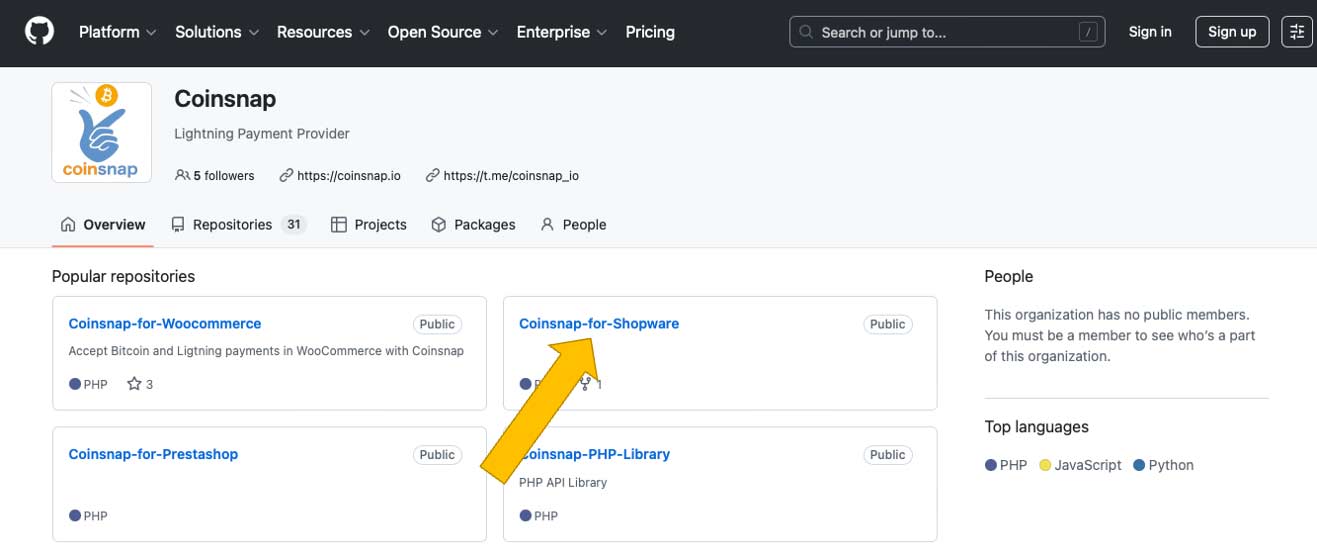
Step 2: Locate the repository that matches your shop system

For example: you are looking for the Coinsnap for Shopware module. In this case, click here:

Open your Coinsnap module page on Github

Click on the repository name to open the module’s GitHub page. Make sure you select the correct module for your shop system to ensure proper compatibility and functionality.

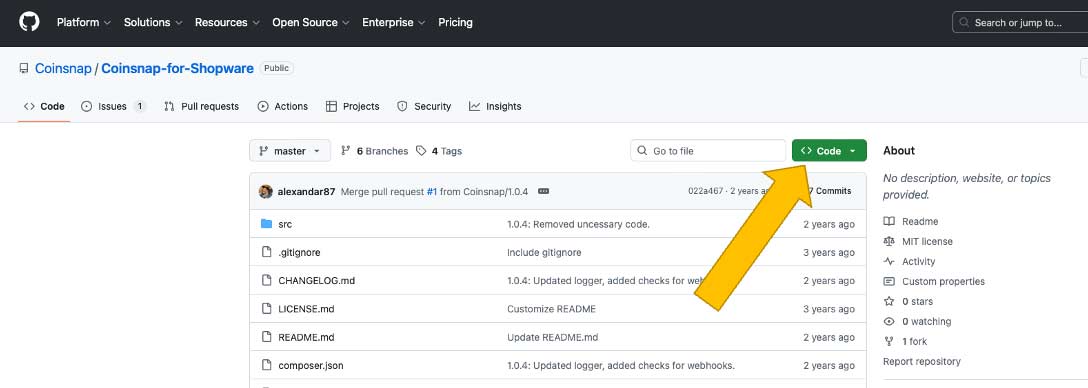
Step 3 — Download the module as a ZIP file

On the GitHub repository page, click the Code button:

Find the module ZIP file for downloading

Select and Download ZIP, and save the ZIP file to your local computer.

Save the Coinsnap module ZIP file on your computer

This ZIP file contains the full Coinsnap module source code required for installation.

Done

You now have the ZIP file containing the Coinsnap module and can proceed with the platform-specific instructions to install it into your shop system.

All our Installation Guides are here.

How to Install a Coinsnap Plugin in WordPress (Step by Step)

Step 1: Open the Plugin Installer

Log in to your WordPress admin area and navigate to Plugins → Add Plugin

Add a new plugin in WordPress

This opens the built-in WordPress Plugin Directory, where all verified WordPress plugins are listed.

Step 2: Search and Install the Coinsnap Plugin

Use the search field in the top right and enter Coinsnap [1] or the specific plugin name you want to install (e.g. Bitcoin Donation, Bitcoin Invoice, Bitcoin Voting). Choose the one you want to install, and click Install Now. [2]

Search and install the chosen plugin on WordPress

Step 3: Activate the Plugin

Once installation is complete, click Activate.

Activate the new WordPress plugin

The plugin is now enabled and immediately available in your WordPress backend.

Step 4: Open the Plugin Settings

After activation, a new Coinsnap menu item or settings page will appear in your WordPress dashboard, depending on the plugin. It can look like this [1]:

A Coinsnap Plugin in your WordPress backend

From there, you can connect your Coinsnap account and configure the plugin [2]  according to your use case. We explain how to do this here.

Done

The Coinsnap plugin is now installed, active, and ready to be connected—no manual uploads, no technical setup, and no external tools required. Done in less than a minute!

How to Open a Coinsnap Account (Step by Step)

What you need before you start

Before you follow these 3 simple steps to open a Coinsnap account, make sure you have:

  • A valid email address
  • A Bitcoin wallet (Lightning or on-chain)
  • A web browser (desktop or mobile)

That’s all. Now we show you – step by step – what to do:

Step 1: Open the Coinsnap website and start registration

On the Coinsnap website, click Sign In in the main menu at the top of the page.

Sign up for a Coinsnap account

Here is what you’ll see:

Sign up for your Coinsnap account with just your email address

Enter your email [1] and click Send code.

Step 2: Confirm your email address and sign in to the Coinsnap dashboard

  1. Check your inbox for the code sent by Coinsnap
  2. Enter the code [1] in the sign-in form, then click Sign in [2].

Confirm your email to activate your Coinsnap account

Your account is now active.

Step 3: Connect your shop and wallet to receive Bitcoin

After entering the code, you will be redirected to your account dashboard. It prompts you to connect your shop and wallet to activate Bitcoin payments.

Connecting your store and your wallet with Coinsnap Bitcoin payment

Enter your store name [1] (this will be shown to your customers at checkout).

Enter your Lightning address [2] (e.g. yourname@wallet.com) to receive Bitcoin payments.

(Optional) Enter your xPub key [3] if you want to receive on-chain Bitcoin payments directly to your wallet.

(Optional) Enter a referral code [4] if you have one.

Click Connect store to complete the setup.

Done

Your Coinsnap account is now open and fully functional.

Bitcoin Payment Integration via API

A Guide for Developers & Web Agencies

Bitcoin payments are becoming increasingly relevant for online shops and digital business models. With Coinsnap, developers and web agencies can integrate Bitcoin quickly, securely, and without unnecessary complexity — either using ready-made plugins or by connecting custom applications via API.

This article explains the available integration options and outlines a recommended setup process for developers and agencies.

Integrating Bitcoin Payments with Coinsnap

Coinsnap provides a wide range of Bitcoin payment modules that allow for fast and simple integration into popular shop and eCommerce systems, including WordPress, WooCommerce, Shopify, and more.

For custom-built shop systems or individual eCommerce applications, Coinsnap also offers a fully documented API, enabling direct Bitcoin payment integration tailored to your specific requirements.

API Integration for Custom Shop Systems & Applications

If you are working with a custom-developed shop system or a bespoke eCommerce application, the Coinsnap API is the right approach.

API documentation is available at:
👉 https://docs.coinsnap.io/

You’ll find comprehensive API documentation, including detailed interface descriptions and practical code snippets to help you implement Bitcoin payments efficiently.

Recommended Setup for Developers & Agencies

To ensure a smooth integration process, we recommend the following steps:

1. Create a Developer or Agency Account

Start by creating a dedicated developer or agency account with Coinsnap.
All you need is an email address.

2. Set Up a Bitcoin Wallet

To receive Bitcoin payments, you’ll need a Bitcoin wallet.

If you don’t already have one, we recommend Wallet of Satoshi, as it is quick and easy to set up.

A step-by-step guide is available here:
👉 https://coinsnap.io/blog/how-to-set-up-wallet-of-satoshi-and-receive-bitcoin-instantly/ 

3. Add Your Lightning Address to Coinsnap

Next, store your Lightning address in the Coinsnap backend.

If you need test funds, simply send a short message via the support system in the backend, and Coinsnap will send you a few sats for testing purposes.

4. Retrieve Store ID and API Key

For API-based integrations, you will need:

  • Coinsnap Store ID
  • API Key

Both can be found in the backend under:
Settings → Store

Implementation & Support

All additional technical details are covered in the API documentation.

If you need assistance or have project-specific questions, the Coinsnap team is happy to help.
Just contact them via the support section directly from within the Coinsnap backend.

Best Practices for a Successful Bitcoin Checkout

To ensure Bitcoin is perceived as an attractive payment option, we recommend the following best practices:

Offer a Bitcoin Discount

Consider offering a discount for Bitcoin payments.
This increases visibility and encourages customers to choose Bitcoin at checkout.

Use Clear Payment Naming

Always label the payment method as “Bitcoin”, not “Coinsnap”, to avoid confusion and ensure a clean user experience.

Enable Payments at a Later Time

If a Bitcoin payment is not completed, send the customer a Bitcoin payment link so they can finalize the transaction later.

Monetization Opportunities for Developers & Agencies

If you are building an API integration not only for a single project but for a broader audience, you can include your Coinsnap referrer code in the application.

This allows you to earn a commission whenever merchants use your integration — an ideal option for agencies, plugin developers, and SaaS providers.

Conclusion

Coinsnap enables flexible Bitcoin payment integration — from ready-to-use shop plugins to full API-based custom implementations.

Developers and agencies benefit from clear documentation, direct support, and built-in monetization options.

👉 Get started now: https://docs.coinsnap.io/